
Have you ever had a craving so powerful it feels like a little alarm is going off in your stomach? It’s not just hunger; it’s a specific, irresistible need for something warm, savory, and outrageously cheesy. Maybe you’re coming home after a long day of school, or perhaps you just finished a big weekend project, and your body is calling out for a reward—a big, warm, crunchy hug in food form. That, my friend, is where this incredible recipe steps in. It’s the perfect answer to those urgent cravings, combining the irresistible flavor of garlic bread with the satisfying heartiness of a full chicken dinner, all wrapped up and grilled to golden perfection.
Get ready to experience the magic of the Ooey-Gooey Cheesy Garlic Wraps with Chicken. This isn’t just a recipe; it’s a game-changer for your weeknight meal routine. It’s incredibly fast, uses simple ingredients you likely already have, and delivers a flavor payoff that is truly phenomenal. You’ll be amazed that something so simple—tender cooked chicken breast, shredded, a double dose of amazing shredded cheese, and a generous slathering of aromatic garlic butter—can taste so spectacular. We’re going to walk through every step, ensuring your wraps come out perfectly golden brown and with that dreamily melted, ooey-gooey cheese every single time. Prepare yourself for a new favorite comfort food that is guaranteed to earn rave reviews!
The Allure of the Ooey-Gooey: Why This Recipe is a Super-Hit
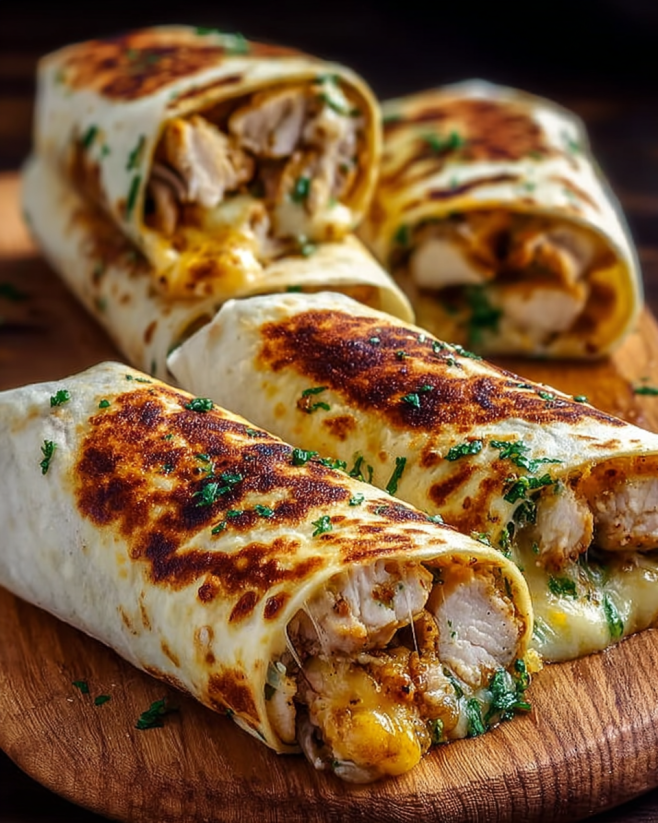
The reason this dish has earned its famous “ooey-gooey” title is simple: texture. Cooking is as much about how food feels as it is about how it tastes, and this dish delivers a winning combination. You get the crunch of the flour tortilla exterior, the silky tenderness of the shredded chicken, and the beautiful, melty pull of hot cheese. It’s a sensory experience that is impossible to resist. This balance of textures makes the Ooey-Gooey Cheesy Garlic Wraps with Chicken stand out from your average sandwich or taco.
This recipe is also a hero because of its speed. From the moment you start melting the unsalted butter to the moment you slice the wraps in half, you’re looking at less than 20 minutes. That makes it a fantastic easy dinner option for your busiest evenings. It’s a complete meal that doesn’t require turning on the oven, relying instead on your trusty large nonstick skillet to get that perfect crust. Knowing you have a fast, filling, and flavorful meal waiting makes those tough days a little easier. You are about to master a true kitchen time-saver.
The Double-Cheese Advantage: Mozzarella and Cheddar
The secret to achieving that satisfying ooey-gooey factor lies in the smart use of a two-cheese blend. This recipe calls for 1 ½ cups of shredded mozzarella cheese and 1 cup of shredded cheddar cheese. This mix is crucial for both melt quality and flavor depth.
- Mozzarella Cheese (The Stretch): Mozzarella is the star when it comes to the “ooey-gooey” pull. It has high moisture content, meaning it melts smoothly and stretches wonderfully when heated. It provides that classic, Instagram-worthy cheese pull that makes the dish look as good as it tastes.
- Cheddar Cheese (The Flavor): Shredded cheddar cheese, especially sharp cheddar, adds a necessary burst of bold, savory flavor. Since mozzarella is mild, the cheddar ensures the cheese layer doesn’t taste bland. The cheddar provides the satisfying, salty, cheesy oomph that makes the wraps feel like true comfort food.
By using this combination, you get the best of both worlds: incredible texture from the mozzarella and powerful taste from the cheddar. Using shredded cheese is also important because it melts much faster and more evenly than using slices or cubes, ensuring your wraps are ready quickly.
Rotisserie Chicken Magic: Your Time-Saving Trick
When we talk about making a lightning-fast weeknight meal, the secret is using pre-cooked protein. The recipe calls for 2 cups of cooked chicken breast, shredded. While you can certainly cook and shred your own chicken, using a rotisserie chicken is the ultimate shortcut.
Think about how much time you save! You skip the boiling, the baking, and the waiting. All you have to do is peel the meat off the bone and shred it. Using shredded chicken (instead of diced or cubed) is key because it packs nicely into the flour tortillas and mixes well with the melted cheese, ensuring every bite is moist and flavorful. This smart swap turns a 45-minute recipe into a 15-minute recipe, making it a powerful addition to your collection of easy dinner ideas. You deserve to save time without sacrificing taste!
Gathering Your Supplies: The Ingredient Power-Up
A dish this delicious only requires a few basic ingredients. Before you fire up your skillet, take a moment to gather everything you need. This technique, called mise en place (everything in its place), is what separates a stressed cook from a happy one! Getting everything ready in advance means you can focus entirely on the fun part: assembly and grilling. You’ll be surprised at how few ingredients it takes to create such a massive flavor.
The most important part of this meal prep phase is getting the two key flavor components ready: the chicken/cheese mixture and the legendary garlic butter mixture. This simple preparation ensures a smooth, non-stop trip from countertop to dinner table.
| Ingredient Category | Ingredient Name | Quantity | Purpose in the Recipe | Key Prep Step |
|---|---|---|---|---|
| Protein | Cooked Chicken Breast | 2 cups | Tender filling base; use shredded chicken. | Ensure it is shredded and cooled. |
| Cheeses | Shredded Mozzarella Cheese | 1 ½ cups | Provides the essential ooey-gooey stretch. | Best when freshly shredded, but store-bought is fine. |
| Cheeses | Shredded Cheddar Cheese | 1 cup | Adds the bold, savory, cheesy flavor. | Combine with mozzarella before assembly. |
| Wrapper | Flour Tortillas | 4 large | The casing for the filling; creates the crispy shell. | Lay flat and ready on the counter. |
| Flavor Base | Unsalted Butter | 3 tablespoons | Needed to create the garlic infusion glaze. | Melted gently over medium heat. |
| Aromatic | Fresh Garlic | 3 cloves | The star flavor; adds pungent depth. | Mince finely before starting the butter melt. |
| Herb/Seasoning | Fresh Parsley | 2 tablespoons | Adds a bright, clean, herby lift to the garlic butter. | Chop finely. |
| Seasoning | Salt | ½ teaspoon | Enhances the savory flavors. | Add directly to the garlic butter. |
| Seasoning | Black Pepper | ¼ teaspoon | Adds a subtle, warm spice note. | Add directly to the garlic butter. |
The Secret Weapon: Garlic Butter Infusion
The reason these wraps taste so much better than a standard quesadilla or burrito is the secret ingredient that goes inside the wrap and on the outside during the cooking process: the garlic butter mixture. This isn’t just plain butter; it’s a fragrant, herb-infused glaze that elevates the entire dish.
You are essentially taking melted unsalted butter and cooking minced garlic in it briefly to release its powerful flavor. Then, you stir in chopped fresh parsley, salt, and black pepper. This creates a golden, fragrant liquid that does two jobs: it seasons the chicken and cheese filling from the inside, and it ensures that when the wraps hit the skillet, the flour tortillas crisp up to a beautiful golden brown with that classic garlic bread taste. The garlic is the bold star, providing a deep, savory foundation that is simply irresistible.
Why Unsalted Butter Gives You Control
The recipe specifically calls for unsalted butter. Why? Because it gives you total control over the sodium content of your meal. Cheese is naturally salty, and you also add a measured amount of salt to the butter mixture. If you used salted butter, the dish could easily become too salty, overpowering the subtle flavors of the shredded chicken and fresh parsley. Using unsalted butter is a simple but important chef trick to ensure your wraps are seasoned perfectly and not just overwhelmingly salty. [Search for an image of melted garlic butter with parsley]
The Role of Fresh Parsley for Freshness
The final component of the garlic butter is 2 tablespoons of chopped fresh parsley. Parsley doesn’t just make the butter look pretty; it serves a crucial flavor purpose. It provides a bright, clean, green herby lift that cuts through the richness of the butter and cheese. Without it, the wraps would taste heavy. The fresh parsley adds a burst of freshness that brightens up the deep comfort food flavors, ensuring the dish feels balanced and not too greasy. Don’t substitute with dried parsley here—the fresh herb is key to that vibrant final taste.
Step-by-Step Mastery: From Skillet to Serve
With your ingredients prepped and your garlic butter ready, it’s time for the straightforward assembly and cooking process. This recipe is divided into easy phases that move quickly from one to the next, designed for your ultimate easy dinner success. Just follow these steps, and you’ll be enjoying your Ooey-Gooey Cheesy Garlic Wraps with Chicken in no time!
Phase 1: Creating the Golden Garlic Glaze
The first step is melting and infusing the unsalted butter with garlic and herbs.
- Melt the Butter: In a small saucepan or microwave-safe dish, melt the 3 tablespoons of unsalted butter over medium heat until fully liquid.
- Infuse the Garlic: Add the 3 cloves of minced garlic to the melted butter. Cook for only 1 to 2 minutes, stirring constantly. You want the garlic to become fragrant, but do not let it burn or turn brown. Burnt garlic tastes bitter and will ruin your wraps.
- Finish the Glaze: Remove the saucepan from the heat and stir in the chopped fresh parsley, ½ teaspoon of salt, and ¼ teaspoon of black pepper. Give it a final stir to combine, and set it aside. This is your golden glaze, ready to be drizzled!
Phase 2: Layering the Flavor Bomb
This is the assembly part, where you bring the filling together inside the flour tortillas.
- Prep the Tortillas: Lay out your 4 large flour tortillas on a clean surface.
- Add Protein and Cheese: Evenly distribute the 2 cups of cooked chicken breast, shredded, the shredded mozzarella cheese, and the shredded cheddar cheese over the center of each tortilla. Leave about an inch of space around the edges for folding.
- Drizzle the Magic: Take your garlic butter mixture and drizzle it generously over the chicken and cheese filling on each tortilla. The warm butter starts to lightly coat the shredded chicken, infusing the whole filling with flavor.
The Importance of a Tight Roll
The way you roll your wraps matters a lot! A tight roll prevents the filling from spilling out during cooking and ensures you get a nice, crisp surface area on the skillet.
- Fold the Sides: First, fold the two opposite sides (the sides parallel to the filling) inward over the filling. This creates an envelope that contains the cheese.
- Roll from the Bottom: Then, starting from the bottom edge closest to you, roll the tortilla up tightly and firmly, moving away from you. You want a snug, secure wrap.
- Seam Down: Place the wraps on a plate or cutting board seam-side down. This is how you will start cooking them in the skillet, using the heat to seal the seam closed.
Phase 3: The Golden Seal and Melt
Now for the final, satisfying cooking stage where the wraps become crunchy and the cheese turns ooey-gooey.
- Heat the Skillet: Place a large nonstick skillet over medium heat. You don’t need extra oil or butter, as the garlic butter in the wraps will prevent sticking.
- Sear to Perfection: Place the wraps in the hot skillet, seam-side down. Cook for about 2-3 minutes per side. Use a spatula to gently press down on the wraps to ensure full contact with the pan.
- Check for Doneness: The wraps are done when both sides are a beautiful golden brown and the cheese inside is fully melted and trying to ooze out! You can gently press the center—if it feels soft and molten, the melted cheese is ready.
- Slice and Serve: Remove the wraps from the skillet, slice them in half on the diagonal, and serve warm, garnished with extra fresh parsley if you like. This final step turns your simple ingredients into a beautiful comfort food presentation.
Customizing Your Wrap: Flavor Adventures
One of the great joys of this dinner recipe is how easily you can customize it. The combination of shredded chicken, garlic butter, and shredded cheese is a perfect base that welcomes new flavors and ingredients. You are the chef, and you get to decide how to upgrade your Ooey-Gooey Cheesy Garlic Wraps with Chicken! This flexibility makes it a great recipe for using up small amounts of leftovers or tailoring it to specific cravings.
Protein Swaps and Additions
While cooked chicken breast, shredded is the classic choice, you can easily substitute it with other proteins, making this an incredibly versatile easy dinner:
- Pulled Pork or Shredded Beef: If you have leftover pulled pork or shredded beef from a slow cooker meal, it works beautifully. The savory meat is fantastic with the garlic butter and cheese blend.
- Turkey: Leftover Thanksgiving or deli turkey breast can be shredded or diced and used here for a leaner option.
- Ground Beef: You can brown 1 cup of ground beef (80/20 lean recommended), season it with a little taco seasoning, and substitute it for the chicken. Just make sure to drain the grease well before adding it to the flour tortillas.
- Beans (Vegetarian Option): For a meatless option, mash or lightly crush 1 ½ cups of cooked black beans or kidney beans. The creamy texture of the beans mixes well with the shredded cheese and provides a hearty filling.
Spice it Up: Adding a Zesty Kick
If you like a little heat in your comfort food, there are easy ways to inject a zesty kick into these wraps:
- Crushed Red Pepper Flakes: Add a pinch (about ¼ teaspoon) of crushed red pepper flakes directly to the garlic butter mixture while it’s simmering in Phase 1. This subtle heat will permeate the entire filling.
- Diced Jalapeños: Stir 1 tablespoon of finely diced, jarred or fresh jalapeños into the shredded chicken and cheese mixture before rolling. If using fresh jalapeños, remove the seeds for less intense heat.
- Spicy Ranch or Hot Sauce: For an easy, last-minute addition, mix a little hot sauce or sriracha into the sour cream or ranch dressing you plan to serve on the side. This allows everyone to customize their own level of heat.
Meal Prep and Storage: Planning Ahead
This is an excellent dish for meal prep because the filling can be made ahead, and the assembled wraps can even be frozen! Making the components ahead of time is a brilliant way to ensure you have a delicious weeknight meal ready in minutes on your busiest days. Knowing how to properly store and reheat your wraps guarantees they stay fresh and crispy.
You don’t want your Ooey-Gooey Cheesy Garlic Wraps with Chicken to turn soggy! Follow these tips for storing and reheating to preserve that golden brown crust and ooey-gooey interior.
Preparing Wraps for the Freezer
If you want a true freezer meal solution, you can assemble the wraps ahead of time and freeze them un-cooked. This is perfect for batch cooking!
- Assemble Completely: Follow the steps to make the garlic butter, combine the filling, and roll the wraps tightly. Do not cook them.
- Wrap Individually: Wrap each uncooked wrap tightly in plastic wrap, and then cover with a layer of aluminum foil. This protects them from freezer burn.
- Freeze: Place the wrapped bundles into a large, labeled freezer bag. They will keep well for up to 3 months.
- Cooking from Frozen: When you’re ready to eat, unwrap the frozen wrap (discarding the plastic wrap and foil). Place it directly in a preheated large nonstick skillet over medium-low heat. Cook for about 5-7 minutes per side, pressing occasionally, until the exterior is golden brown and the center is piping hot and the shredded cheese is melted.
Reheating Leftover Cooked Wraps
If you have leftover cooked wraps, don’t use the microwave! The microwave will make the flour tortillas rubbery and ruin the crispness.
- Oven/Toaster Oven: This is the best method. Preheat your oven or toaster oven to 350°F (175°C). Place the leftover wraps directly on a baking sheet and heat for about 10-15 minutes until the outside is crispy again and the filling is hot.
- Skillet: Use your large nonstick skillet again! Reheat over medium-low heat, flipping frequently for 3-5 minutes, until the flour tortillas are crispy and the melted cheese is hot inside.
| Component | Approximate Serving Size | Calories (Estimate) | Protein (g) | Fat (g) | Key Nutrient Focus |
|---|---|---|---|---|---|
| Chicken (Shredded) | Per wrap (est.) | 150-200 | 18-22 | 8-12 | High in Lean Protein (Energy) |
| Mozzarella/Cheddar | Per wrap (est.) | 180-220 | 10-14 | 14-18 | High in Calcium and Saturated Fat |
| Flour Tortilla | 1 large | 150-180 | 4-6 | 4-6 | Carbohydrates for Quick Energy |
| Garlic Butter | Per wrap (est.) | 80-100 | <1 | 9-11 | Flavor and Texture (Fats) |
| Overall Meal | 1 wrap (Standard serving) | 560-700 | 32-42 | 45-55 | Hearty, Balanced, Excellent Comfort Food |
Note: This is an estimated nutritional breakdown per single wrap. Actual values depend on the size of your flour tortillas and the leanness of your chicken.
Frequently Asked Questions (FAQ): Solving Your Wrap Worries
It’s completely normal to have questions when you’re perfecting a new dinner recipe! Especially one with such high expectations for that ooey-gooey center and golden brown crust. Here are the answers to the most common questions about the Ooey-Gooey Cheesy Garlic Wraps with Chicken to ensure your success.
Q1: My wraps are getting dark on the outside before the cheese melts. What should I do?
A: This usually means your heat is too high! The large nonstick skillet should be on medium heat, not medium-high. Turn the heat down to medium-low. This allows the heat to penetrate slowly and melt the shredded cheese (especially the mozzarella cheese and cheddar cheese) inside before the exterior of the flour tortillas browns too much. Use a lid for 30 seconds to trap the steam, which helps melt the cheese quickly without burning the outside.
Q2: Can I use vegetable oil instead of butter for the garlic infusion?
A: You can use olive oil or vegetable oil instead of unsalted butter, but you will lose a lot of the flavor and richness that makes this recipe so special. The butter contributes significantly to the final comfort food taste and helps the wraps achieve that desirable golden brown color and crispy texture in the skillet. If you must use oil, make sure to add a little extra salt to compensate for the missing butter flavor.
Q3: What if I don’t have fresh parsley?
A: While chopped fresh parsley is best for that vibrant flavor, if you don’t have it, you can substitute with a small amount of dried Italian seasoning (about ½ teaspoon) in the garlic butter mixture. Alternatively, a few pinches of finely chopped fresh chives or even a dash of dried oregano can add a bit of an herby lift. Remember, the fresh herb is mainly there to cut the richness of the mozzarella cheese and butter.
Q4: How can I make these wraps hold together better? They keep unwrapping!
A: The key is a tight roll and starting the cooking process seam-side down. When you place the wrap in the large nonstick skillet seam-side down, the heat immediately melts the cheese near the opening and toasts the dough, which acts like glue to seal the wrap shut. Make sure the initial folds (folding the sides in) are tight before you start rolling the flour tortillas up.
Q5: Can I add a sauce inside the wrap?
A: It’s best to keep the inside filling relatively dry (just the shredded chicken, shredded cheese, and garlic butter) to ensure the flour tortillas don’t get soggy. If you want sauce, it’s better to use it as a dip on the side after the wraps are cooked. Try serving them with a side of warm marinara sauce, ranch dressing, or a little salsa for a zesty kick.
Q6: Are there other cooking methods besides the skillet?
A: Yes! If you are making a big batch for meal prep, you can bake them.
- Oven: Place assembled wraps on a baking sheet. Brush the tops lightly with a little extra melted garlic butter. Bake at 400°F (200°C) for 10-15 minutes, flipping halfway, until they are golden brown and the cheese is melted.
- Air Fryer: Place 1-2 wraps in the air fryer basket (seam side down) and cook at 375°F (190°C) for about 5-7 minutes, flipping once, until crisp. This is a great way to guarantee a super golden brown crust!
Final Wrap-Up: Your New Kitchen Staple
You are now fully equipped to make a stunning batch of Ooey-Gooey Cheesy Garlic Wraps with Chicken. You know the secrets: the power of the rotisserie chicken for speed, the magic of the double-cheese blend for that perfect ooey-gooey stretch, and the absolute necessity of the infused garlic butter for flavor. This is the easy dinner you’ve been looking for—a recipe that delivers major flavor without the major fuss.
Making a satisfying comfort food like this is one of the best parts of being in the kitchen. There’s a special kind of pride in creating a dish that disappears off the plate as quickly as you made it. Whether you are using it for meal prep or making a quick weeknight meal, these wraps are guaranteed to be a hit. So grab your flour tortillas, your shredded chicken, and your skillet, and prepare for pure, delicious, ooey-gooey comfort.
Ready to get cooking? Head to the store, grab your shredded mozzarella cheese and minced garlic, and start your new favorite easy dinner tonight!
Ooey-Gooey Cheesy Garlic Wraps with Chicken
Ingredients
Equipment
Method
- Make Garlic Butter: In a small saucepan over medium heat, melt the butter. Add the minced garlic and cook for 1-2 minutes until fragrant. Stir in the chopped parsley, salt, and black pepper. Remove from heat.
- Assemble Wraps: Lay out the four tortillas on a clean surface. Evenly distribute the shredded chicken, mozzarella cheese, and cheddar cheese onto each tortilla.
- Drizzle: Drizzle the prepared garlic butter mixture over the chicken and cheese on each tortilla.
- Roll Wraps: Fold in the sides of each tortilla and roll them up tightly to form the wraps.
- Pan-Fry: Heat a large nonstick skillet over medium heat. Place the wraps seam-side down and cook for 2-3 minutes per side, or until golden brown and the cheese is fully melted and gooey.
- Serve: Slice the wraps in half and serve warm, garnished with extra parsley if desired.