
Introduction to Burnt Basque Cheesecake Loaf Pan
What is a Burnt Basque Cheesecake?
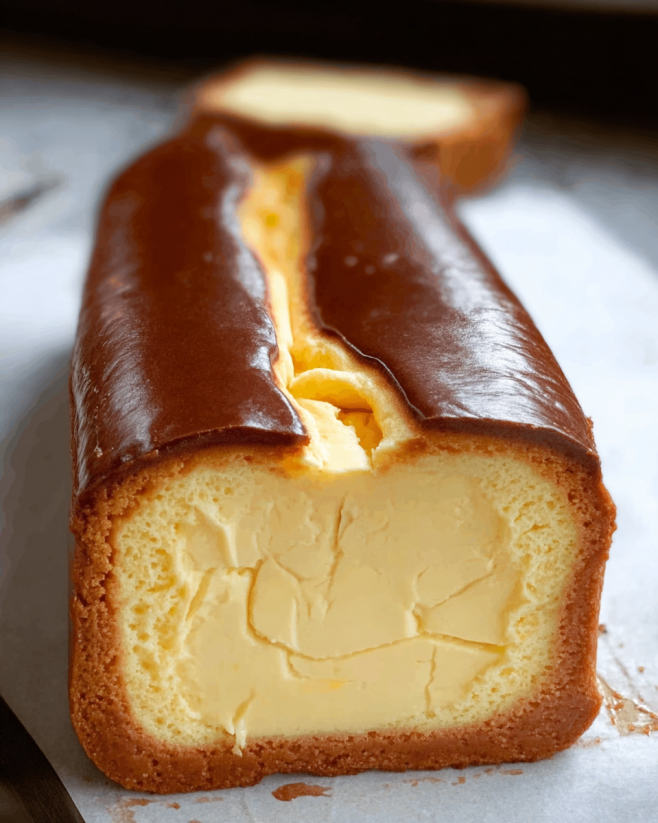
The Burnt Basque Cheesecake is a delightful dessert that has taken the culinary world by storm. Unlike traditional cheesecakes, this unique version is intentionally baked at a high temperature, resulting in a beautifully charred top. The inside remains creamy and smooth, creating a perfect contrast. This cheesecake is rich, indulgent, and has a slightly caramelized flavor that makes it truly special. The loaf pan version is not only easy to make but also perfect for slicing and serving, making it a great choice for gatherings or special occasions.
The Origin of Burnt Basque Cheesecake
This delicious dessert hails from the Basque region of Spain, specifically from a restaurant called La Viña in San Sebastián. The original recipe was created by chef Santiago Rivera in the 1990s. It quickly gained popularity due to its unique appearance and incredible taste. The cheesecake’s burnt top is not a mistake; rather, it is a signature feature that adds to its charm. Over the years, the Burnt Basque Cheesecake has spread beyond Spain, captivating dessert lovers around the globe. Today, many home bakers enjoy making this cheesecake in various forms, including the convenient loaf pan version.
Ingredients for Burnt Basque Cheesecake Loaf Pan
To create a delicious Burnt Basque Cheesecake in a loaf pan, you’ll need a few simple ingredients. Each component plays a vital role in achieving that creamy texture and rich flavor. Here’s what you’ll need:
- 2 cups cream cheese, softened: This is the base of your cheesecake, providing a rich and creamy texture.
- 1 cup granulated sugar: Sugar adds sweetness and helps create that lovely caramelized top.
- 1 cup heavy cream: Heavy cream contributes to the cheesecake’s smoothness and richness.
- 3 large eggs: Eggs help bind the ingredients together and give the cheesecake its structure.
- 1 teaspoon vanilla extract: This adds a warm, sweet flavor that enhances the overall taste.
- 1 tablespoon all-purpose flour: Flour helps stabilize the cheesecake, ensuring it holds its shape.
- 1/4 teaspoon salt: A pinch of salt balances the sweetness and enhances the flavors.
Gathering these ingredients is the first step toward making your Burnt Basque Cheesecake Loaf Pan. Each item is essential for creating that perfect blend of flavors and textures. Once you have everything ready, you can move on to the next steps of preparation!
Step-by-Step Preparation of Burnt Basque Cheesecake Loaf Pan
Step 1: Preparing the Loaf Pan
Before you start mixing your ingredients, it’s important to prepare your loaf pan properly. First, preheat your oven to 400°F (200°C). This high temperature is key to achieving that signature burnt top. Next, take a 9×5 inch loaf pan and line it with parchment paper. Make sure to leave some overhang on the sides. This will help you lift the cheesecake out easily once it’s baked. A well-prepared pan ensures that your cheesecake will come out smoothly, making the serving process a breeze.
Step 2: Mixing the Ingredients
Now it’s time to mix your ingredients! In a large mixing bowl, add the softened cream cheese. Using an electric mixer, beat it until it’s smooth and creamy. This step is crucial for a lump-free cheesecake. Gradually add the granulated sugar, mixing until well combined. Next, pour in the heavy cream, followed by the eggs, vanilla extract, flour, and salt. Mix on low speed until everything is just combined. Be careful not to overmix, as this can affect the texture of your cheesecake. The batter should be smooth and creamy, ready for the next step!
Step 3: Baking the Cheesecake
With your batter ready, it’s time to bake! Pour the cheesecake mixture into the prepared loaf pan. Make sure to spread it evenly. Place the pan in the preheated oven and bake for 25-30 minutes. You’ll know it’s done when the top is deeply browned and the center is slightly jiggly. This jiggly texture is normal and will set as it cools. Once baked, turn off the oven and leave the cheesecake inside for an additional 10 minutes. This helps to prevent cracking and allows the flavors to meld beautifully.
Step 4: Cooling and Serving
After the baking time is up, carefully remove the cheesecake from the oven. Let it cool to room temperature on a wire rack. Once cooled, it’s best to refrigerate the cheesecake for at least 4 hours, or overnight if you can wait! Chilling enhances the flavors and gives the cheesecake a firmer texture. When you’re ready to serve, gently lift the cheesecake out of the loaf pan using the parchment paper overhang. Slice it into pieces and enjoy your delicious Burnt Basque Cheesecake!
Variation of Burnt Basque Cheesecake Loaf Pan
Flavor Variations
One of the best things about the Burnt Basque Cheesecake is its versatility. You can easily customize the flavor to suit your taste. Here are some delightful variations to consider:
- Chocolate Delight: For chocolate lovers, add 1/2 cup of cocoa powder to the batter before mixing. This will give your cheesecake a rich, chocolatey flavor that pairs beautifully with the creamy texture.
- Citrus Zest: Incorporate the zest of one lemon or orange into the batter. This will add a refreshing citrus note that brightens the overall flavor.
- Spiced Pumpkin: In the fall, try adding 1/2 cup of pumpkin puree and 1 teaspoon of pumpkin spice. This variation is perfect for cozy gatherings and holiday celebrations.
- Nutty Flavor: Mix in 1/2 cup of finely chopped nuts, such as walnuts or pecans, for a delightful crunch and nutty flavor.
These flavor variations can make your Burnt Basque Cheesecake even more exciting. Feel free to experiment and find your favorite combination!
Alternative Serving Suggestions
Serving your Burnt Basque Cheesecake can be just as fun as making it! Here are some creative ideas to elevate your dessert presentation:
- Berry Compote: Top your cheesecake with a homemade berry compote. Simply simmer fresh or frozen berries with a bit of sugar until thickened. This adds a sweet and tangy contrast to the rich cheesecake.
- Fresh Fruit: Serve slices of cheesecake with fresh fruit like strawberries, raspberries, or blueberries. The natural sweetness of the fruit complements the cheesecake perfectly.
- Whipped Cream: A dollop of freshly whipped cream on top adds a light and airy touch. You can also sprinkle some cocoa powder or cinnamon for extra flair.
- Chocolate Drizzle: Drizzle melted chocolate over the cheesecake for a decadent finish. This adds a beautiful visual element and enhances the chocolate flavor if you’ve made a chocolate variation.
These alternative serving suggestions can make your Burnt Basque Cheesecake even more appealing. Whether you choose to keep it simple or dress it up, your guests will surely be impressed!
Cooking Note for Burnt Basque Cheesecake Loaf Pan
When making a Burnt Basque Cheesecake in a loaf pan, there are a few important cooking notes to keep in mind. These tips will help ensure that your cheesecake turns out perfectly every time.
First, the high baking temperature of 400°F (200°C) is crucial for achieving that signature burnt top. However, every oven is different. It’s a good idea to keep an eye on your cheesecake as it bakes. If the top starts to brown too quickly, you can loosely cover it with aluminum foil to prevent burning while allowing the center to cook through.
Next, the texture of your cheesecake is key. The center should be slightly jiggly when you take it out of the oven. This means it will set nicely as it cools. If you overbake it, the cheesecake may become dry and lose its creamy texture.
Cooling is another important step. After baking, let the cheesecake cool in the oven for 10 minutes with the door slightly ajar. This gradual cooling helps prevent cracks from forming on the surface. Once it’s at room temperature, refrigerate it for at least 4 hours. Chilling allows the flavors to develop and the cheesecake to firm up, making it easier to slice.
Lastly, remember to use quality ingredients. Fresh cream cheese and heavy cream will make a noticeable difference in flavor and texture. Always opt for full-fat versions for the best results. With these cooking notes in mind, you’ll be well on your way to creating a delicious Burnt Basque Cheesecake that will impress everyone!
Serving Suggestions for Burnt Basque Cheesecake Loaf Pan
Once your Burnt Basque Cheesecake is perfectly chilled and ready to serve, it’s time to think about how to present this delightful dessert. The way you serve it can enhance the overall experience, making it even more enjoyable for your guests. Here are some creative serving suggestions to consider:
- Classic Slice: Simply slice the cheesecake into generous pieces and serve on individual plates. This straightforward approach allows the rich flavors to shine through.
- Garnished with Mint: Add a sprig of fresh mint on top of each slice. This not only adds a pop of color but also a refreshing aroma that complements the cheesecake.
- Chocolate Shavings: For a touch of elegance, sprinkle chocolate shavings over the top of the cheesecake. This adds a beautiful visual element and enhances the dessert’s richness.
- Caramel Sauce: Drizzle warm caramel sauce over each slice for an indulgent treat. The sweet, buttery flavor pairs wonderfully with the creamy cheesecake.
- Ice Cream Scoop: Serve a slice of cheesecake alongside a scoop of vanilla or chocolate ice cream. The cold ice cream contrasts beautifully with the warm, burnt top of the cheesecake.
- Fruit Medley: Create a colorful fruit medley with seasonal fruits like strawberries, blueberries, and kiwi. This adds freshness and a burst of flavor that balances the richness of the cheesecake.
- Layered Parfait: For a fun twist, crumble the cheesecake and layer it with whipped cream and fruit in a glass. This makes for a beautiful presentation and is perfect for individual servings.
These serving suggestions can elevate your Burnt Basque Cheesecake experience. Whether you keep it simple or go for a more elaborate presentation, your guests will surely appreciate the effort. Enjoy sharing this delicious dessert with family and friends!
Tips for Perfecting Your Burnt Basque Cheesecake Loaf Pan
Creating the perfect Burnt Basque Cheesecake in a loaf pan is an art that can be mastered with a few helpful tips. These suggestions will guide you in achieving that creamy texture and signature burnt top that everyone loves. Here are some essential tips to keep in mind:
- Use Room Temperature Ingredients: Make sure your cream cheese and eggs are at room temperature before mixing. This helps create a smooth batter without lumps, ensuring a creamy cheesecake.
- Don’t Overmix: When combining your ingredients, mix just until everything is incorporated. Overmixing can introduce too much air, leading to cracks in your cheesecake as it bakes.
- Check for Doneness: Keep an eye on your cheesecake as it bakes. The top should be a deep brown, but the center should still jiggle slightly. This indicates that it will set perfectly as it cools.
- Cool Gradually: After baking, let your cheesecake cool in the oven with the door slightly ajar. This gradual cooling helps prevent cracks and maintains the creamy texture.
- Chill Before Serving: For the best flavor and texture, refrigerate your cheesecake for at least 4 hours, or overnight if possible. This allows the flavors to meld and the cheesecake to firm up.
- Experiment with Flavors: Don’t hesitate to try different flavor variations. Adding ingredients like citrus zest or chocolate can elevate your cheesecake and make it uniquely yours.
- Use Quality Ingredients: Opt for high-quality cream cheese and heavy cream. Fresh ingredients will enhance the flavor and texture of your cheesecake, making it even more delicious.
- Serve with Style: Presentation matters! Consider garnishing your cheesecake with fresh fruit, whipped cream, or a drizzle of chocolate or caramel sauce to make it visually appealing.
By following these tips, you’ll be well on your way to perfecting your Burnt Basque Cheesecake in a loaf pan. Each step contributes to creating a dessert that is not only delicious but also a feast for the eyes. Enjoy the process and the delightful results!
Breakdown of Time for Burnt Basque Cheesecake Loaf Pan
Prep Time
Preparing your Burnt Basque Cheesecake in a loaf pan is a straightforward process. The prep time typically takes about 15-20 minutes. This includes gathering your ingredients, softening the cream cheese, and mixing everything together. Make sure to have all your ingredients ready before you start. This will make the process smoother and more enjoyable!
Cooking Time
The cooking time for your cheesecake is approximately 25-30 minutes. During this time, the cheesecake will bake at a high temperature, allowing the top to achieve that signature burnt look. After baking, it’s essential to leave the cheesecake in the oven for an additional 10 minutes. This helps it set properly and prevents cracking.
Total Time
In total, you can expect the entire process, from prep to baking, to take around 50-60 minutes. However, don’t forget about the chilling time! For the best results, refrigerate your cheesecake for at least 4 hours, or overnight if you can wait. This chilling period is crucial for enhancing the flavors and achieving the perfect texture. So, while the active time is short, the waiting time is well worth it for a delicious Burnt Basque Cheesecake!
Nutritional Information for Burnt Basque Cheesecake Loaf Pan
Calories
When indulging in a slice of Burnt Basque Cheesecake, it’s good to know the calorie content. Each serving contains approximately 320 calories. This rich dessert is a treat, so enjoying it in moderation is key. The combination of cream cheese, heavy cream, and sugar contributes to its calorie count, making it a decadent choice for special occasions or a delightful dessert after dinner.
Protein
In addition to its delicious flavor, this cheesecake also provides a decent amount of protein. Each serving contains about 6 grams of protein. The protein comes primarily from the cream cheese and eggs used in the recipe. This makes the cheesecake not only a satisfying dessert but also a source of protein, which can help keep you feeling full and satisfied.
Sodium
For those watching their sodium intake, it’s important to consider the sodium content in your dessert. Each slice of Burnt Basque Cheesecake contains approximately 200 milligrams of sodium. This amount is relatively moderate, especially when compared to other desserts. However, if you’re on a low-sodium diet, you may want to enjoy this cheesecake occasionally or in smaller portions.
FAQs about Burnt Basque Cheesecake Loaf Pan
What makes Burnt Basque Cheesecake different from regular cheesecake?
The Burnt Basque Cheesecake stands out from regular cheesecake due to its unique baking method. It is baked at a high temperature, which creates a beautifully charred top while keeping the inside creamy and smooth. This intentional “burnt” appearance is not a mistake; it adds a rich, caramelized flavor that is distinct from traditional cheesecakes. Additionally, the texture is softer and more custard-like, making it a delightful treat for cheesecake lovers.
Can I make Burnt Basque Cheesecake in a different pan?
Yes, you can make Burnt Basque Cheesecake in different types of pans! While the loaf pan is convenient for slicing, you can also use a round springform pan or even a square baking dish. Just keep in mind that the baking time may vary slightly depending on the size and shape of the pan. Always monitor the cheesecake closely to ensure it achieves that signature burnt top and creamy center.
How do I store leftover Burnt Basque Cheesecake?
Storing leftover Burnt Basque Cheesecake is easy! First, make sure it has cooled completely. Then, cover it with plastic wrap or transfer it to an airtight container. You can store it in the refrigerator for up to 5 days. If you want to keep it longer, consider freezing it. Just remember to wrap it tightly to prevent freezer burn. When you’re ready to enjoy it again, thaw it in the refrigerator overnight for the best texture.
Can I freeze Burnt Basque Cheesecake?
Absolutely! Freezing Burnt Basque Cheesecake is a great way to preserve it for later. To freeze, wrap the cheesecake tightly in plastic wrap and then in aluminum foil to protect it from freezer burn. It can be stored in the freezer for up to 2 months. When you’re ready to eat it, simply transfer it to the refrigerator to thaw overnight. This method helps maintain its creamy texture and delicious flavor.
Conclusion on Burnt Basque Cheesecake Loaf Pan
In conclusion, the Burnt Basque Cheesecake made in a loaf pan is a delightful dessert that combines simplicity with elegance. Its unique baking method creates a stunning contrast between the charred top and the creamy interior, making it a showstopper at any gathering. With just a few basic ingredients, you can whip up this indulgent treat that is sure to impress your family and friends.
Whether you choose to stick to the classic recipe or experiment with various flavor variations, the possibilities are endless. From chocolate twists to refreshing citrus notes, each version offers a unique taste experience. Plus, the alternative serving suggestions allow you to present your cheesecake in creative ways, enhancing its appeal even further.
Remember, the key to a perfect Burnt Basque Cheesecake lies in the details. Pay attention to the baking time, cooling process, and ingredient quality. With these tips in mind, you’ll be well on your way to mastering this delicious dessert. So, gather your ingredients, preheat your oven, and get ready to enjoy a slice of this creamy, burnt delight!
As you savor each bite, you’ll appreciate the rich flavors and textures that make the Burnt Basque Cheesecake a favorite among dessert lovers. Happy baking!
Burnt Basque Cheesecake Loaf Pan
Ingredients
Equipment
Method
- Preheat your oven to 400°F (200°C) and prepare a 9×5 inch loaf pan lined with parchment paper.
- In a large mixing bowl, beat the softened cream cheese until smooth. Gradually add sugar, then mix in heavy cream, eggs, vanilla extract, flour, and salt until just combined.
- Pour the cheesecake mixture into the prepared loaf pan and bake for 25-30 minutes until the top is deeply browned and the center is slightly jiggly.
- Turn off the oven and leave the cheesecake inside for an additional 10 minutes. Then, let it cool to room temperature and refrigerate for at least 4 hours before serving.