
Introduction to Peanut Butter Butterfinger Cookies Recipe
Peanut Butter Butterfinger Cookies Recipe is not just easy to make; it’s also a guaranteed crowd-pleaser. Whether you’re baking for a special occasion or just want to satisfy your sweet tooth, these cookies are sure to hit the spot.
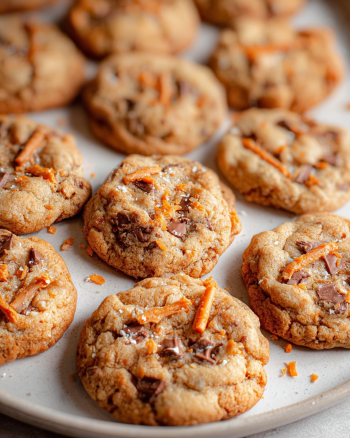
Imagine biting into a warm cookie, where the smooth peanut butter melds perfectly with the crispy, chocolatey bits of Butterfinger. It’s a match made in dessert heaven! Plus, this recipe requires minimal ingredients and can be whipped up in no time. Perfect for busy bakers or those new to the kitchen.
In this article, we’ll guide you through each step of the process, from gathering your ingredients to enjoying the final product. You’ll also find tips and variations to customize your cookies to your liking. So, roll up your sleeves, and let’s get started on making these irresistible Peanut Butter Butterfinger Cookies!
Ingredients for Peanut Butter Butterfinger Cookies Recipe
Peanut Butter Butterfinger Cookies Recipe. Having everything ready will make your baking experience smooth and enjoyable. Here’s what you’ll need:
- 1 cup creamy peanut butter
- 1 cup granulated sugar
- 1 large egg
- 1 teaspoon vanilla extract
- 1 cup Butterfinger candy bars, chopped (about 4 fun-sized bars)
- 1/2 teaspoon baking soda
- 1/4 teaspoon salt
These ingredients come together to create a cookie that’s not only delicious but also easy to make. The creamy peanut butter provides a rich base, while the Butterfinger pieces add a delightful crunch and sweetness. The sugar and egg help bind everything together, ensuring a chewy texture. Baking soda and salt enhance the flavors, making each bite irresistible.
Feel free to customize your ingredients based on your preferences. For instance, if you love chocolate, consider adding chocolate chips to the mix. Now that we have our ingredients ready, let’s move on to the next step of preparing these delightful cookies!
Step-by-Step Preparation of Peanut Butter Butterfinger Cookies Recipe
Peanut Butter Butterfinger Cookies Recipe. Each step is easy to follow, ensuring that even novice bakers can enjoy the process.
Step 1: Preheat the Oven
First things first, preheat your oven to 350°F (175°C). This step is crucial as it ensures your cookies bake evenly. While the oven heats up, you can prepare your baking sheet. Line it with parchment paper to prevent the cookies from sticking.
Step 2: Mix the Dry Ingredients
In a medium bowl, combine the baking soda and salt. This mixture will help enhance the flavors of your cookies. Stir them together until they are well mixed. This step is quick and sets the foundation for your cookie dough.
Step 3: Combine the Wet Ingredients
In a large mixing bowl, add the creamy peanut butter, granulated sugar, egg, and vanilla extract. Using a whisk or a hand mixer, blend these ingredients until they are smooth and creamy. This mixture will be the heart of your cookie dough, so make sure it’s well combined!
Step 4: Blend the Mixtures
Now, it’s time to combine the wet and dry ingredients. Gradually add the dry mixture to the wet mixture. Stir gently until everything is fully incorporated. You want a smooth dough without any lumps. This step is where the magic begins!
Step 5: Fold in the Butterfinger Pieces
Next, take your chopped Butterfinger candy bars and fold them into the dough. Use a spatula to ensure the pieces are evenly distributed. This will give your cookies that delightful crunch and sweet flavor. The Butterfinger bits will melt slightly during baking, creating a delicious surprise in every bite!
Step 6: Shape the Cookies
Using a tablespoon or a cookie scoop, drop rounded balls of dough onto your prepared baking sheet. Make sure to space them about 2 inches apart. This spacing allows the cookies to spread while baking. Once you’ve placed the dough, flatten each ball slightly with the back of a fork, creating a crisscross pattern. This not only looks nice but also helps them bake evenly.
Step 7: Bake the Cookies
Place the baking sheet in your preheated oven and bake for 10-12 minutes. Keep an eye on them! The edges should be lightly golden, while the centers may look a bit underbaked. Don’t worry; they will firm up as they cool. This is the moment you’ve been waiting for!
Step 8: Cool and Serve
Peanut Butter Butterfinger Cookies! They’re perfect for sharing or indulging all by yourself.
Variations of Peanut Butter Butterfinger Cookies Recipe
Peanut Butter Butterfinger Cookies Recipe is already a delightful treat, there are many ways to customize it to suit your taste. Whether you want to switch up the flavors or add some extra crunch, these variations will keep your cookie game exciting. Let’s explore some alternative ingredients and different mix-ins that can elevate your cookie experience!
Alternative Ingredients
Sometimes, you might want to switch things up with different ingredients. Here are a few ideas:
- Nut Butters: Instead of creamy peanut butter, try using almond butter or cashew butter. These alternatives will give your cookies a unique flavor while still keeping them delicious.
- Sweeteners: If you’re looking for a healthier option, consider using honey or maple syrup instead of granulated sugar. Just remember to adjust the amount of dry ingredients to maintain the right dough consistency.
- Gluten-Free Options: For a gluten-free version, substitute regular flour with almond flour or a gluten-free baking mix. This way, everyone can enjoy these tasty cookies!
Different Mix-Ins
Mix-ins can add a fun twist to your cookies. Here are some tasty options to consider:
- Chocolate Chips: Add 1/2 cup of chocolate chips to the dough for a rich chocolate flavor. Dark, milk, or even white chocolate chips work wonderfully!
- Chopped Nuts: For an extra crunch, fold in some chopped walnuts or pecans. They pair beautifully with the peanut butter and Butterfinger pieces.
- Dried Fruits: Consider adding dried cranberries or raisins for a chewy texture and a hint of tartness. This can balance the sweetness of the cookies.
Peanut Butter Butterfinger Cookies Recipe!
Cooking Note for Peanut Butter Butterfinger Cookies Recipe
Peanut Butter Butterfinger Cookies Recipe.
First, always measure your ingredients accurately. Baking is a science, and even a small difference in measurements can affect the final outcome. Use measuring cups and spoons for precision. For the peanut butter, it’s best to use a measuring cup that allows you to scoop and level off the top for an accurate measurement.
Next, consider the temperature of your ingredients. Room temperature eggs mix better with other ingredients, creating a smoother dough. If your peanut butter is too thick, you can warm it slightly in the microwave for a few seconds. This will make it easier to blend with the sugar and egg.
Another important note is to keep an eye on your baking time. Ovens can vary, so it’s wise to check your cookies a minute or two before the suggested baking time. You want the edges to be golden brown, while the centers should still look slightly soft. This ensures a chewy texture once they cool.
Lastly, allow your cookies to cool properly. Cooling them on the baking sheet for a few minutes helps them set, making them easier to transfer without breaking. Once on the wire rack, let them cool completely before storing. This will help maintain their freshness and texture.
Peanut Butter Butterfinger Cookies that everyone will love. Happy baking!
Serving Suggestions for Peanut Butter Butterfinger Cookies Recipe
Peanut Butter Butterfinger Cookies, it’s time to think about how to serve them! These cookies are not only tasty but also versatile, making them perfect for various occasions. Here are some delightful serving suggestions to enhance your cookie experience:
- With a Glass of Milk: There’s nothing quite like enjoying cookies with a cold glass of milk. The creamy texture of the milk complements the rich peanut butter and chocolate flavors perfectly. It’s a classic pairing that never goes out of style!
- As a Dessert Sandwich: For a fun twist, try making cookie sandwiches. Spread a layer of your favorite frosting or whipped cream between two cookies. This adds an extra layer of sweetness and makes for a delightful treat.
- With Ice Cream: Serve your cookies warm with a scoop of vanilla or chocolate ice cream on top. The warm cookie and cold ice cream create a delicious contrast that’s sure to impress your guests.
- At Parties: These cookies are perfect for gatherings! Arrange them on a decorative platter and serve them at birthday parties, potlucks, or holiday celebrations. They’re sure to be a hit with both kids and adults alike.
- Gift Them: If you want to share the love, package your cookies in a cute box or jar. Tie it with a ribbon for a thoughtful gift. Homemade cookies make for a heartfelt present for friends, family, or neighbors.
Peanut Butter Butterfinger Cookies Recipe in various delightful ways. Whether you’re indulging solo or sharing with others, these cookies are sure to bring smiles all around!
Tips for Perfect Peanut Butter Butterfinger Cookies Recipe
Peanut Butter Butterfinger Cookies Recipe turns out perfectly every time, here are some handy tips to keep in mind. These simple suggestions can elevate your baking game and help you achieve cookies that are not only delicious but also visually appealing.
First, always use fresh ingredients. Check the expiration dates on your baking soda and other ingredients. Fresh ingredients will enhance the flavor and texture of your cookies. For instance, using fresh peanut butter will give your cookies a rich, nutty taste.
Next, consider chilling your dough. If you have time, refrigerate the cookie dough for about 30 minutes before baking. Chilling helps the cookies maintain their shape and prevents them from spreading too much in the oven. This results in thicker, chewier cookies that are simply irresistible!
Another important tip is to rotate your baking sheet halfway through the baking time. Ovens can have hot spots, which may cause uneven baking. By rotating the sheet, you ensure that all cookies bake evenly, resulting in a consistent texture and color.
Don’t forget to experiment with baking times! If you prefer softer cookies, take them out of the oven when they are just set and lightly golden around the edges. For crunchier cookies, leave them in for an extra minute or two. Remember, they will continue to cook slightly after being removed from the oven.
Lastly, store your cookies properly to maintain their freshness. Place them in an airtight container at room temperature. If you want to keep them for longer, consider freezing them. Just make sure to separate layers with parchment paper to prevent sticking.
Peanut Butter Butterfinger Cookies. Enjoy the process and happy baking!
Breakdown of Time for Peanut Butter Butterfinger Cookies Recipe
Peanut Butter Butterfinger Cookies Recipe can help you plan your baking session better. Here’s a simple breakdown of the time required for preparation, cooking, and the total time to enjoy your delicious cookies!
Prep Time
The prep time for this delightful cookie recipe is approximately 15 minutes. This includes gathering your ingredients, mixing the wet and dry components, and shaping the cookie dough. It’s a quick and easy process, making it perfect for busy bakers!
Cooking Time
Once your cookies are shaped and ready to go, the cooking time is about 10-12 minutes. Keep an eye on them as they bake, ensuring the edges turn golden brown while the centers remain slightly soft. This short baking time is what makes these cookies so quick to prepare!
Total Time
Peanut Butter Butterfinger Cookies ready to enjoy in no time!
Nutritional Information for Peanut Butter Butterfinger Cookies Recipe
Peanut Butter Butterfinger Cookies Recipe can help you enjoy these treats while keeping your dietary goals in mind. Here’s a breakdown of the key nutritional information per serving, so you can indulge with confidence!
Calories
Each cookie contains approximately 150 calories. This makes them a satisfying treat without being overly indulgent. Enjoying one or two cookies can fit nicely into a balanced diet, especially when paired with a healthy meal or snack.
Protein
These cookies provide about 4 grams of protein per serving. The protein comes mainly from the peanut butter and egg, making these cookies not only delicious but also a source of energy. This protein content can help keep you feeling full and satisfied after enjoying your sweet treat.
Sodium
Each cookie has around 100 milligrams of sodium. This amount is relatively low, especially considering the flavor packed into each bite. Keeping an eye on sodium intake is important, but these cookies can be enjoyed as part of a balanced diet without worry.
Peanut Butter Butterfinger Cookies. Remember, moderation is key, and these cookies can be a delightful addition to your dessert repertoire!
FAQs about Peanut Butter Butterfinger Cookies Recipe
Can I use crunchy peanut butter instead of creamy?
Peanut Butter Butterfinger Cookies Recipe. This will add a delightful texture to your cookies. The crunchy bits will give each bite an extra layer of flavor and crunch. Just keep in mind that the cookies may have a slightly different consistency, but they will still be delicious!
How do I store leftover cookies?
Storing your leftover cookies properly is key to keeping them fresh. Place the cookies in an airtight container at room temperature. This will help maintain their chewy texture. If you want to keep them for a longer period, you can refrigerate them. Just make sure to let them come to room temperature before enjoying them again!
Can I freeze the cookie dough?
Yes, you can freeze the cookie dough! This is a great way to have fresh cookies on hand whenever you want. To freeze, scoop the dough into balls and place them on a baking sheet. Freeze until solid, then transfer the dough balls to a freezer-safe bag. When you’re ready to bake, just take out the desired amount and bake them straight from the freezer, adding a minute or two to the baking time.
What can I substitute for Butterfinger candy?
If you don’t have Butterfinger candy on hand, there are several tasty substitutes you can use. Try using chopped Reese’s Peanut Butter Cups for a chocolatey twist. Alternatively, you can use crushed toffee bars or even chocolate-covered pretzels for a unique flavor. Each option will give your cookies a different taste, so feel free to experiment!
Conclusion on Peanut Butter Butterfinger Cookies Recipe
Peanut Butter Butterfinger Cookies Recipe is a delightful treat that combines the rich flavors of peanut butter with the sweet crunch of Butterfinger candy bars. This recipe is not only simple to follow but also allows for plenty of creativity. Whether you stick to the classic version or try out some of the variations, you’re sure to create a batch of cookies that will impress everyone.
These cookies are perfect for any occasion, from casual family gatherings to festive celebrations. They are easy to make and even easier to enjoy! The combination of chewy and crunchy textures, along with the sweet and salty flavors, makes each bite a delightful experience.
As you embark on your baking journey, remember to have fun and experiment with different ingredients and mix-ins. The beauty of baking lies in the ability to customize recipes to suit your taste. So, gather your ingredients, preheat your oven, and get ready to enjoy the delicious aroma of freshly baked cookies wafting through your home.
Peanut Butter Butterfinger Cookies as much as we do. Happy baking, and may your cookies always be warm and delicious!
Peanut Butter Butterfinger Cookies
Ingredients
Equipment
Method
- Preheat your oven to 350°F (175°C) and line a baking sheet with parchment paper.
- In a medium bowl, combine the baking soda and salt.
- In a large mixing bowl, blend the creamy peanut butter, granulated sugar, egg, and vanilla extract until smooth.
- Gradually add the dry mixture to the wet mixture and stir until fully incorporated.
- Fold in the chopped Butterfinger pieces until evenly distributed.
- Drop rounded balls of dough onto the prepared baking sheet, spacing them about 2 inches apart, and flatten slightly with a fork.
- Bake for 10-12 minutes until edges are lightly golden and centers are slightly soft.
- Cool on the baking sheet for 5 minutes before transferring to a wire rack to cool completely.