
Introduction to Caramel Apple Cheesecake Bars
Are you ready to indulge in a delightful dessert that combines the best of both worlds? Caramel Apple Cheesecake Bars are a perfect treat for any occasion. These bars bring together the creamy richness of cheesecake with the sweet, tart flavor of apples, all topped off with a luscious caramel drizzle. They are not just delicious; they are also easy to make, making them a favorite among bakers of all skill levels.
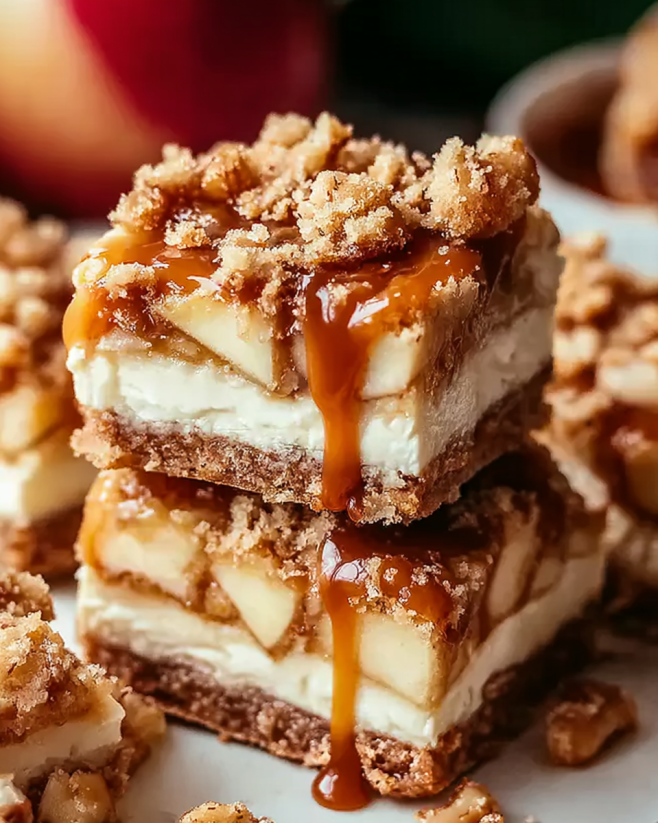
Imagine biting into a soft, creamy layer of cheesecake, with bits of tender apples and a hint of cinnamon. The graham cracker crust adds a satisfying crunch, while the caramel sauce ties everything together with its sweet, gooey goodness. Whether you’re hosting a party, celebrating a special event, or simply craving something sweet, these bars are sure to impress your family and friends.
In this article, we will guide you through the ingredients, preparation steps, and tips to make the perfect Caramel Apple Cheesecake Bars. You’ll learn how to create this scrumptious dessert that not only looks beautiful but also tastes heavenly. So, let’s dive into the world of baking and discover how to make these delightful bars that will leave everyone asking for seconds!
Ingredients for Caramel Apple Cheesecake Bars
To create the delicious Caramel Apple Cheesecake Bars, you’ll need a few simple ingredients. Each component plays a vital role in achieving that perfect balance of flavors and textures. Here’s what you’ll need:
- 1 ½ cups graham cracker crumbs
- ½ cup unsalted butter, melted
- 2 tablespoons granulated sugar
- 2 (8-ounce) packages cream cheese, softened
- ¾ cup granulated sugar
- 1 teaspoon vanilla extract
- 2 large eggs
- 2 cups peeled and diced apples (about 2 medium apples)
- 1 teaspoon ground cinnamon
- ½ cup caramel sauce (store-bought or homemade)
These ingredients come together to create a rich and creamy cheesecake base, complemented by the sweetness of apples and the crunch of the graham cracker crust. The caramel sauce adds a delightful finishing touch, making each bite a heavenly experience. Make sure to gather everything before you start baking, as it will help streamline the process and ensure you don’t miss any key components!
Preparation of Caramel Apple Cheesecake Bars
Now that you have all your ingredients ready, it’s time to dive into the preparation of your Caramel Apple Cheesecake Bars. This process is straightforward and fun, allowing you to create a delicious dessert that will wow your guests. Let’s break it down step by step!
Step 1: Prepare the Crust
Start by preheating your oven to 325°F. This ensures that your bars bake evenly. Next, take a medium bowl and combine the graham cracker crumbs, melted butter, and 2 tablespoons of sugar. Mix these ingredients until they are well combined. The mixture should resemble wet sand.
Now, press this crumb mixture firmly into the bottom of a greased 9×13-inch baking dish. Make sure to pack it down tightly to form a solid crust. This will provide a sturdy base for your cheesecake filling. Once done, set it aside while you prepare the filling.
Step 2: Make the Cheesecake Filling
In a large mixing bowl, beat the softened cream cheese with ¾ cup of sugar and the vanilla extract. Use an electric mixer for a smooth and creamy texture. Mix until there are no lumps left. This step is crucial for achieving that velvety cheesecake consistency.
Next, add the eggs one at a time, mixing well after each addition. This helps to incorporate air into the mixture, making it light and fluffy. Once everything is well combined, you’re ready for the next step!
Step 3: Add the Apple Layer
In a separate bowl, toss the peeled and diced apples with ground cinnamon. This adds a warm, spicy flavor that complements the sweetness of the apples. Gently fold the apple mixture into the cream cheese filling. Make sure the apples are evenly distributed throughout the mixture for a balanced taste in every bite.
Step 4: Drizzle with Caramel
Now it’s time to pour the creamy apple mixture over the prepared crust in the baking dish. Spread it out evenly with a spatula. Then, take your caramel sauce and drizzle it generously over the top. For a fun twist, use a knife or toothpick to swirl the caramel into the cheesecake layer. This creates a beautiful marbled effect and enhances the flavor.
Step 5: Bake the Bars
Place the baking dish in the preheated oven and bake for 35-40 minutes. You’ll know they are done when the center is set and the edges are lightly golden. Keep an eye on them to avoid overbaking, as this can lead to a dry texture.
Step 6: Cool and Slice
Once baked, remove the bars from the oven and let them cool at room temperature for about 30 minutes. This cooling period is essential for the bars to set properly. After that, refrigerate them for at least 2 hours before slicing. Chilling helps the flavors meld together and makes cutting easier. When you’re ready to serve, slice them into squares and enjoy your delicious Caramel Apple Cheesecake Bars!
Variation of Caramel Apple Cheesecake Bars
While the classic Caramel Apple Cheesecake Bars are already a delightful treat, there are many ways to customize them to suit your taste. Whether you want to add a twist with alternative toppings or make them gluten-free, the possibilities are endless. Let’s explore some fun variations!
Alternative Toppings
One of the easiest ways to change up your Caramel Apple Cheesecake Bars is by experimenting with different toppings. Here are a few ideas:
- Chopped Nuts: Sprinkle some chopped pecans or walnuts on top for added crunch and flavor.
- Chocolate Drizzle: For chocolate lovers, a drizzle of melted chocolate can add a rich touch.
- Whipped Cream: Serve with a dollop of whipped cream for a light and airy finish.
- Fresh Fruit: Top with slices of fresh apples or pears for a refreshing contrast.
- Toffee Bits: Add toffee bits for an extra layer of sweetness and texture.
Feel free to mix and match these toppings to create your own unique version of these bars. Each addition can bring a new flavor profile that enhances the overall experience!
Gluten-Free Options
If you or your guests are following a gluten-free diet, you can easily adapt this recipe. Here’s how:
- Gluten-Free Graham Crackers: Substitute regular graham cracker crumbs with gluten-free graham crackers. Many brands offer delicious options that work perfectly.
- Almond Flour Crust: For a nutty flavor, consider using almond flour mixed with melted butter and a bit of sugar to create a crust.
- Check Caramel Sauce: Ensure that the caramel sauce you use is gluten-free. Many store-bought options are, but it’s always good to double-check the label.
With these simple substitutions, everyone can enjoy the deliciousness of Caramel Apple Cheesecake Bars without worry. These variations not only cater to different dietary needs but also add a fun twist to a beloved dessert!
Cooking Note for Caramel Apple Cheesecake Bars
When it comes to baking Caramel Apple Cheesecake Bars, a few cooking notes can help ensure your dessert turns out perfectly every time. These tips will guide you through the process, making it easier and more enjoyable. Let’s take a look at some important points to keep in mind!
First, always use softened cream cheese. This is crucial for achieving a smooth and creamy filling. If your cream cheese is too cold, it can lead to lumps in your mixture. To soften it quickly, cut it into small cubes and let it sit at room temperature for about 30 minutes before mixing.
Next, be mindful of the apples you choose. Opt for firm varieties like Granny Smith or Honeycrisp. These apples hold their shape well during baking and provide a nice balance of sweetness and tartness. Make sure to peel and dice them evenly for consistent cooking.
Another important note is to avoid overmixing the cheesecake filling. While you want everything to be well combined, overmixing can incorporate too much air, leading to cracks in your bars as they cool. Mix just until smooth and creamy.
When baking, keep an eye on the bars as they approach the end of the baking time. Ovens can vary, and you want to pull them out when the edges are set but the center still has a slight jiggle. This ensures a creamy texture once they cool.
Lastly, patience is key! Allow the bars to cool completely at room temperature before refrigerating. Chilling them for at least two hours helps the flavors meld and makes slicing easier. If you can wait overnight, the taste will be even better!
By following these cooking notes, you’ll be well on your way to creating delicious Caramel Apple Cheesecake Bars that are sure to impress. Happy baking!
Serving Suggestions for Caramel Apple Cheesecake Bars
Once your Caramel Apple Cheesecake Bars are perfectly baked and chilled, it’s time to think about how to serve them. Presentation can elevate your dessert experience, making it even more enjoyable for you and your guests. Here are some delightful serving suggestions to consider:
- Plate with Style: Serve the bars on a beautiful platter or individual dessert plates. A simple garnish of fresh apple slices or a sprinkle of cinnamon can add a touch of elegance.
- Pair with Ice Cream: A scoop of vanilla or caramel ice cream complements the flavors of the bars beautifully. The cold ice cream contrasts nicely with the creamy cheesecake, creating a delightful combination.
- Drizzle More Caramel: For an extra indulgent treat, drizzle additional caramel sauce over the top just before serving. This adds a beautiful shine and enhances the sweetness.
- Top with Whipped Cream: A dollop of freshly whipped cream can lighten the dessert and add a fluffy texture. You can even flavor the whipped cream with a hint of vanilla or cinnamon for an extra twist.
- Serve with Coffee or Tea: Pairing these bars with a warm cup of coffee or tea can enhance the flavors. The warmth of the drink complements the coolness of the cheesecake, making for a cozy dessert experience.
These serving suggestions not only enhance the visual appeal of your Caramel Apple Cheesecake Bars but also elevate the overall taste experience. Whether you’re hosting a gathering or enjoying a quiet evening at home, these ideas will make your dessert feel special. Enjoy every delicious bite!
Tips for Perfect Caramel Apple Cheesecake Bars
Creating the perfect Caramel Apple Cheesecake Bars requires a bit of attention to detail. With these helpful tips, you can ensure that your dessert turns out delicious every time. Let’s explore some key pointers that will elevate your baking game!
First, always measure your ingredients accurately. Baking is a science, and even a small difference can affect the outcome. Use measuring cups and spoons for dry ingredients and a liquid measuring cup for wet ingredients. This will help you achieve the right texture and flavor.
Next, don’t skip the chilling time. After baking, allow your bars to cool at room temperature before refrigerating. This step is crucial for setting the cheesecake layer properly. If you’re in a hurry, try placing them in the freezer for a short time, but keep an eye on them to avoid freezing.
Another tip is to line your baking dish with parchment paper. This makes it easier to lift the bars out once they are cooled. Simply leave some overhang on the sides, and you can pull them out effortlessly. This also helps prevent sticking, ensuring clean slices.
When it comes to the apples, choose the right variety. Firm apples like Granny Smith or Fuji work best. They hold their shape during baking and provide a nice contrast to the creamy cheesecake. Make sure to dice them evenly for consistent cooking.
Lastly, don’t be afraid to experiment! While the classic recipe is delicious, you can add your own twist. Consider mixing in some chopped nuts, or try different spices like nutmeg or ginger for added warmth. Each variation can bring a new flavor profile to your bars.
By following these tips, you’ll be well on your way to creating Caramel Apple Cheesecake Bars that are not only beautiful but also bursting with flavor. Happy baking!
Breakdown of Time for Caramel Apple Cheesecake Bars
Understanding the time required for each step in making Caramel Apple Cheesecake Bars can help you plan your baking session effectively. Here’s a detailed breakdown of the time you’ll need for preparation, cooking, and cooling. This way, you can enjoy the process without feeling rushed!
Prep Time
The prep time for these delicious bars is approximately 20-25 minutes. This includes gathering your ingredients, preparing the crust, and mixing the cheesecake filling. Make sure to have everything ready before you start, as it will make the process smoother and more enjoyable.
Cooking Time
Once you’ve prepped your ingredients, the cooking time is about 35-40 minutes. During this time, the bars will bake in the oven until they are set and lightly golden around the edges. Keep an eye on them to ensure they don’t overbake, as this can affect the texture.
Total Time
In total, you should expect to spend around 2 hours and 30 minutes from start to finish. This includes the prep time, cooking time, and the essential cooling period. After baking, allow the bars to cool at room temperature for about 30 minutes, then refrigerate for at least 2 hours before slicing. This chilling time is crucial for the flavors to meld and for the bars to set properly.
By keeping track of these timeframes, you can ensure that your Caramel Apple Cheesecake Bars turn out perfectly every time. Happy baking!
Nutritional Information for Caramel Apple Cheesecake Bars
Understanding the nutritional content of your Caramel Apple Cheesecake Bars can help you enjoy them guilt-free. Whether you’re counting calories or just curious about what’s in your dessert, here’s a breakdown of the key nutritional information per serving. Each serving is approximately one bar, and this recipe yields 12 bars.
Calories
250 calories. This makes them a satisfying treat without being overly indulgent. The combination of cream cheese, apples, and caramel contributes to the calorie count, but it also provides a delightful flavor experience.
Protein
4 grams. The cream cheese and eggs in the recipe provide this essential nutrient, making these bars not just a sweet treat but also a source of protein. This can help keep you feeling full and satisfied.
Sodium
150 mg of sodium. This level is reasonable for a dessert, especially considering the rich flavors from the cream cheese and caramel. If you’re watching your sodium intake, be mindful of the other meals you consume throughout the day.
Overall, these Caramel Apple Cheesecake Bars can fit into a balanced diet. They offer a delightful mix of flavors and textures while providing some nutritional benefits. Enjoy them as an occasional treat, and savor every delicious bite!
FAQs about Caramel Apple Cheesecake Bars
Can I make Caramel Apple Cheesecake Bars ahead of time?
Absolutely! Caramel Apple Cheesecake Bars are perfect for making ahead of time. In fact, they taste even better after chilling in the refrigerator for a few hours or overnight. This allows the flavors to meld beautifully. Just prepare the bars as directed, let them cool, and then refrigerate. When you’re ready to serve, simply slice and enjoy!
How should I store leftover Caramel Apple Cheesecake Bars?
To keep your leftover Caramel Apple Cheesecake Bars fresh, store them in an airtight container in the refrigerator. They can last for up to five days. If you want to keep them longer, consider freezing them. Wrap each bar tightly in plastic wrap and then place them in a freezer-safe container. They can be frozen for up to three months. Just thaw them in the refrigerator before serving!
Can I use different fruits in the recipe?
Yes, you can definitely switch up the fruits in your Caramel Apple Cheesecake Bars! While apples are a classic choice, pears, peaches, or even berries can work wonderfully. Just make sure to adjust the amount of sugar based on the sweetness of the fruit you choose. This way, you can create a unique flavor profile that suits your taste!
What can I substitute for cream cheese in Caramel Apple Cheesecake Bars?
If you’re looking for a cream cheese substitute, there are a few options. You can use mascarpone cheese for a similar creamy texture. Greek yogurt is another great alternative, offering a tangy flavor and lower fat content. For a dairy-free option, consider using cashew cream or a vegan cream cheese. Just keep in mind that the flavor and texture may vary slightly, but they can still create delicious bars!
Conclusion on Caramel Apple Cheesecake Bars
In conclusion, Caramel Apple Cheesecake Bars are a delightful dessert that combines the rich creaminess of cheesecake with the sweet and tart flavors of apples, all drizzled with luscious caramel. This recipe is not only easy to follow but also allows for plenty of creativity, making it a perfect choice for bakers of all skill levels. Whether you’re preparing for a special occasion or simply treating yourself, these bars are sure to impress.
By following the steps outlined in this article, you can create a dessert that is both visually appealing and delicious. The combination of textures—from the crunchy graham cracker crust to the smooth cheesecake filling—creates a satisfying experience in every bite. Plus, with the option to customize toppings and variations, you can make these bars your own.
Remember to take your time during the preparation and baking process. Allowing the bars to cool and chill properly will enhance their flavor and texture. With a little patience and attention to detail, you’ll be rewarded with a dessert that is not only tasty but also a crowd-pleaser.
So, gather your ingredients, roll up your sleeves, and get ready to bake some Caramel Apple Cheesecake Bars. Enjoy the process, share with loved ones, and savor the delicious results. Happy baking!
Caramel Apple Cheesecake Bars
Ingredients
Equipment
Method
- Preheat your oven to 325°F. Combine graham cracker crumbs, melted butter, and sugar in a bowl. Press into the bottom of a greased 9×13-inch baking dish.
- In a large mixing bowl, beat cream cheese, sugar, and vanilla until smooth. Add eggs one at a time, mixing well after each addition.
- Toss diced apples with cinnamon and fold into the cream cheese mixture. Pour over the crust and drizzle with caramel sauce.
- Bake for 35-40 minutes until the center is set and edges are lightly golden. Let cool at room temperature for 30 minutes, then refrigerate for at least 2 hours before slicing.