
Introduction to Chocolate Pizzelles with Cannoli Filling
Chocolate pizzelles with cannoli filling are a delightful treat that combines two beloved desserts into one irresistible creation. These thin, crisp cookies are not only visually appealing but also bursting with flavor. The rich chocolate pizzelles serve as the perfect vessel for the creamy, sweet cannoli filling, making them a favorite for any occasion.
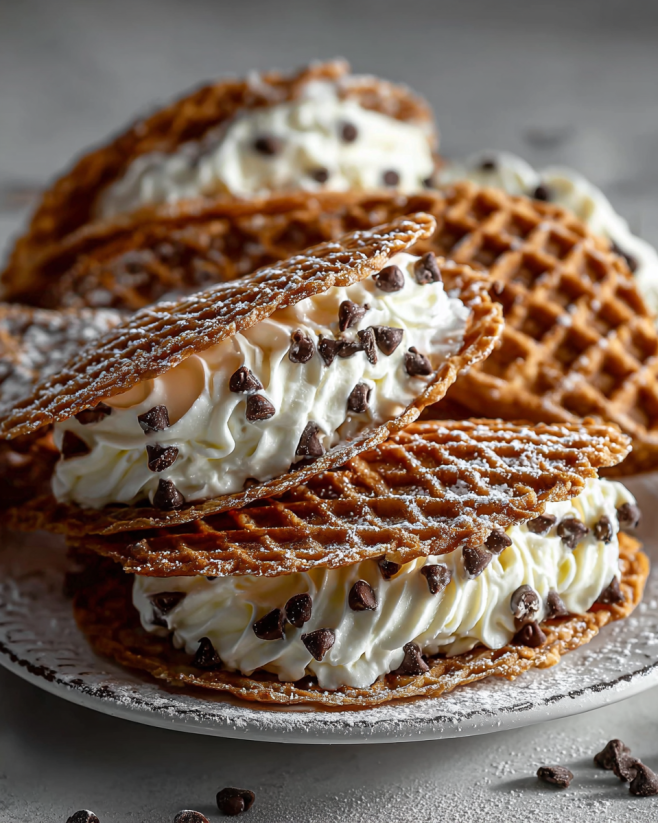
Originating from Italy, pizzelles are traditional waffle cookies that have been enjoyed for generations. Their unique texture and intricate designs make them a standout dessert. When you add chocolate to the mix, it elevates the pizzelle experience to a whole new level. The cannoli filling, made with creamy ricotta and sweet chocolate chips, adds a luscious contrast to the crispness of the pizzelles.
Whether you’re hosting a party, celebrating a holiday, or simply indulging in a sweet treat, these chocolate pizzelles with cannoli filling are sure to impress. They are easy to make and can be customized to suit your taste. Plus, they are a fun way to bring a taste of Italy into your home.
In this article, we will guide you through the ingredients, preparation steps, and tips for making the perfect chocolate pizzelles with cannoli filling. Get ready to delight your taste buds and impress your friends and family with this decadent dessert!
Ingredients for Chocolate Pizzelles with Cannoli Filling
To create these delicious chocolate pizzelles with cannoli filling, you will need a selection of simple yet essential ingredients. Each component plays a vital role in achieving the perfect balance of flavors and textures. Here’s what you’ll need:
For the Chocolate Pizzelles:
- 1 cup all-purpose flour
- 1/2 cup unsweetened cocoa powder
- 1 teaspoon baking powder
- 1/4 teaspoon salt
- 3 large eggs
- 3/4 cup granulated sugar
- 1/2 cup melted butter
- 1 teaspoon vanilla extract
- 1/2 teaspoon almond extract
For the Cannoli Filling:
- 1 cup ricotta cheese
- 1/2 cup powdered sugar
- 1/2 teaspoon vanilla extract
- 1/4 cup mini chocolate chips
- 1/4 cup chopped pistachios (optional)
These ingredients come together to create a delightful dessert that is both rich and satisfying. The combination of cocoa powder and sugar in the pizzelle batter gives it a deep chocolate flavor, while the creamy ricotta filling adds a sweet and smooth contrast. Feel free to customize the filling with your favorite mix-ins, like nuts or additional chocolate chips, to make it your own!
Preparation of Chocolate Pizzelles with Cannoli Filling
Now that you have gathered all the ingredients, it’s time to dive into the preparation of your chocolate pizzelles with cannoli filling. This process is straightforward and fun, allowing you to create a delicious dessert that will impress everyone. Let’s break it down into easy steps!
Step 1: Preparing the Pizzelle Batter
Start by preparing the pizzelle batter. In a medium bowl, whisk together the all-purpose flour, unsweetened cocoa powder, baking powder, and salt. This dry mixture is essential for the structure of your pizzelles. In a separate large bowl, beat the three large eggs and granulated sugar together until the mixture becomes light and fluffy. This step is crucial as it incorporates air, giving your pizzelles a lovely texture.
Next, gradually add the melted butter, vanilla extract, and almond extract to the egg mixture. Mix well until everything is combined. Now, slowly incorporate the dry ingredients into the wet mixture. Stir gently until you have a smooth batter. Make sure there are no lumps, as this will ensure even cooking and a delightful texture in your pizzelles.
Step 2: Cooking the Pizzelles
Once your batter is ready, it’s time to cook the pizzelles. Preheat your pizzelle maker according to the manufacturer’s instructions. If necessary, lightly grease the pizzelle maker with a non-stick spray or a little melted butter. This will help prevent sticking and make it easier to remove the pizzelles.
Pour about 1 tablespoon of batter onto the center of each pizzelle mold. Close the lid and cook for about 30 to 60 seconds. The cooking time may vary depending on your pizzelle maker, so keep an eye on them. You want them to be crisp and set. Once cooked, carefully remove the pizzelles and let them cool on a wire rack. This cooling step is important as it helps them maintain their crispness.
Step 3: Making the Cannoli Filling
While the pizzelles are cooling, you can prepare the cannoli filling. In a medium bowl, combine the ricotta cheese, powdered sugar, and vanilla extract. Mix until the mixture is smooth and creamy. This filling is what makes your pizzelles truly special!
Next, fold in the mini chocolate chips and chopped pistachios if you’re using them. The chocolate chips add a delightful sweetness, while the pistachios provide a nice crunch and a pop of color. Feel free to adjust the mix-ins to your liking. You can even add a pinch of cinnamon or a splash of orange zest for a unique twist!
Step 4: Assembling the Chocolate Pizzelles with Cannoli Filling
Now comes the fun part—assembling your chocolate pizzelles with cannoli filling! Once the pizzelles are completely cool, take a piping bag or a spoon and fill each pizzelle with the creamy cannoli mixture. Be generous, but don’t overfill them, as you want to be able to close them without spilling.
After filling, you can serve them immediately for the best texture. However, if you prefer, you can refrigerate them until you’re ready to serve. This dessert is perfect for gatherings, and your guests will love the combination of flavors and textures!
Variation of Chocolate Pizzelles with Cannoli Filling
While the classic chocolate pizzelles with cannoli filling are undeniably delicious, there are many ways to switch things up! Variations can enhance the flavors and make your dessert even more exciting. Let’s explore some alternative fillings and different flavors of pizzelles that you can try.
Alternative Fillings for Pizzelles
If you want to get creative, consider trying different fillings for your pizzelles. Here are a few ideas:
- Fruit and Cream Cheese Filling: Mix cream cheese with your favorite fruit preserves or fresh fruit. This filling adds a fruity twist that pairs beautifully with the chocolate pizzelles.
- Peanut Butter Filling: Combine creamy peanut butter with powdered sugar and a splash of vanilla extract. This filling offers a rich, nutty flavor that chocolate lovers will adore.
- Nutella Filling: For a quick and easy option, simply use Nutella as your filling. Its smooth, chocolate-hazelnut flavor complements the pizzelles perfectly.
- Mascarpone Filling: Blend mascarpone cheese with a bit of sugar and vanilla. This filling is light and creamy, providing a delightful contrast to the crisp pizzelles.
Feel free to mix and match these fillings to create your own unique combinations. The possibilities are endless!
Different Flavors of Pizzelles
In addition to the chocolate pizzelles, you can experiment with different flavors of pizzelles. Here are some ideas to inspire you:
- Vanilla Pizzelles: Stick to the classic recipe but omit the cocoa powder. The result is a light and airy vanilla pizzelle that pairs well with any filling.
- Lemon Pizzelles: Add lemon zest and a bit of lemon juice to the batter for a refreshing citrus flavor. These pizzelles are perfect for spring and summer gatherings.
- Spiced Pizzelles: Incorporate spices like cinnamon, nutmeg, or cardamom into the batter. This adds warmth and depth, making them perfect for fall and winter celebrations.
- Matcha Pizzelles: For a unique twist, add matcha powder to the batter. This green tea flavor is not only delicious but also adds a beautiful color to your pizzelles.
By trying out these variations, you can create a delightful assortment of pizzelles that cater to different tastes and preferences. Whether you stick to the classic chocolate or venture into new flavors, your pizzelles will surely be a hit!
Cooking Note for Chocolate Pizzelles with Cannoli Filling
When it comes to making chocolate pizzelles with cannoli filling, a few cooking notes can help ensure your success. These tips will guide you through the process, making it easier and more enjoyable. Let’s dive into some essential points to keep in mind!
First, always preheat your pizzelle maker properly. This step is crucial for achieving that perfect crispness. If the maker isn’t hot enough, your pizzelles may turn out soft or undercooked. On the other hand, if it’s too hot, they might burn quickly. A well-preheated pizzelle maker will give you beautifully cooked cookies every time.
Next, be mindful of the batter consistency. The batter should be thick but pourable. If it’s too runny, your pizzelles may spread too much and lose their shape. Conversely, if it’s too thick, they may not cook evenly. Aim for a smooth, thick batter that holds its shape when dropped onto the pizzelle maker.
Additionally, don’t overcrowd the pizzelle maker. Each pizzelle needs space to expand as it cooks. If you pour too much batter, they may stick together or not cook properly. Stick to the recommended amount of batter for each mold, usually about 1 tablespoon.
Timing is also key. Keep an eye on your pizzelles as they cook. Depending on your pizzelle maker, cooking times can vary. Start with 30 seconds and check for doneness. You want them to be crisp and lightly browned. If they need more time, close the lid and check again in 10-second intervals.
Finally, allow the pizzelles to cool completely on a wire rack. This step is essential for maintaining their crisp texture. If you stack them while they’re still warm, they may become soggy. Cooling them properly will ensure that delightful crunch when you bite into them.
By following these cooking notes, you’ll be well on your way to creating perfect chocolate pizzelles with cannoli filling. Enjoy the process, and don’t hesitate to experiment with your technique to find what works best for you!
Serving Suggestions for Chocolate Pizzelles with Cannoli Filling
When it comes to serving chocolate pizzelles with cannoli filling, presentation is key! These delightful treats not only taste amazing but also look stunning on any dessert table. Here are some creative serving suggestions to elevate your dessert experience:
Plating Ideas
- Stacked Presentation: Create a beautiful stack of filled pizzelles on a decorative plate. You can alternate layers with fresh fruit or whipped cream for added color and flavor.
- Dusting with Powdered Sugar: Just before serving, lightly dust the filled pizzelles with powdered sugar. This adds a touch of elegance and enhances their visual appeal.
- Chocolate Drizzle: Drizzle melted chocolate over the filled pizzelles for a decadent touch. Use dark, milk, or white chocolate to complement the flavors.
- Garnish with Fresh Berries: Serve the pizzelles alongside fresh berries like strawberries, raspberries, or blueberries. The tartness of the berries balances the sweetness of the filling.
Pairing Suggestions
To enhance the overall experience, consider pairing your chocolate pizzelles with complementary beverages:
- Coffee or Espresso: A rich cup of coffee or a shot of espresso pairs perfectly with the chocolate pizzelles. The bitterness of the coffee balances the sweetness of the dessert.
- Sweet Dessert Wine: A glass of sweet dessert wine, like Moscato or Vin Santo, can elevate the flavors and add a touch of sophistication.
- Milk or Hot Chocolate: For a comforting treat, serve the pizzelles with a glass of cold milk or a warm cup of hot chocolate. This combination is sure to please both kids and adults alike!
These serving suggestions will not only make your chocolate pizzelles with cannoli filling look irresistible but also enhance the overall dining experience. Whether it’s a special occasion or a casual gathering, these delightful treats are sure to impress your guests!
Tips for Perfect Chocolate Pizzelles with Cannoli Filling
Creating the perfect chocolate pizzelles with cannoli filling is an art that can be mastered with a few helpful tips. These pointers will ensure that your pizzelles turn out deliciously crisp and your filling is creamy and flavorful. Let’s explore some essential tips to elevate your dessert-making skills!
Use Fresh Ingredients
Always use fresh ingredients for the best flavor. Check the expiration dates on your baking powder and cocoa powder. Fresh ingredients will enhance the taste and texture of your pizzelles and filling.
Measure Accurately
Accurate measurements are crucial in baking. Use measuring cups and spoons for dry and wet ingredients. This ensures that your batter has the right consistency, leading to perfectly cooked pizzelles.
Don’t Overmix the Batter
When combining the wet and dry ingredients, mix just until combined. Overmixing can lead to tough pizzelles. A few lumps are okay; they will smooth out during cooking.
Experiment with Cooking Time
Every pizzelle maker is different. Start with the recommended cooking time, but feel free to adjust it based on your machine. Check your pizzelles frequently to avoid burning.
Cool Completely Before Filling
Allow your pizzelles to cool completely on a wire rack before filling them. This step is essential for maintaining their crispness. If you fill them while warm, they may become soggy.
Use a Piping Bag for Filling
For a neat and easy filling process, use a piping bag. This allows you to control the amount of filling in each pizzelle and prevents mess. If you don’t have a piping bag, a zip-top bag with a corner snipped off works well too!
Store Properly
If you have leftovers, store the filled pizzelles in an airtight container in the refrigerator. This keeps them fresh. However, for the best texture, it’s recommended to fill them just before serving.
By following these tips, you’ll be well on your way to creating perfect chocolate pizzelles with cannoli filling every time. Enjoy the process and share your delicious creations with friends and family!
Breakdown of Time for Chocolate Pizzelles with Cannoli Filling
Understanding the time required for each step in making chocolate pizzelles with cannoli filling can help you plan your baking session effectively. Here’s a detailed breakdown of the time you’ll need for preparation, cooking, and the total time involved in creating this delightful dessert.
Prep Time
The prep time for chocolate pizzelles with cannoli filling is approximately 20 to 30 minutes. This includes gathering your ingredients, measuring them accurately, and preparing the pizzelle batter and cannoli filling. Taking your time during this stage ensures that everything is ready for cooking, leading to a smoother process.
Cooking Time
Cooking the pizzelles will take about 15 to 20 minutes. Depending on your pizzelle maker, you can cook multiple pizzelles at once, which speeds up the process. Each batch typically takes around 30 to 60 seconds to cook. Keep an eye on them to achieve that perfect crispness!
Total Time
In total, you can expect to spend about 35 to 50 minutes from start to finish. This includes both prep and cooking times. If you plan to chill the filled pizzelles before serving, you may want to add additional time for refrigeration. However, the hands-on time remains relatively short, making this dessert a quick yet impressive option for any occasion.
Nutritional Information for Chocolate Pizzelles with Cannoli Filling
Understanding the nutritional information of chocolate pizzelles with cannoli filling can help you enjoy this delightful dessert while keeping track of your dietary needs. Here’s a breakdown of the key nutritional components per serving:
Calories
Each serving of chocolate pizzelles with cannoli filling contains approximately 150 calories. This makes them a satisfying treat without being overly indulgent. The combination of rich chocolate and creamy filling provides a delightful balance of flavors that can satisfy your sweet tooth.
Protein
In terms of protein, each serving offers about 4 grams. The ricotta cheese in the cannoli filling contributes to this protein content, making these pizzelles not just a sweet treat but also a source of essential nutrients. Protein is important for muscle repair and overall health, so you can enjoy these pizzelles guilt-free!
Sodium
The sodium content in each serving is relatively low, making it a heart-friendly option. With approximately 100 milligrams of sodium per serving, these chocolate pizzelles with cannoli filling can fit well into a balanced diet. Keeping sodium levels in check is important for maintaining healthy blood pressure and overall wellness.
By being aware of the nutritional information, you can enjoy your chocolate pizzelles with cannoli filling while making informed choices. Whether you’re treating yourself or sharing with friends, these delightful desserts are sure to please!
FAQs about Chocolate Pizzelles with Cannoli Filling
Can I make Chocolate Pizzelles with Cannoli Filling ahead of time?
Yes, you can make chocolate pizzelles with cannoli filling ahead of time! The pizzelles can be prepared and stored in an airtight container for up to a week. However, it’s best to fill them just before serving. This way, they will maintain their crisp texture. If you fill them too early, they may become soft. You can prepare the cannoli filling in advance and store it in the refrigerator until you’re ready to assemble the pizzelles.
What can I substitute for ricotta in the cannoli filling?
If you don’t have ricotta cheese, there are several great substitutes you can use for the cannoli filling. Cream cheese is a popular option, as it provides a similar creamy texture. You can also use mascarpone cheese for a richer flavor. For a lighter option, consider using Greek yogurt mixed with a bit of powdered sugar. Each substitute will give a unique taste, so feel free to experiment!
How do I store leftover Chocolate Pizzelles with Cannoli Filling?
To store leftover chocolate pizzelles with cannoli filling, place them in an airtight container in the refrigerator. This will help keep them fresh for a few days. However, for the best texture, it’s recommended to fill the pizzelles just before serving. If you have unfilled pizzelles, they can be stored at room temperature in a cool, dry place for up to a week.
Can I freeze Chocolate Pizzelles with Cannoli Filling?
Yes, you can freeze chocolate pizzelles with cannoli filling! To do this, place the filled pizzelles in a single layer on a baking sheet and freeze them until solid. Then, transfer them to an airtight container or freezer bag. They can be stored in the freezer for up to three months. When you’re ready to enjoy them, simply thaw them in the refrigerator or at room temperature. Keep in mind that the texture may change slightly after freezing, but they will still be delicious!
Conclusion on Chocolate Pizzelles with Cannoli Filling
In conclusion, chocolate pizzelles with cannoli filling are a delightful fusion of flavors and textures that can elevate any dessert table. These treats are not only visually stunning but also incredibly satisfying to eat. The crispness of the chocolate pizzelles perfectly complements the creamy, sweet cannoli filling, creating a harmonious balance that is hard to resist.
Whether you’re preparing them for a special occasion or simply indulging in a sweet treat at home, these pizzelles are sure to impress. The versatility of the recipe allows for endless variations, making it easy to customize to your taste. From alternative fillings to different pizzelle flavors, the possibilities are truly endless.
As you embark on your baking journey, remember the tips and techniques shared throughout this article. They will help you achieve the perfect pizzelles every time. Don’t hesitate to experiment and make this recipe your own. After all, the joy of baking lies in creativity and personal touch!
So gather your ingredients, fire up your pizzelle maker, and get ready to create a dessert that will leave everyone asking for seconds. Enjoy the process, and most importantly, savor every delicious bite of your chocolate pizzelles with cannoli filling!
Chocolate Pizzelles with Cannoli Filling
Ingredients
Equipment
Method
- Prepare the pizzelle batter by whisking together flour, cocoa powder, baking powder, and salt. In another bowl, beat eggs and sugar until light and fluffy. Add melted butter, vanilla, and almond extract, then mix in dry ingredients until smooth.
- Preheat the pizzelle maker and lightly grease if necessary. Pour 1 tablespoon of batter into each mold and cook for 30 to 60 seconds until crisp. Remove and cool on a wire rack.
- Prepare the cannoli filling by mixing ricotta, powdered sugar, and vanilla until smooth. Fold in chocolate chips and pistachios.
- Fill each cooled pizzelle with the cannoli mixture using a piping bag or spoon. Serve immediately or refrigerate until ready to serve.