
Introduction to Cherry Pistachio Cheesecake Recipe
Cherry Pistachio Cheesecake Recipe is not just a dessert; it’s an experience that tantalizes your taste buds and impresses your guests. Whether you’re celebrating a special occasion or simply indulging in a sweet craving, this cheesecake is sure to be a hit.
What Makes the Cherry Pistachio Cheesecake Unique?
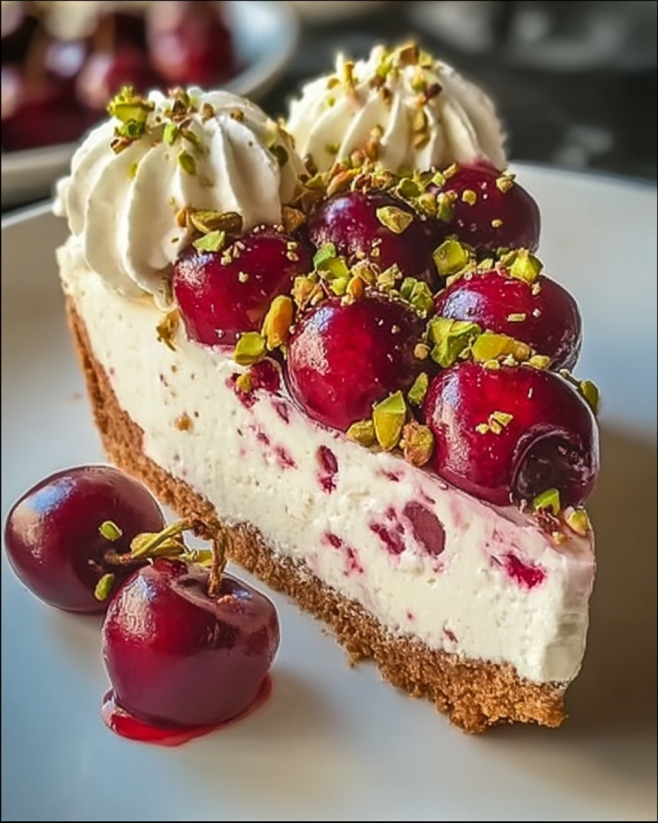
What sets this cheesecake apart from the rest? First, the combination of cherries and pistachios creates a beautiful contrast in flavor and texture. The sweet and tart cherries complement the creamy cheesecake perfectly, while the pistachios add a delightful crunch. This unique pairing not only enhances the taste but also adds a pop of color, making it visually appealing.
Cherry Pistachio Cheesecake Recipe is versatile. You can easily customize it to suit your preferences. Want a lighter version? Swap in low-fat cream cheese and sour cream. Prefer fresh fruit? Use ripe cherries instead of pie filling. The possibilities are endless!
In addition, this cheesecake is a crowd-pleaser. It serves beautifully at gatherings, parties, or family dinners. Each slice is a little piece of heaven that leaves everyone wanting more. So, let’s get started on this delicious journey and learn how to create this stunning dessert!
Ingredients for Cherry Pistachio Cheesecake Recipe
Cherry Pistachio Cheesecake Recipe, you’ll need a selection of fresh and flavorful ingredients. Each component plays a vital role in achieving that perfect balance of taste and texture. Here’s what you’ll need:
- 1 ½ cups graham cracker crumbs
- ½ cup unsalted butter, melted
- 2 tablespoons granulated sugar
- 16 ounces cream cheese, softened
- ½ cup granulated sugar
- 1 teaspoon vanilla extract
- 2 large eggs
- 1 cup sour cream
- 1 cup cherry pie filling
- ½ cup shelled pistachios, chopped
These ingredients come together to create a rich and creamy cheesecake that is both satisfying and delicious. The graham cracker crumbs form a buttery crust that perfectly complements the smooth filling. The cream cheese provides that classic cheesecake flavor, while the cherry pie filling adds a burst of fruity sweetness. Finally, the chopped pistachios introduce a crunchy texture that elevates the entire dessert.
Before you start baking, make sure to gather all your ingredients. Having everything ready will make the preparation process smoother and more enjoyable. Now that you have your ingredients, let’s move on to the next step: preparing the crust!
Step-by-Step Preparation of Cherry Pistachio Cheesecake Recipe
Cherry Pistachio Cheesecake Recipe. Follow these simple steps to create a delicious cheesecake that will impress everyone!
Step 1: Preparing the Crust
1 ½ cups of graham cracker crumbs, ½ cup of melted unsalted butter, and 2 tablespoons of granulated sugar. Mix these ingredients together until they are well combined. The mixture should resemble wet sand.
9-inch springform pan. Make sure to spread it evenly to create a solid base for your cheesecake. Once you’ve pressed it down, bake the crust in a preheated oven at 325°F for about 10 minutes. This step helps to set the crust and gives it a nice golden color. After baking, remove it from the oven and let it cool slightly.
Step 2: Making the Cheesecake Filling
16 ounces of softened cream cheese with ½ cup of granulated sugar until the mixture is smooth and creamy. This may take a few minutes, so be patient!
1 teaspoon of vanilla extract and mix well. Then, add the 2 large eggs one at a time, mixing thoroughly after each addition. Finally, stir in 1 cup of sour cream until everything is fully incorporated. Your cheesecake filling should be rich and velvety at this point.
Step 3: Incorporating Cherry and Pistachio Flavors
1 cup of cherry pie filling and drop spoonfuls over the top of the cheesecake batter. Use a knife to gently swirl the cherry filling into the cheesecake. This creates beautiful marbled patterns and infuses the cheesecake with cherry flavor.
½ cup of chopped pistachios evenly over the top. The pistachios not only add flavor but also a delightful crunch that contrasts beautifully with the creamy filling.
Step 4: Baking the Cheesecake
50-60 minutes. You’ll know it’s done when the edges are set, but the center is still slightly jiggly. This slight jiggle is key to achieving that perfect creamy texture.
Once baked, turn off the oven and leave the cheesecake inside for an additional hour. This gradual cooling helps prevent cracks from forming on the surface.
Step 5: Cooling and Setting the Cheesecake
4 hours, or overnight if you can wait! This chilling time allows the cheesecake to fully set and develop its flavors.
When you’re ready to serve, carefully remove the sides of the springform pan. Slice your cheesecake and enjoy the delightful combination of cherry and pistachio flavors!
Variations of Cherry Pistachio Cheesecake Recipe
Cherry Pistachio Cheesecake Recipe is a fantastic base that allows for plenty of creativity. If you’re looking to switch things up, consider these delicious variations. They can add new flavors and textures, making your cheesecake even more exciting!
Alternative Fruit Toppings
While cherries are a classic choice, there are many other fruits that can elevate your cheesecake. Here are some tasty alternatives:
- Blueberries: Fresh or cooked blueberries can add a sweet and tangy flavor. They pair wonderfully with the creamy filling.
- Raspberries: Their tartness complements the sweetness of the cheesecake, creating a delightful balance.
- Strawberries: Sliced fresh strawberries can add a burst of color and sweetness. You can even make a strawberry sauce to drizzle on top!
- Peaches: Fresh or canned peaches can bring a juicy sweetness that works beautifully with the creamy texture.
Feel free to mix and match these fruits with the pistachios for a unique twist on your cheesecake!
Different Nut Options
If you want to change the nutty flavor of your cheesecake, there are several options to consider. Each nut brings its own unique taste and texture:
- Almonds: Chopped almonds can add a lovely crunch and a slightly sweet flavor. They also pair well with the cherry topping.
- Walnuts: These nuts have a rich, earthy flavor that can enhance the overall taste of the cheesecake.
- Hazelnuts: Chopped hazelnuts can add a delightful nuttiness and a hint of sweetness, making your cheesecake even more indulgent.
- Pecans: Their buttery flavor can complement the creaminess of the cheesecake, creating a rich experience.
Cherry Pistachio Cheesecake Recipe. So, don’t hesitate to get creative and find your favorite combination!
Cooking Note for Cherry Pistachio Cheesecake Recipe
Cherry Pistachio Cheesecake Recipe, a few cooking notes can make all the difference. These tips will help ensure that your cheesecake turns out creamy, delicious, and visually appealing.
First, always use room temperature ingredients. This includes the cream cheese, eggs, and sour cream. Room temperature ingredients blend more easily, resulting in a smoother filling. If you forget to take them out in advance, you can place the cream cheese in a microwave for about 10-15 seconds to soften it quickly.
Next, be mindful of the baking time. Every oven is different, so keep an eye on your cheesecake as it bakes. The edges should be set, while the center remains slightly jiggly. This slight jiggle is crucial for a creamy texture. If you notice the edges browning too much, you can cover the cheesecake with aluminum foil to prevent over-baking.
Additionally, consider using a water bath for baking. This method helps maintain moisture in the oven, preventing cracks on the surface of your cheesecake. To create a water bath, wrap the outside of your springform pan with aluminum foil to prevent leaks. Place the pan in a larger baking dish filled with hot water, and then bake as directed.
Lastly, patience is key! Allow your cheesecake to cool gradually in the oven after baking. This step helps prevent sudden temperature changes that can cause cracks. Once cooled, refrigerate it for the recommended time to let the flavors meld and the texture set properly.
Cherry Pistachio Cheesecake that will impress everyone at your next gathering!
Serving Suggestions for Cherry Pistachio Cheesecake Recipe
Cherry Pistachio Cheesecake Recipe is ready, it’s time to think about how to serve it. The right presentation and beverage pairings can elevate your dessert experience. Here are some delightful suggestions to make your cheesecake shine!
Ideal Pairings with Beverages
Choosing the right beverage can enhance the flavors of your cheesecake. Here are some excellent options:
- Coffee: A rich cup of coffee pairs beautifully with the creamy cheesecake. The bitterness of the coffee balances the sweetness of the dessert.
- Tea: Herbal teas, like chamomile or mint, can provide a refreshing contrast. Green tea also works well, adding a light, earthy flavor.
- Red Wine: A glass of fruity red wine, such as Merlot or Pinot Noir, complements the cherry flavors in the cheesecake.
- Sparkling Water: For a non-alcoholic option, sparkling water with a slice of lemon or lime can cleanse the palate and enhance the dessert experience.
Feel free to experiment with different beverages to find your perfect pairing. Each sip can bring out new flavors in your cheesecake!
Presentation Tips for Serving
Cherry Pistachio Cheesecake. Here are some tips to make it visually appealing:
- Garnish: Add a few fresh cherries or a sprinkle of chopped pistachios on top for a pop of color. A dollop of whipped cream can also add a touch of elegance.
- Slice Neatly: Use a sharp knife to cut clean slices. Wipe the knife with a damp cloth between cuts for perfect presentation.
- Serve on a Beautiful Plate: Choose a decorative plate that complements the colors of your cheesecake. A white plate can make the vibrant colors of the cherries and pistachios stand out.
- Drizzle Sauce: Consider drizzling a cherry or chocolate sauce around the plate for an artistic touch. This adds flavor and makes the dessert look gourmet.
Cherry Pistachio Cheesecake Recipe will not only taste amazing but also look stunning on the table. Enjoy sharing this delightful dessert with family and friends!
Tips for Perfecting Your Cherry Pistachio Cheesecake Recipe
Cherry Pistachio Cheesecake Recipe is an art that requires attention to detail. Here are some valuable tips to help you achieve a cheesecake that is not only delicious but also visually stunning.
First, always preheat your oven. This ensures that your cheesecake bakes evenly from the start. A properly heated oven helps set the crust and filling, preventing any unwanted texture issues.
Next, consider using a springform pan. This type of pan allows for easy removal of the cheesecake without damaging its delicate structure. Make sure to line the bottom with parchment paper for added ease when serving.
When mixing your ingredients, avoid overmixing. While you want a smooth filling, overmixing can incorporate too much air, leading to cracks during baking. Mix just until combined for the best results.
Additionally, let your cheesecake cool gradually. After baking, turn off the oven and crack the door open. This gradual cooling process helps prevent sudden temperature changes that can cause cracks on the surface.
For a creamier texture, consider using a food processor to blend your filling. This method ensures that all ingredients are thoroughly combined, resulting in a silky smooth cheesecake.
Lastly, don’t rush the chilling process. Allow your cheesecake to set in the refrigerator for at least four hours, or overnight if possible. This time allows the flavors to meld beautifully and the texture to firm up perfectly.
Cherry Pistachio Cheesecake Recipe. Your friends and family will be amazed by your baking skills!
Breakdown of Time for Cherry Pistachio Cheesecake Recipe
Prep Time
Cherry Pistachio Cheesecake Recipe is a delightful process that requires some time. The prep time typically takes about 30 minutes. This includes gathering your ingredients, making the crust, and preparing the cheesecake filling. Taking your time during this stage ensures that everything is mixed well and ready for baking.
Cooking Time
50-60 minutes. After baking, it’s important to let the cheesecake cool in the oven for an additional hour. This gradual cooling helps prevent cracks and ensures a creamy consistency.
Total Time
2 hours and 30 minutes on the entire process, including prep and cooking time. However, remember that you will need to refrigerate the cheesecake for at least 4 hours (or overnight) to allow it to set properly. So, while the active time is relatively short, the waiting time is essential for the best results!
Nutritional Information for Cherry Pistachio Cheesecake Recipe
Cherry Pistachio Cheesecake Recipe can help you enjoy this delicious dessert while keeping track of your dietary needs. Here’s a breakdown of the key nutritional components per serving, which is based on a total of 8 servings.
Calories
320 calories. This calorie count includes the rich ingredients like cream cheese and sour cream, which contribute to the creamy texture and flavor. While it’s a treat, it’s important to enjoy it in moderation!
Protein Content
6 grams. The cream cheese and eggs are the primary sources of protein in this cheesecake. Protein is essential for building and repairing tissues, making this dessert a satisfying option when enjoyed as part of a balanced diet.
Sodium Levels
Cherry Pistachio Cheesecake Recipe contains around 250 milligrams of sodium per serving. This level is fairly moderate, but if you’re watching your sodium intake, consider using low-sodium ingredients where possible. For instance, you can opt for low-sodium butter or cream cheese alternatives.
Overall, this cheesecake is a delicious indulgence that can fit into a variety of dietary plans. Just remember to savor each bite and enjoy the wonderful flavors of cherries and pistachios!
FAQs about Cherry Pistachio Cheesecake Recipe
Can I use frozen cherries for the Cherry Pistachio Cheesecake Recipe?
Cherry Pistachio Cheesecake Recipe. Just make sure to thaw them first and drain any excess liquid. This will help prevent your cheesecake from becoming too watery. Frozen cherries can be just as delicious as fresh ones, and they can add a lovely flavor to your dessert!
How do I store leftover Cherry Pistachio Cheesecake?
Cherry Pistachio Cheesecake is easy! Simply cover the cheesecake with plastic wrap or aluminum foil to keep it fresh. You can also place it in an airtight container. Store it in the refrigerator, where it will stay good for about 3 to 5 days. If you want to keep it longer, consider freezing individual slices. Just wrap them tightly and place them in a freezer-safe container. They can last for up to 2 months in the freezer!
Can I make the Cherry Pistachio Cheesecake ahead of time?
Cherry Pistachio Cheesecake ahead of time is a great idea! In fact, it’s often better to prepare it a day in advance. This allows the flavors to meld and the cheesecake to set properly. Just remember to refrigerate it after it cools to room temperature. When you’re ready to serve, simply remove it from the fridge, slice, and enjoy!
What can I substitute for cream cheese in the Cherry Pistachio Cheesecake Recipe?
Cherry Pistachio Cheesecake Recipe, there are a few options. You can use mascarpone cheese for a rich and creamy texture. Another option is to use ricotta cheese, but it may result in a slightly different texture. For a dairy-free alternative, consider using cashew cream or a vegan cream cheese. Just keep in mind that the flavor and texture may vary slightly with these substitutes!
Conclusion on Cherry Pistachio Cheesecake Recipe
Cherry Pistachio Cheesecake Recipe is a delightful dessert that brings together the best of both worlds: creamy cheesecake and vibrant fruit flavors. This recipe not only satisfies your sweet tooth but also impresses with its beautiful presentation and unique taste. Whether you’re hosting a gathering or simply treating yourself, this cheesecake is sure to be a crowd-pleaser.
As you’ve learned, the process of making this cheesecake is straightforward and enjoyable. From preparing the buttery graham cracker crust to swirling in the cherry filling and sprinkling the crunchy pistachios, each step is a chance to create something special. Plus, with the variations and tips provided, you can easily customize the recipe to suit your preferences or dietary needs.
Remember, the key to a perfect cheesecake lies in patience and attention to detail. Allowing it to cool gradually and refrigerating it properly will ensure a smooth and creamy texture. So, don’t rush the process—good things come to those who wait!
Cherry Pistachio Cheesecake Recipe. With its rich flavors and delightful textures, it’s bound to become a favorite in your dessert repertoire. Enjoy every slice, and don’t forget to share the joy with family and friends!
Cherry Pistachio Cheesecake
Ingredients
Equipment
Method
- Preheat the oven to 325°F.
- In a medium bowl, combine graham cracker crumbs, melted butter, and 2 tablespoons of sugar. Mix until well combined.
- Press the mixture firmly into the bottom of a 9-inch springform pan to form the crust.
- Bake crust for 10 minutes, then remove from the oven and let cool slightly.
- In a large mixing bowl, beat the softened cream cheese with ½ cup of sugar until smooth and creamy.
- Add the vanilla extract and mix well.
- Add the eggs one at a time, mixing well after each addition.
- Stir in the sour cream until fully incorporated.
- Pour the cream cheese mixture over the cooled crust in the springform pan.
- Drop spoonfuls of cherry pie filling over the top.
- Use a knife to gently swirl the cherry pie filling into the cheesecake batter.
- Sprinkle the chopped pistachios evenly over the top.
- Bake the cheesecake for 50-60 minutes, or until the edges are set and the center is slightly jiggly.
- Turn off the oven and leave the cheesecake inside for an additional hour to cool gradually.
- Remove from the oven and let cool to room temperature.
- Refrigerate for at least 4 hours, or overnight, to fully set.
- To serve, carefully remove the sides of the springform pan.