
Introduction to Red Velvet Cake Pops
What Are Red Velvet Cake Pops?
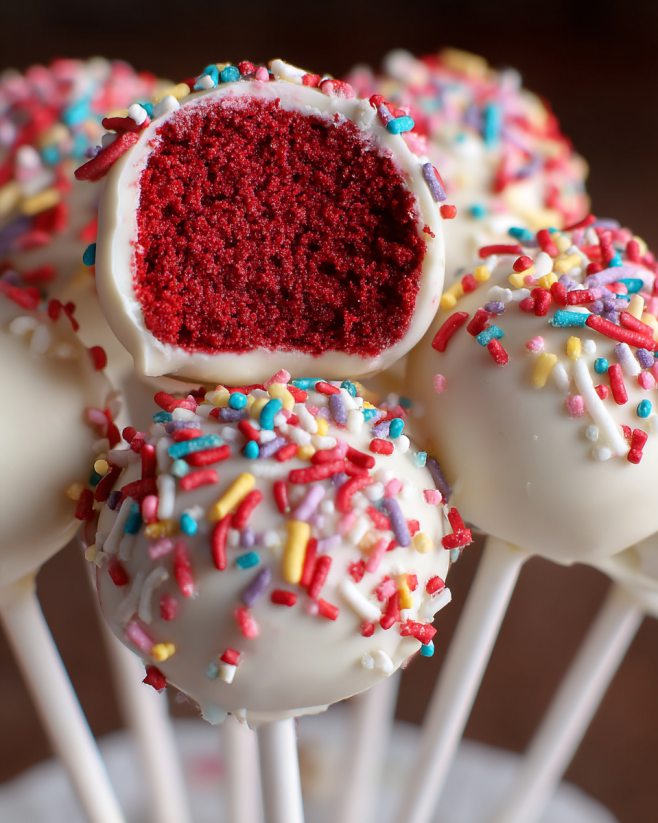
Red Velvet Cake Pops are delightful treats that combine the rich flavors of red velvet cake with the fun of cake pops. These bite-sized desserts are made by crumbling a baked red velvet cake and mixing it with cream cheese frosting. The mixture is then rolled into small balls, dipped in melted chocolate, and decorated with sprinkles or edible glitter. They are perfect for parties, celebrations, or just a sweet snack at home. With their vibrant red color and creamy center, Red Velvet Cake Pops are sure to impress anyone who tries them!
The History of Red Velvet Cake
The history of red velvet cake is as rich as its flavor. This cake has roots that trace back to the early 20th century. Originally, it was a simple chocolate cake with a hint of cocoa powder, which gave it a subtle red hue. The addition of buttermilk and vinegar not only enhanced the flavor but also created a unique texture. Over time, the cake became popular in the Southern United States, especially during the 1920s and 1930s.
Interestingly, the red color became more pronounced due to the use of cocoa powder that reacted with acidic ingredients. This led to the cake being dubbed “red velvet.” The cake gained even more fame when it was featured in the 1989 movie “Steel Magnolias.” Since then, it has become a beloved dessert, often served at weddings and special occasions. Today, Red Velvet Cake Pops bring this classic dessert into a fun, portable form that everyone can enjoy!
Ingredients for Red Velvet Cake Pops
Creating stunning Red Velvet Cake Pops requires a few simple ingredients. Each component plays a vital role in achieving that delicious flavor and beautiful appearance. Here’s what you’ll need:
- 2 cups red velvet cake crumbs: This is the base of your cake pops. You can use leftover cake from a baked 9-inch round red velvet cake.
- 1 cup cream cheese frosting: This adds moisture and sweetness, binding the cake crumbs together.
- 8 ounces white chocolate: Chopped into small pieces, this will be melted and used for coating the cake pops.
- 1 tablespoon vegetable oil: This helps to thin the melted chocolate, making it easier to dip the cake pops.
- Sprinkles or edible glitter: These are for decoration, adding a festive touch to your cake pops.
- Lollipop sticks: Essential for holding the cake pops, these sticks make them easy to enjoy!
With these ingredients on hand, you’re ready to embark on your cake pop-making adventure. Each item contributes to the overall taste and presentation, ensuring your Red Velvet Cake Pops are not only delicious but also visually appealing!
Step-by-Step Preparation of Red Velvet Cake Pops
Step 1: Baking the Red Velvet Cake
To start, you need to bake a delicious red velvet cake. Preheat your oven to 350°F (175°C). Grease and flour a 9-inch round cake pan. In a large bowl, mix together the dry ingredients, including flour, cocoa powder, baking soda, and salt. In another bowl, combine the wet ingredients, such as sugar, vegetable oil, eggs, buttermilk, and vanilla extract. Add red food coloring to achieve that vibrant hue. Gradually mix the dry ingredients into the wet mixture until smooth. Pour the batter into the prepared pan and bake for about 30-35 minutes. Once done, let it cool completely before crumbling.
Step 2: Crumbling the Cake
Once your red velvet cake has cooled, it’s time to crumble it. Carefully remove the cake from the pan and place it on a large plate or cutting board. Using your hands or a fork, break the cake into fine crumbs. Aim for a texture that resembles sand. This step is crucial, as the finer the crumbs, the better they will mix with the frosting. Make sure there are no large chunks left, as they can affect the shape of your cake pops.
Step 3: Mixing with Frosting
Now, take your crumbled cake and place it in a large mixing bowl. Add the cream cheese frosting to the crumbs. Using your hands or a spatula, mix everything together until fully combined. The mixture should be moist and hold together when pressed. If it feels too dry, add a little more frosting. This step is essential for creating the perfect texture for your cake pops!
Step 4: Forming the Cake Balls
With your mixture ready, it’s time to form the cake balls. Take a small amount of the mixture and roll it into a ball about 1 inch in diameter. Place each ball on a baking sheet lined with parchment paper. Repeat this process until all the mixture is used. Once you have formed all the cake balls, refrigerate them for at least 1 hour. Chilling helps them firm up, making them easier to dip later.
Step 5: Melting the Coating
While the cake balls chill, prepare the coating. In a microwave-safe bowl, add the chopped white chocolate. Heat it in the microwave in 30-second intervals, stirring in between, until it’s completely melted and smooth. To make the chocolate easier to work with, stir in 1 tablespoon of vegetable oil. This will help thin the chocolate, making it perfect for dipping your cake pops.
Step 6: Dipping and Decorating the Cake Pops
Now comes the fun part! Remove the chilled cake balls from the refrigerator. Dip the end of each lollipop stick into the melted chocolate, then insert it into the center of a cake ball. This helps secure the stick in place. Next, dip each cake pop into the melted chocolate, allowing any excess to drip off. Before the chocolate sets, sprinkle with your choice of decorations, like sprinkles or edible glitter. Finally, place the finished cake pops upright in a styrofoam block or a cup to dry completely. Let them sit at room temperature for about 30 minutes until the chocolate hardens.
Variations of Red Velvet Cake Pops
Different Coating Options
While white chocolate is a classic choice for coating your Red Velvet Cake Pops, there are many other delicious options to explore. Each coating can add a unique flavor and visual appeal to your treats. Here are some popular alternatives:
- Dark Chocolate: For a richer taste, try dipping your cake pops in dark chocolate. The slight bitterness of dark chocolate pairs beautifully with the sweetness of red velvet.
- Milk Chocolate: If you prefer a sweeter option, milk chocolate is a great choice. It adds a creamy texture and a delightful sweetness that complements the cake.
- Colored Chocolate Melts: For a fun twist, use colored chocolate melts. You can find them in various colors, allowing you to match your cake pops to any theme or occasion.
- Caramel Coating: For a decadent treat, consider a caramel coating. Melt caramel candies and dip your cake pops for a sweet and gooey finish.
Experimenting with different coatings can make your Red Velvet Cake Pops even more exciting. Each option brings its own flavor and style, making them perfect for any celebration!
Flavor Variations
Red Velvet Cake Pops are versatile, and you can easily switch up the flavors to suit your taste. Here are some fun flavor variations to try:
- Chocolate Cake Pops: Substitute red velvet cake with chocolate cake for a rich, chocolatey treat. Pair it with chocolate frosting for an extra indulgent experience.
- Vanilla Cake Pops: For a lighter option, use vanilla cake instead. This allows the cream cheese frosting to shine through, creating a delightful balance.
- Carrot Cake Pops: For a twist on the classic, use carrot cake. The spices in the cake add warmth and depth, making for a unique dessert.
- Funfetti Cake Pops: Add colorful sprinkles to your cake batter for a funfetti version. This adds a festive touch and a burst of flavor in every bite!
These flavor variations can make your Red Velvet Cake Pops a hit at any gathering. Whether you stick with the classic red velvet or try something new, your guests will love these delightful treats!
Cooking Note for Red Velvet Cake Pops
When making Red Velvet Cake Pops, a few cooking notes can help ensure your treats turn out perfectly. First, always use high-quality ingredients. Fresh cream cheese frosting and good-quality chocolate will enhance the flavor of your cake pops. If you’re using a cake mix, check the expiration date to ensure the best results.
Next, be mindful of the temperature when melting chocolate. Overheating can cause the chocolate to seize, making it difficult to dip your cake pops. Stirring frequently while melting helps maintain a smooth consistency. If you find your chocolate is too thick, adding a bit more vegetable oil can help thin it out.
Additionally, when rolling the cake balls, make sure they are uniform in size. This ensures even coating and a consistent look. If the mixture feels too sticky, you can lightly coat your hands with a bit of vegetable oil to make rolling easier.
Lastly, patience is key! Allow the cake pops to chill properly before dipping. This helps them hold their shape and prevents them from falling apart in the melted chocolate. Once dipped, let them sit undisturbed until the chocolate hardens completely. Following these cooking notes will help you create stunning Red Velvet Cake Pops that are not only delicious but also visually appealing!
Serving Suggestions for Red Velvet Cake Pops
Red Velvet Cake Pops are not just delicious; they are also visually stunning! Their vibrant color and festive appearance make them perfect for various occasions. Here are some creative serving suggestions to elevate your cake pop experience:
- Party Platters: Arrange your cake pops on a decorative platter. You can mix and match different coatings and flavors for a colorful display. This makes for an eye-catching centerpiece at birthday parties, baby showers, or holiday gatherings.
- Gift Treats: Package individual cake pops in clear cellophane bags tied with colorful ribbons. These make delightful gifts for friends, family, or coworkers. They are perfect for special occasions like Valentine’s Day or as a sweet thank-you gesture.
- Buffet Style: Set up a cake pop station at your event. Provide various toppings, such as crushed nuts, coconut flakes, or colored sprinkles. Guests can customize their cake pops, making it a fun and interactive experience!
- On-the-Go Snacks: For a quick treat, serve cake pops in cups or small containers. This makes them easy to grab and enjoy while on the move. They are perfect for picnics, road trips, or school lunches.
- Seasonal Themes: Decorate your cake pops according to the season or holiday. For example, use red and green sprinkles for Christmas or pastel colors for Easter. This adds a festive touch and makes them suitable for any celebration.
With these serving suggestions, your Red Velvet Cake Pops will not only taste amazing but also look fantastic. Whether you’re hosting a party or simply enjoying them at home, these ideas will help you present your treats in style!
Tips for Perfect Red Velvet Cake Pops
Creating the perfect Red Velvet Cake Pops can be a fun and rewarding experience. However, a few tips can help you achieve the best results. Here are some essential tips to keep in mind:
- Use Fresh Ingredients: Always opt for fresh ingredients, especially when it comes to your cake and frosting. Fresh cream cheese frosting will enhance the flavor and texture of your cake pops.
- Chill the Cake Balls: After forming the cake balls, chilling them is crucial. This step helps them firm up, making them easier to dip in chocolate without falling apart.
- Don’t Overheat the Chocolate: When melting chocolate, do it slowly. Heat in short intervals and stir frequently. Overheating can cause the chocolate to seize, ruining your coating.
- Use a Styrofoam Block: To let your cake pops dry, use a styrofoam block or a cup. This keeps them upright and prevents them from touching each other, ensuring a clean finish.
- Experiment with Decorations: Get creative with your decorations! Use different types of sprinkles, edible glitter, or even drizzle contrasting chocolate over the pops for a beautiful effect.
- Keep the Size Consistent: When rolling the cake balls, aim for uniform size. This ensures even coating and a professional look. A small cookie scoop can help with this.
- Practice Patience: Allow the chocolate to set completely before moving the cake pops. This prevents smudging and helps maintain their beautiful appearance.
- Try Different Flavors: Don’t hesitate to experiment with different cake flavors and frostings. This can lead to exciting new combinations that everyone will love!
By following these tips, you’ll be well on your way to creating stunning Red Velvet Cake Pops that are not only delicious but also visually appealing. Enjoy the process and have fun sharing your delightful treats with friends and family!
Breakdown of Time for Red Velvet Cake Pops
Prep Time
Preparing Red Velvet Cake Pops is a delightful process that requires some time. The prep time mainly involves baking the cake, crumbling it, and mixing it with frosting. Here’s a quick breakdown:
- Baking the Red Velvet Cake: Approximately 30-35 minutes.
- Cooling the Cake: Allow at least 30 minutes for the cake to cool completely.
- Crumbling and Mixing: This should take about 15-20 minutes.
- Forming the Cake Balls: Expect to spend around 15 minutes rolling the mixture into balls.
In total, the prep time is roughly 1 hour and 30 minutes, including baking and cooling.
Cooking Time
The cooking time for Red Velvet Cake Pops is minimal once the cake is baked. The main cooking time involves melting the chocolate and dipping the cake balls. Here’s how it breaks down:
- Melting the Chocolate: This takes about 5-10 minutes, depending on your microwave.
- Dipping and Decorating: Allow around 20-30 minutes for dipping the cake pops and adding decorations.
Overall, the cooking time is approximately 30-40 minutes.
Total Time
When you combine both the prep and cooking times, the total time to make Red Velvet Cake Pops is about 2 hours and 10 minutes. However, keep in mind that you need to refrigerate the cake balls for at least 1 hour to firm up. This chilling time is essential for achieving the perfect texture.
So, while the active time spent in the kitchen is around 1 hour and 30 minutes, the total time from start to finish, including chilling, is about 3 hours and 10 minutes. Planning ahead will ensure you have plenty of time to create these delicious treats!
Nutritional Information for Red Velvet Cake Pops
Calories
When indulging in Red Velvet Cake Pops, it’s essential to be aware of their caloric content. Each cake pop contains approximately 180 calories. This makes them a delightful treat that can fit into a balanced diet when enjoyed in moderation. The rich flavors and satisfying texture make these cake pops a popular choice for dessert lovers.
Protein
In terms of protein, each Red Velvet Cake Pop offers about 2 grams. While this may not seem like a lot, it contributes to the overall nutritional profile of the treat. The protein content comes primarily from the cream cheese frosting and the cake itself. Although cake pops are not a significant source of protein, they can still be enjoyed as part of a varied diet.
Sodium
When it comes to sodium, each serving of Red Velvet Cake Pops contains around 150 milligrams. This level of sodium is relatively moderate, making these treats a reasonable option for those watching their sodium intake. However, it’s always a good idea to be mindful of your overall daily sodium consumption, especially if you have dietary restrictions.
In summary, Red Velvet Cake Pops are a delicious dessert option that can be enjoyed without too much guilt. With their moderate calorie count, low protein content, and reasonable sodium levels, they can be a delightful addition to your dessert table. Just remember to savor each bite!
FAQs About Red Velvet Cake Pops
Can I make Red Velvet Cake Pops ahead of time?
Absolutely! You can make Red Velvet Cake Pops ahead of time, which is perfect for busy schedules. After forming the cake balls, you can refrigerate them for up to a week before dipping them in chocolate. Just make sure to store them in an airtight container to keep them fresh. If you want to prepare them even further in advance, you can freeze the cake balls. Just remember to let them thaw in the refrigerator before dipping them in chocolate. This way, you can enjoy your delicious treats whenever you like!
How do I store Red Velvet Cake Pops?
Storing Red Velvet Cake Pops is simple! Once the chocolate coating has hardened, place them in an airtight container. You can keep them in the refrigerator for up to a week. If you want to keep them longer, consider freezing them. Just make sure to separate layers with parchment paper to prevent sticking. When you’re ready to enjoy them, let them thaw in the fridge for a few hours. This will help maintain their texture and flavor!
Can I use a cake mix for Red Velvet Cake Pops?
Yes, using a cake mix is a great option for making Red Velvet Cake Pops! It saves time and ensures consistent results. Just follow the instructions on the box to bake the cake. Once it’s cooled, crumble it and mix it with cream cheese frosting as you would with a homemade cake. This method is especially handy for beginners or anyone looking for a quick and easy way to enjoy these delightful treats!
What can I use instead of cream cheese frosting?
If you’re not a fan of cream cheese frosting or need a substitute, there are several options you can try. Buttercream frosting is a popular alternative that adds sweetness and creaminess. You can also use chocolate frosting for a richer flavor. For a healthier option, consider using Greek yogurt mixed with a bit of powdered sugar. This will give you a creamy texture while reducing the sweetness. Feel free to experiment with different frostings to find your perfect match!
Conclusion on Red Velvet Cake Pops
In conclusion, Red Velvet Cake Pops are a delightful treat that combines the classic flavors of red velvet cake with the fun and portability of cake pops. Their vibrant color and rich taste make them a favorite for celebrations, parties, or simply as a sweet indulgence at home. With a straightforward recipe and a few simple ingredients, you can create these stunning desserts that are sure to impress your family and friends.
Whether you choose to stick with the traditional red velvet flavor or experiment with different cake mixes and coatings, the possibilities are endless. From chocolate to vanilla, each variation offers a unique twist that can cater to any palate. Plus, with the tips and serving suggestions provided, you can elevate your cake pops to a whole new level, making them not just delicious but also visually appealing.
So, gather your ingredients, roll up your sleeves, and dive into the fun of making Red Velvet Cake Pops. Enjoy the process, share them with loved ones, and watch as they bring smiles to everyone’s faces. Happy baking!
Red Velvet Cake Pops
Ingredients
Equipment
Method
- Preheat your oven to 350°F. Grease and flour a 9-inch round cake pan. Mix dry ingredients in one bowl and wet ingredients in another. Gradually combine and pour into the pan. Bake for 30-35 minutes and let cool.
- Crumble the cooled cake into fine crumbs using your hands or a fork.
- Mix the crumbled cake with cream cheese frosting until fully combined.
- Roll the mixture into 1-inch balls and place on a baking sheet. Refrigerate for at least 1 hour.
- Melt the white chocolate in a microwave-safe bowl in 30-second intervals, stirring in between. Add vegetable oil to thin the chocolate.
- Dip the end of each lollipop stick into the melted chocolate, insert into a cake ball, then dip the cake pop into the chocolate and decorate before it sets.