
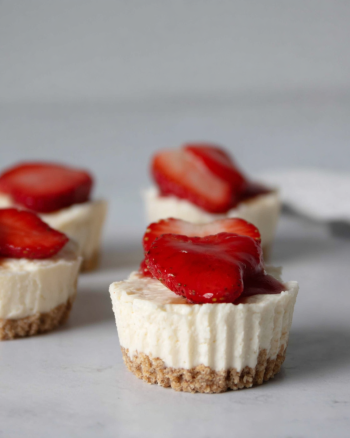
Introduction to No-Bake Philadelphia Cheesecake Oat Crust
If you’re looking for a delightful dessert that’s easy to make and requires no baking, then the No-Bake Philadelphia Cheesecake Oat Crust is just for you! This creamy cheesecake, paired with a crunchy oat crust, is a perfect treat for any occasion. Whether it’s a family gathering, a birthday party, or just a sweet craving, this cheesecake will surely impress your guests and satisfy your taste buds.
What Makes No-Bake Philadelphia Cheesecake Oat Crust Special?
What sets this cheesecake apart is its unique oat crust. Unlike traditional graham cracker crusts, the oat crust adds a wholesome touch. It’s not only delicious but also provides a delightful texture that complements the creamy filling. The combination of old-fashioned oats, butter, and brown sugar creates a rich, nutty flavor that enhances the overall dessert experience.
Moreover, the no-bake aspect means you can whip this up without turning on the oven. This is especially great during hot summer months when you want a cool dessert without heating up your kitchen. Plus, it’s a fantastic way to involve kids in the kitchen. They’ll love mixing the ingredients and pressing the crust into the pan!
In addition to its ease of preparation, this cheesecake is versatile. You can customize it with various flavors and toppings, making it suitable for everyone’s taste. From chocolate to fruit toppings, the possibilities are endless. So, let’s dive into the ingredients and get started on this delicious journey!
Ingredients for No-Bake Philadelphia Cheesecake Oat Crust
To create the delightful No-Bake Philadelphia Cheesecake Oat Crust, you’ll need a few simple ingredients. Each component plays a vital role in achieving that perfect balance of flavors and textures. Here’s what you’ll need:
- 2 cups old-fashioned oats: These oats form the base of your crust, providing a hearty and nutty flavor.
- 1/2 cup unsalted butter, melted: The melted butter helps bind the oats together, giving the crust its rich taste.
- 1/4 cup brown sugar: This adds sweetness and a hint of caramel flavor to the crust.
- 1/4 teaspoon salt: A pinch of salt enhances the overall flavor of the crust.
- 2 (8-ounce) packages cream cheese, softened: Cream cheese is the star of the cheesecake filling, providing that creamy texture.
- 1 cup powdered sugar: This sweetens the filling and gives it a smooth consistency.
- 1 teaspoon vanilla extract: Vanilla adds a warm, aromatic flavor to the cheesecake.
- 1 cup heavy whipping cream: Whipping cream is whipped to stiff peaks, making the filling light and fluffy.
- 1 tablespoon lemon juice: Lemon juice brightens the flavor of the cheesecake, balancing the sweetness.
With these ingredients on hand, you’re ready to embark on your cheesecake-making adventure. Each item contributes to the overall deliciousness of the No-Bake Philadelphia Cheesecake Oat Crust. Now, let’s move on to the step-by-step preparation!
Step-by-Step Preparation of No-Bake Philadelphia Cheesecake Oat Crust
Now that you have all your ingredients ready, it’s time to dive into the fun part: preparing your No-Bake Philadelphia Cheesecake Oat Crust! Follow these simple steps to create a delicious dessert that everyone will love.
Step 1: Preparing the Oat Crust
First, grab a medium bowl and combine the old-fashioned oats, melted butter, brown sugar, and salt. Mix everything together until the oats are evenly coated. This mixture will form the base of your cheesecake.
Next, take a 9-inch springform pan and press the oat mixture firmly into the bottom. Use the back of a measuring cup to pack it down well. This step is crucial for a sturdy crust. Once you’ve pressed it down, place the pan in the refrigerator for about 30 minutes. This will help the crust set and hold its shape.
Step 2: Making the Cheesecake Filling
While the crust is chilling, it’s time to make the creamy cheesecake filling. In a large mixing bowl, beat the softened cream cheese with an electric mixer until it’s smooth and creamy. This should take about 2-3 minutes.
Gradually add the powdered sugar and vanilla extract to the cream cheese. Mix until everything is well combined and smooth. The sweetness from the powdered sugar will balance the tanginess of the cream cheese.
In a separate bowl, whip the heavy cream until stiff peaks form. This means that when you lift the whisk, the cream should hold its shape. Gently fold the whipped cream into the cream cheese mixture. Be careful not to deflate the whipped cream; you want to keep that light and fluffy texture!
Finally, stir in the lemon juice until just combined. This will add a refreshing zing to your cheesecake filling.
Step 3: Assembling the No-Bake Philadelphia Cheesecake Oat Crust
Once your filling is ready, it’s time to assemble the cheesecake! Take the chilled oat crust out of the refrigerator. Pour the cheesecake filling over the crust, smoothing the top with a spatula. Make sure it’s evenly spread out for a beautiful finish.
After that, cover the cheesecake with plastic wrap. This will keep it fresh while it chills. Now, it’s time for the most challenging part: waiting!
Step 4: Chilling the Cheesecake
Place the cheesecake in the refrigerator for at least 4 hours. For the best results, let it chill overnight. This allows the flavors to meld together and the cheesecake to set properly. When you’re ready to serve, carefully remove the cheesecake from the springform pan and slice it into wedges.
And there you have it! A delicious No-Bake Philadelphia Cheesecake Oat Crust that’s sure to impress. Now, let’s explore some fun variations you can try!
Variations of No-Bake Philadelphia Cheesecake Oat Crust
One of the best things about the No-Bake Philadelphia Cheesecake Oat Crust is its versatility. You can easily switch things up to suit your taste or the occasion. Let’s explore some exciting flavor variations and alternative toppings that will take your cheesecake to the next level!
Flavor Variations to Try
Why stick to the classic flavor when you can experiment? Here are some fun ideas to give your cheesecake a unique twist:
- Chocolate Delight: For chocolate lovers, add 1/4 cup of cocoa powder to the cream cheese mixture. This will create a rich, chocolatey filling that pairs perfectly with the oat crust.
- Berry Bliss: Mix in 1 cup of pureed berries, like strawberries or raspberries, into the cream cheese filling. This will give your cheesecake a fruity flavor and a beautiful color.
- Peanut Butter Dream: Stir in 1/2 cup of creamy peanut butter into the filling for a nutty twist. This flavor is especially delightful when topped with chocolate sauce.
- Minty Fresh: Add 1 teaspoon of peppermint extract to the filling for a refreshing mint flavor. This is perfect for a summer dessert!
Feel free to mix and match these flavors to create your own signature cheesecake. The possibilities are endless!
Alternative Toppings for No-Bake Philadelphia Cheesecake Oat Crust
Toppings can elevate your cheesecake and make it even more delicious. Here are some tasty options to consider:
- Fresh Fruits: Top your cheesecake with fresh berries, sliced bananas, or kiwi for a burst of color and flavor.
- Fruit Compote: Drizzle a homemade fruit compote over the cheesecake. Simply cook down your favorite fruits with a bit of sugar until thickened.
- Chocolate Ganache: Pour a rich chocolate ganache over the top for a decadent finish. Just melt chocolate with heavy cream and let it cool slightly before pouring.
- Whipped Cream: Add a dollop of whipped cream on each slice for a classic touch. You can even sprinkle some cocoa powder or crushed nuts on top for added flair.
These variations and toppings will not only enhance the flavor but also make your No-Bake Philadelphia Cheesecake Oat Crust visually appealing. Now, let’s move on to some cooking notes to ensure your cheesecake turns out perfectly!
Cooking Note for No-Bake Philadelphia Cheesecake Oat Crust
When preparing your No-Bake Philadelphia Cheesecake Oat Crust, a few cooking notes can help ensure your dessert turns out perfectly every time. These tips will guide you through the process and help you avoid common pitfalls.
First, make sure your cream cheese is at room temperature. This will make it easier to blend smoothly into the filling. If it’s too cold, you may end up with lumps in your cheesecake, which can affect the texture.
Next, when whipping the heavy cream, be careful not to over-whip it. You want to achieve stiff peaks, but if you whip it too long, it can turn grainy and start to separate. Keep an eye on it, and stop as soon as you see those peaks forming.
Also, remember to fold the whipped cream gently into the cream cheese mixture. Use a spatula and a gentle motion to combine them. This helps maintain the light and airy texture of the filling, which is key to a successful cheesecake.
Lastly, patience is essential when it comes to chilling. Allowing the cheesecake to set for at least 4 hours, or preferably overnight, is crucial. This time lets the flavors meld beautifully and ensures the cheesecake holds its shape when sliced.
By following these cooking notes, you’ll be well on your way to creating a delicious No-Bake Philadelphia Cheesecake Oat Crust that everyone will love. Now, let’s explore some serving suggestions to make your dessert even more delightful!
Serving Suggestions for No-Bake Philadelphia Cheesecake Oat Crust
Once your No-Bake Philadelphia Cheesecake Oat Crust is ready, it’s time to think about how to serve it! Presentation can make a big difference, and there are many fun ways to serve this delicious dessert. Here are some serving suggestions that will impress your guests and enhance their experience:
- Slice and Serve: Cut the cheesecake into wedges and place them on individual dessert plates. This makes it easy for guests to enjoy their own slice.
- Garnish with Fresh Fruits: Add a few fresh berries or slices of fruit on top of each slice. This not only adds color but also a refreshing taste that complements the creamy cheesecake.
- Drizzle with Sauce: Consider drizzling chocolate sauce, caramel, or fruit compote over the cheesecake slices. This adds an extra layer of flavor and makes the dessert look more appealing.
- Serve with Whipped Cream: A dollop of whipped cream on the side or on top of each slice can elevate the dessert. You can even sprinkle some crushed nuts or chocolate shavings for added texture.
- Pair with Coffee or Tea: Serve the cheesecake alongside a cup of coffee or tea. The warm beverage pairs beautifully with the cool, creamy cheesecake, making for a delightful dessert experience.
- Make it a Dessert Bar: Set up a dessert bar with your cheesecake as the star. Offer various toppings like nuts, sprinkles, and sauces, allowing guests to customize their slices.
These serving suggestions will not only make your No-Bake Philadelphia Cheesecake Oat Crust look stunning but also enhance the overall enjoyment of this delightful dessert. Now that you have some ideas on how to serve it, let’s move on to tips for perfecting your cheesecake!
Tips for Perfecting No-Bake Philadelphia Cheesecake Oat Crust
Creating the perfect No-Bake Philadelphia Cheesecake Oat Crust is all about attention to detail. With a few helpful tips, you can ensure that your cheesecake turns out creamy, delicious, and visually appealing. Here are some essential tips to keep in mind:
- Use Quality Ingredients: The flavor of your cheesecake largely depends on the quality of the ingredients. Opt for high-quality cream cheese and pure vanilla extract. Fresh ingredients will enhance the overall taste.
- Room Temperature Cream Cheese: Always let your cream cheese sit at room temperature before mixing. This helps it blend smoothly, preventing lumps in your filling. Aim for a creamy consistency for the best results.
- Don’t Overmix: When combining the cream cheese and whipped cream, mix gently. Overmixing can deflate the whipped cream, leading to a denser filling. Use a folding motion to keep it light and airy.
- Chill Thoroughly: Patience is key! Allow your cheesecake to chill for at least 4 hours, but overnight is best. This ensures it sets properly and allows the flavors to meld beautifully.
- Check for Stiff Peaks: When whipping the heavy cream, watch for stiff peaks. This means the cream holds its shape well. If you see graininess, you may have over-whipped it, so keep an eye on it!
- Experiment with Flavors: Don’t hesitate to try different flavors and toppings. Whether it’s adding cocoa powder or fresh fruit, experimenting can lead to delightful surprises!
- Use a Springform Pan: A springform pan makes it easy to remove the cheesecake without damaging it. This is especially helpful when serving, as it keeps the edges neat and clean.
- Garnish Just Before Serving: If you’re adding toppings like fruit or whipped cream, do so just before serving. This keeps them fresh and visually appealing.
By following these tips, you’ll be well on your way to mastering the art of making a No-Bake Philadelphia Cheesecake Oat Crust. Each step contributes to a delicious dessert that will impress your family and friends. Now, let’s break down the time needed for this delightful treat!
Breakdown of Time for No-Bake Philadelphia Cheesecake Oat Crust
Understanding the time required for each step in making the No-Bake Philadelphia Cheesecake Oat Crust is essential for planning. This dessert is not only easy to make but also allows you to manage your time effectively. Here’s a breakdown of the time you’ll need:
Prep Time
The prep time for this cheesecake is quite manageable. You’ll spend about 20-30 minutes gathering your ingredients and preparing the crust and filling. This includes mixing the oat crust, pressing it into the pan, and whipping the cream cheese filling. It’s a fun and straightforward process that doesn’t require much time!
Cooking Time
Since this is a no-bake cheesecake, there’s no actual cooking involved. However, you will need to chill the cheesecake to allow it to set properly. This chilling time is crucial for achieving the right texture. You should plan for at least 4 hours of chilling time in the refrigerator. For the best results, letting it chill overnight is highly recommended.
Total Time
When you combine the prep time and the chilling time, the total time for making the No-Bake Philadelphia Cheesecake Oat Crust is approximately 4 hours and 30 minutes if you chill it for the minimum time. If you choose to let it chill overnight, the total time will extend to about 24 hours, but most of that is hands-off time. This makes it a perfect dessert to prepare ahead of a gathering or special occasion!
With this time breakdown, you can easily plan your cheesecake-making adventure. Now that you know how to manage your time, let’s dive into the nutritional information for this delightful dessert!
Nutritional Information for No-Bake Philadelphia Cheesecake Oat Crust
Understanding the nutritional information of your No-Bake Philadelphia Cheesecake Oat Crust is essential, especially if you’re mindful of your diet. This delicious dessert can be enjoyed in moderation, and knowing its nutritional content can help you make informed choices. Here’s a breakdown of the key nutritional components per serving:
Calories
Each serving of the No-Bake Philadelphia Cheesecake Oat Crust contains approximately 320 calories. This calorie count includes the creamy filling and the hearty oat crust. While it’s a delightful treat, it’s important to enjoy it as part of a balanced diet.
Protein
In terms of protein, this cheesecake offers about 5 grams per serving. The protein primarily comes from the cream cheese and heavy whipping cream used in the filling. While it’s not a high-protein dessert, it does provide some essential nutrients that contribute to your daily intake.
Sodium
The sodium content in each serving is approximately 200 milligrams. This amount is relatively moderate, but if you’re watching your sodium intake, it’s good to keep this in mind. The salt in the oat crust and the cream cheese contributes to this sodium level.
Overall, the No-Bake Philadelphia Cheesecake Oat Crust is a delicious dessert that can fit into a variety of dietary plans. By being aware of its nutritional information, you can enjoy this treat while maintaining a balanced approach to your meals. Now, let’s move on to some frequently asked questions about this delightful cheesecake!
FAQs about No-Bake Philadelphia Cheesecake Oat Crust
Can I use a different type of crust for this cheesecake?
Absolutely! While the oat crust adds a unique flavor and texture, you can use other types of crusts if you prefer. For instance, a classic graham cracker crust is a popular choice. You could also try a cookie crust made from crushed chocolate cookies or even a nut-based crust for a gluten-free option. Just remember to adjust the ingredients accordingly to ensure the crust holds together well.
How long can I store No-Bake Philadelphia Cheesecake Oat Crust in the fridge?
Your No-Bake Philadelphia Cheesecake Oat Crust can be stored in the refrigerator for up to 5 days. Make sure to cover it tightly with plastic wrap or store it in an airtight container. This will help keep it fresh and prevent it from absorbing any odors from the fridge. Just be aware that the texture may change slightly over time, but it will still be delicious!
Can I freeze No-Bake Philadelphia Cheesecake Oat Crust?
Yes, you can freeze your No-Bake Philadelphia Cheesecake Oat Crust! To do this, make sure it’s well wrapped in plastic wrap and then placed in a freezer-safe container. It can be frozen for up to 2 months. When you’re ready to enjoy it, simply transfer it to the fridge to thaw overnight. This is a great way to prepare ahead for special occasions!
What are some common mistakes to avoid when making No-Bake Philadelphia Cheesecake Oat Crust?
There are a few common mistakes to watch out for when making your cheesecake:
- Using Cold Cream Cheese: Always let your cream cheese come to room temperature. Cold cream cheese can lead to lumps in your filling.
- Over-Whipping the Cream: Be careful not to over-whip the heavy cream. It should form stiff peaks but remain smooth. Over-whipping can make it grainy.
- Not Chilling Long Enough: Patience is key! Make sure to chill the cheesecake for at least 4 hours, or overnight for the best results. This helps it set properly.
- Skipping the Lemon Juice: Don’t skip the lemon juice! It adds a refreshing flavor and helps balance the sweetness of the cheesecake.
By avoiding these common pitfalls, you’ll be well on your way to creating a perfect No-Bake Philadelphia Cheesecake Oat Crust that everyone will love!
Conclusion on No-Bake Philadelphia Cheesecake Oat Crust
In conclusion, the No-Bake Philadelphia Cheesecake Oat Crust is a delightful dessert that combines simplicity with deliciousness. Its creamy filling and crunchy oat crust create a perfect balance of flavors and textures. Whether you’re a seasoned baker or a beginner, this recipe is easy to follow and requires no baking, making it a fantastic choice for any occasion.
Not only is this cheesecake versatile, but it also allows for endless customization. You can experiment with different flavors and toppings to suit your taste. From chocolate to fresh fruits, the options are limitless! Plus, the oat crust adds a wholesome touch that sets it apart from traditional cheesecakes.
As you prepare this dessert, remember the tips and cooking notes shared throughout the article. They will help you achieve the best results and ensure your cheesecake turns out perfectly every time. With a little patience during the chilling process, you’ll be rewarded with a creamy, dreamy cheesecake that will impress your family and friends.
So, gather your ingredients, roll up your sleeves, and get ready to create a No-Bake Philadelphia Cheesecake Oat Crust that everyone will love. Enjoy every bite of this delightful treat, and don’t forget to share it with those you care about. Happy baking!
No-Bake Philadelphia Cheesecake Oat Crust
Ingredients
Equipment
Method
- Combine oats, melted butter, brown sugar, and salt in a bowl. Press into a 9-inch springform pan and refrigerate for 30 minutes.
- Beat cream cheese until smooth. Gradually add powdered sugar and vanilla, mixing until smooth.
- Whip heavy cream to stiff peaks and fold into cream cheese mixture. Stir in lemon juice.
- Pour filling over chilled crust, smooth the top, cover with plastic wrap, and refrigerate for at least 4 hours or overnight.