
Introduction to Apple Crisp Cheesecake Recipe
What Makes the Apple Crisp Cheesecake Unique?
The Apple Crisp Cheesecake is a delightful fusion of two beloved desserts: cheesecake and apple crisp. This unique combination brings together the creamy richness of cheesecake with the warm, comforting flavors of baked apples and a crunchy topping. The result is a dessert that is not only visually appealing but also offers a variety of textures and tastes. The smooth cheesecake layer contrasts beautifully with the tender apples and the crispy oat topping, making each bite a delightful experience.
What truly sets this recipe apart is its versatility. You can easily customize it to suit your taste preferences. Whether you prefer a hint of caramel drizzled on top or a sprinkle of nuts for added crunch, the possibilities are endless. This dessert is perfect for those who love the classic flavors of fall, yet it can be enjoyed year-round. The combination of spices like cinnamon and nutmeg adds warmth, making it a comforting choice for any gathering.
The Perfect Dessert for Any Occasion
Whether you’re hosting a holiday dinner, celebrating a birthday, or simply enjoying a cozy night in, the Apple Crisp Cheesecake is the perfect dessert. Its rich flavors and beautiful presentation make it a showstopper at any event. Guests will be impressed by the layers of flavor and texture, and it’s sure to become a favorite among family and friends.
Moreover, this cheesecake is easy to prepare, allowing you to spend more time enjoying the company of your loved ones. With just a few simple steps, you can create a dessert that looks and tastes like it came from a professional bakery. So, gather your ingredients and get ready to impress everyone with this delicious Apple Crisp Cheesecake!
Ingredients for Apple Crisp Cheesecake Recipe
Essential Ingredients for the Cheesecake Layer
To create the creamy base of your Apple Crisp Cheesecake, you’ll need a few key ingredients. Start with two packages of softened cream cheese, which gives the cheesecake its rich and velvety texture. You’ll also need one cup of granulated sugar to sweeten the mixture, along with a teaspoon of vanilla extract for that delightful flavor boost. Finally, three large eggs are essential for binding everything together, ensuring your cheesecake sets perfectly.
Ingredients for the Apple Filling
The apple filling is where the magic happens! For this layer, you’ll need about two medium apples, peeled and diced into small pieces. This should yield around two cups of apples. To enhance the flavor, toss the diced apples with one teaspoon of cinnamon and a quarter teaspoon of nutmeg. These spices add warmth and depth to the filling, making it truly irresistible. A quarter cup of brown sugar will also be added to the apples, providing a lovely caramelized sweetness.
Components of the Crisp Topping
The crisp topping is what makes this cheesecake stand out. For this crunchy layer, gather one cup of rolled oats, which will provide a hearty texture. You’ll also need half a cup of all-purpose flour to help bind the topping together. To sweeten it, use half a cup of packed brown sugar and half a teaspoon of cinnamon for that warm flavor. Finally, a quarter cup of softened unsalted butter will help create that delightful crumbly texture. Together, these ingredients will form a delicious topping that perfectly complements the creamy cheesecake and spiced apple filling.
Preparation of Apple Crisp Cheesecake Recipe
Step 1: Preparing the Cheesecake Base
To start, gather your ingredients for the cheesecake base. In a medium bowl, combine the graham cracker crumbs, melted butter, and 1/4 cup of granulated sugar. Mix these ingredients until they are well combined. The mixture should resemble wet sand. Next, press this mixture firmly into the bottom of a 9-inch springform pan. Make sure to create an even layer, as this will be the foundation of your cheesecake.
Step 2: Making the Apple Filling
Now, let’s move on to the apple filling. In a separate bowl, take your peeled and diced apples. Toss them with 1 teaspoon of cinnamon and 1/4 teaspoon of nutmeg. This step is crucial, as it enhances the flavor of the apples. Once coated, set the apple mixture aside. This will allow the spices to infuse into the apples, making them even more delicious when baked.
Step 3: Creating the Crisp Topping
Next, it’s time to prepare the crisp topping. In another bowl, combine the rolled oats, 1/2 cup of all-purpose flour, 1/2 cup of packed brown sugar, and 1/2 teaspoon of cinnamon. Mix these dry ingredients together. Then, add the softened butter to the mixture. Use your fingers or a fork to blend everything until it becomes crumbly. This topping will add a delightful crunch to your cheesecake.
Step 4: Assembling the Apple Crisp Cheesecake
With all components ready, it’s time to assemble your cheesecake. In a large mixing bowl, beat the softened cream cheese with 1 cup of granulated sugar and the vanilla extract until smooth and creamy. Add the eggs one at a time, mixing well after each addition. Once the mixture is well combined, gently fold in the spiced apple mixture. Pour this creamy apple filling over the prepared graham cracker crust in the springform pan. Finally, sprinkle the crisp topping evenly over the cheesecake layer, ensuring every bite will have that delicious crunch.
Step 5: Baking the Cheesecake
Now, it’s time to bake your masterpiece! Preheat your oven to 325°F (163°C). Place the assembled cheesecake in the oven and bake for 55-60 minutes. You’ll know it’s done when the center is set and the edges are lightly golden. Once baked, turn off the oven and let the cheesecake cool inside with the door slightly ajar for about an hour. This gentle cooling helps prevent cracks. Afterward, refrigerate the cheesecake for at least 4 hours or overnight before serving. This waiting period allows the flavors to meld beautifully.
Preparation of Apple Crisp Cheesecake Recipe
Step 1: Preparing the Cheesecake Base
To kick off your Apple Crisp Cheesecake, start by gathering your ingredients for the cheesecake base. In a medium bowl, combine the graham cracker crumbs, melted butter, and 1/4 cup of granulated sugar. Mix these ingredients until they are well combined. The mixture should resemble wet sand. Next, press this mixture firmly into the bottom of a 9-inch springform pan. Make sure to create an even layer, as this will be the foundation of your cheesecake. A solid base is key to holding everything together!
Step 2: Making the Apple Filling
Now, let’s move on to the apple filling. In a separate bowl, take your peeled and diced apples. Toss them with 1 teaspoon of cinnamon and 1/4 teaspoon of nutmeg. This step is crucial, as it enhances the flavor of the apples. Once coated, set the apple mixture aside. This will allow the spices to infuse into the apples, making them even more delicious when baked. The aroma of cinnamon and nutmeg will fill your kitchen, creating a warm and inviting atmosphere.
Step 3: Creating the Crisp Topping
Next, it’s time to prepare the crisp topping. In another bowl, combine the rolled oats, 1/2 cup of all-purpose flour, 1/2 cup of packed brown sugar, and 1/2 teaspoon of cinnamon. Mix these dry ingredients together. Then, add the softened butter to the mixture. Use your fingers or a fork to blend everything until it becomes crumbly. This topping will add a delightful crunch to your cheesecake. The combination of oats and brown sugar creates a sweet, nutty flavor that perfectly complements the creamy cheesecake.
Step 4: Assembling the Apple Crisp Cheesecake
With all components ready, it’s time to assemble your cheesecake. In a large mixing bowl, beat the softened cream cheese with 1 cup of granulated sugar and the vanilla extract until smooth and creamy. Add the eggs one at a time, mixing well after each addition. Once the mixture is well combined, gently fold in the spiced apple mixture. Pour this creamy apple filling over the prepared graham cracker crust in the springform pan. Finally, sprinkle the crisp topping evenly over the cheesecake layer, ensuring every bite will have that delicious crunch. This layering creates a beautiful visual and a delightful taste experience.
Step 5: Baking the Cheesecake
Now, it’s time to bake your masterpiece! Preheat your oven to 325°F (163°C). Place the assembled cheesecake in the oven and bake for 55-60 minutes. You’ll know it’s done when the center is set and the edges are lightly golden. Once baked, turn off the oven and let the cheesecake cool inside with the door slightly ajar for about an hour. This gentle cooling helps prevent cracks. Afterward, refrigerate the cheesecake for at least 4 hours or overnight before serving. This waiting period allows the flavors to meld beautifully, making each bite even more delicious!
Variation of Apple Crisp Cheesecake Recipe
Alternative Ingredients for a Healthier Version
If you’re looking to make your Apple Crisp Cheesecake a bit healthier, there are several easy substitutions you can try. For starters, consider swapping out half of the cream cheese with Greek yogurt. This change not only adds protein but also gives the cheesecake a creamy texture without all the extra fat. You can also use low-fat cream cheese for a lighter option.
When it comes to sweeteners, you might want to replace some of the granulated sugar with natural alternatives. For instance, using honey or maple syrup can add a unique flavor while reducing refined sugar. Additionally, you can use whole grain graham cracker crumbs instead of regular ones for added fiber.
For the apple filling, opt for fresh, organic apples to enhance the flavor and nutritional value. You can also reduce the amount of brown sugar in the apple mixture, as the natural sweetness of the apples can shine through. Lastly, consider adding some chopped nuts, like walnuts or pecans, to the crisp topping for a boost of healthy fats and crunch.
Flavor Variations to Try
While the classic Apple Crisp Cheesecake is delicious on its own, experimenting with different flavors can take it to the next level. For a caramel twist, drizzle caramel sauce over the cheesecake before serving. This adds a rich sweetness that pairs perfectly with the apples.
If you enjoy a bit of tartness, try adding cranberries or cherries to the apple filling. These fruits can provide a delightful contrast to the sweetness of the cheesecake. You can also play with spices; adding a pinch of ginger or allspice can create a warm, cozy flavor profile.
For a chocolatey variation, consider folding in some mini chocolate chips into the cheesecake batter. This will create a delicious chocolate-apple combination that is sure to please any chocolate lover. Lastly, if you want to add a bit of zest, a teaspoon of lemon juice in the apple filling can brighten the flavors and enhance the overall taste of your cheesecake.
Cooking Note for Apple Crisp Cheesecake Recipe
Tips for Perfecting Your Cheesecake
Creating the perfect Apple Crisp Cheesecake requires attention to detail. Here are some helpful tips to ensure your cheesecake turns out beautifully every time. First, make sure your cream cheese is at room temperature. This helps it blend smoothly with the other ingredients, preventing lumps in your batter.
When mixing the cheesecake batter, avoid overmixing after adding the eggs. Overmixing can incorporate too much air, leading to cracks during baking. Instead, mix just until combined. Additionally, consider using a water bath while baking. This method helps maintain moisture in the oven, resulting in a creamier texture and reducing the risk of cracks.
After baking, let your cheesecake cool gradually in the oven with the door slightly ajar. This gentle cooling process helps prevent sudden temperature changes that can cause cracks. Finally, always refrigerate your cheesecake for at least four hours, or overnight if possible. This allows the flavors to meld and the cheesecake to set properly, making it easier to slice.
Common Mistakes to Avoid
Even the best bakers can make mistakes! Here are some common pitfalls to watch out for when making your Apple Crisp Cheesecake. One frequent error is not measuring ingredients accurately. Baking is a science, so using the right amounts is crucial for the best results. Always use measuring cups and spoons for precision.
Another mistake is not preparing the springform pan properly. Make sure to grease the pan lightly to prevent sticking. If you skip this step, you may end up with a cheesecake that’s difficult to remove. Also, avoid opening the oven door too often while baking. Each time you open the door, heat escapes, which can affect the baking time and texture.
Lastly, don’t rush the cooling and chilling process. Allowing your cheesecake to cool slowly and refrigerate thoroughly is essential for achieving the right texture. If you cut into it too soon, it may not hold its shape. By following these tips and avoiding common mistakes, you’ll be well on your way to making a delicious Apple Crisp Cheesecake!
Serving Suggestions for Apple Crisp Cheesecake Recipe
Ideal Pairings and Accompaniments
When it comes to serving your Apple Crisp Cheesecake, the right pairings can elevate the experience. A dollop of freshly whipped cream is a classic choice. Its light and airy texture complements the rich cheesecake beautifully. You can also add a sprinkle of cinnamon on top for an extra touch of flavor.
If you want to add a fruity twist, consider serving the cheesecake with a side of warm apple compote. This enhances the apple flavor and adds a delightful warmth. For those who enjoy a bit of tartness, a scoop of vanilla ice cream can provide a creamy contrast to the cheesecake’s richness.
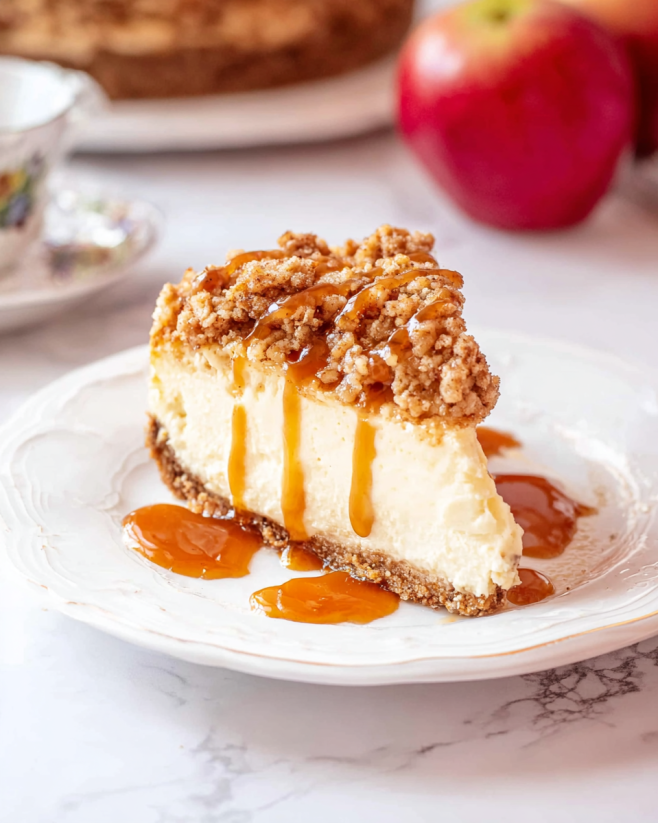
For a more indulgent experience, drizzle caramel or chocolate sauce over the cheesecake before serving. This adds a sweet touch that pairs perfectly with the spiced apple filling. You can also sprinkle some chopped nuts, like pecans or walnuts, on top for added crunch and flavor.
Presentation Tips for Serving
Presentation is key when serving your Apple Crisp Cheesecake. Start by carefully removing the cheesecake from the springform pan. Use a sharp knife to slice the cheesecake into even pieces. For a clean cut, dip the knife in hot water and wipe it dry before each slice.
To make your cheesecake look even more appealing, consider garnishing each slice with a few thin apple slices arranged on top. This not only adds a pop of color but also highlights the apple flavor. You can also add a sprig of mint for a fresh touch.
For a beautiful serving display, place the cheesecake on a decorative cake stand. Surround it with small bowls of your chosen accompaniments, like whipped cream, caramel sauce, or nuts. This creates an inviting dessert table that will impress your guests.
Lastly, don’t forget to serve your cheesecake with a smile! The joy of sharing a delicious dessert is what makes it truly special. Enjoy every bite and the company of those around you!
Tips for Making the Best Apple Crisp Cheesecake Recipe
Storage Tips for Leftovers
After enjoying your delicious Apple Crisp Cheesecake, you may have some leftovers. Proper storage is key to keeping it fresh and tasty. First, allow the cheesecake to cool completely at room temperature. Once cooled, cover it tightly with plastic wrap or aluminum foil. This helps prevent it from drying out and keeps it fresh for longer.
For optimal freshness, store the cheesecake in the refrigerator. It can last for about 5 to 7 days when properly stored. If you want to keep it for a longer period, consider freezing it. To freeze, slice the cheesecake into individual pieces. Wrap each slice in plastic wrap, then place them in an airtight container or a freezer bag. This way, you can enjoy a slice whenever you crave it!
When you’re ready to enjoy a frozen slice, simply transfer it to the refrigerator to thaw overnight. This method ensures that your cheesecake retains its creamy texture and delicious flavor. Remember, never refreeze cheesecake that has already been thawed, as this can affect its quality.
Reheating Instructions
If you prefer your Apple Crisp Cheesecake warm, reheating is simple! Start by removing the cheesecake from the refrigerator. If it’s frozen, allow it to thaw in the fridge overnight first. Once thawed, you can reheat individual slices in the microwave. Place a slice on a microwave-safe plate and cover it with a damp paper towel. Heat it on medium power for about 15-20 seconds. Check to see if it’s warmed through; if not, continue heating in 10-second intervals until it reaches your desired temperature.
Alternatively, you can reheat the cheesecake in the oven. Preheat your oven to 325°F (163°C). Place the cheesecake on a baking sheet and cover it loosely with aluminum foil to prevent browning. Heat for about 10-15 minutes, or until warmed through. This method helps maintain the cheesecake’s texture and flavor, making it just as delightful as when it was freshly baked.
Whether you enjoy it cold or warm, your Apple Crisp Cheesecake is sure to be a hit. With these storage and reheating tips, you can savor every last bite of this delicious dessert!
Breakdown of Time for Apple Crisp Cheesecake Recipe
Prep Time
Preparing your Apple Crisp Cheesecake is a delightful process that doesn’t take too long. The prep time for this recipe is approximately 30 minutes. During this time, you will gather all your ingredients, prepare the cheesecake base, make the apple filling, and create the crisp topping. It’s a great opportunity to enjoy the aromas of cinnamon and nutmeg as you work!
Cooking Time
The cooking time for the Apple Crisp Cheesecake is about 55 to 60 minutes. This is when the cheesecake bakes in the oven, allowing the flavors to meld together beautifully. It’s essential to keep an eye on it during the last few minutes of baking to ensure it doesn’t overcook. The edges should be lightly golden, and the center should be set for the perfect texture.
Total Time
In total, you can expect to spend around 1 hour and 30 minutes on this recipe, including both prep and cooking time. However, remember that you will need to refrigerate the cheesecake for at least 4 hours or overnight before serving. This chilling time is crucial for the cheesecake to set properly and allows the flavors to develop fully. So, while the active time is relatively short, planning ahead will ensure you have a delicious dessert ready to impress your guests!
Nutritional Information for Apple Crisp Cheesecake Recipe
Calories and Macronutrients
Understanding the nutritional content of your Apple Crisp Cheesecake can help you enjoy it mindfully. Each serving of this delightful dessert contains approximately 350 calories. The macronutrient breakdown is as follows:
- Net Carbs: 30g
- Protein: 5g
- Fat: 22g
This balance of macronutrients makes the cheesecake a satisfying treat. The combination of carbohydrates from the crust and apples, protein from the cream cheese, and healthy fats from the butter and nuts (if added) creates a well-rounded dessert. Enjoying a slice can be a delightful way to indulge while still being aware of your nutritional intake.
Health Benefits of Ingredients
The ingredients in your Apple Crisp Cheesecake not only create a delicious dessert but also offer some health benefits. Here are a few highlights:
- Apples: Rich in fiber and vitamin C, apples can support heart health and aid digestion. They also contain antioxidants that help combat free radicals in the body.
- Cinnamon: This spice is known for its anti-inflammatory properties and can help regulate blood sugar levels. It adds a warm flavor that enhances the overall taste of the cheesecake.
- Oats: A great source of whole grains, oats provide fiber that can help lower cholesterol and keep you feeling full longer. They also contribute to the crunchy topping that many love.
- Greek Yogurt (if used): Substituting Greek yogurt for cream cheese can increase protein content while reducing fat. It also contains probiotics, which are beneficial for gut health.
By incorporating these wholesome ingredients, your Apple Crisp Cheesecake can be a treat that not only satisfies your sweet tooth but also provides some nutritional benefits. Enjoy it as part of a balanced diet, and feel good about indulging in this delightful dessert!
FAQs about Apple Crisp Cheesecake Recipe
Can I make the Apple Crisp Cheesecake ahead of time?
Absolutely! The Apple Crisp Cheesecake is a fantastic dessert to prepare in advance. In fact, making it a day ahead can enhance the flavors as they meld together during refrigeration. After baking, allow the cheesecake to cool completely, then cover it tightly with plastic wrap or aluminum foil. Store it in the refrigerator until you’re ready to serve. This way, you can enjoy a stress-free dessert on the day of your event!
What type of apples are best for this recipe?
When it comes to choosing apples for your Apple Crisp Cheesecake, opt for varieties that hold their shape well during baking. Some great options include Granny Smith, Honeycrisp, or Fuji apples. Granny Smith apples provide a nice tartness that balances the sweetness of the cheesecake, while Honeycrisp and Fuji apples add a touch of sweetness and crisp texture. Feel free to mix different types for a more complex flavor!
Can I freeze the Apple Crisp Cheesecake?
Yes, you can freeze the Apple Crisp Cheesecake! To do this, slice the cheesecake into individual pieces for easier thawing. Wrap each slice tightly in plastic wrap, then place them in an airtight container or a freezer bag. The cheesecake can be frozen for up to three months. When you’re ready to enjoy a slice, simply transfer it to the refrigerator to thaw overnight. This method helps maintain its creamy texture and delicious flavor.
How do I know when the cheesecake is done baking?
Knowing when your Apple Crisp Cheesecake is done baking is key to achieving the perfect texture. Look for a few signs: the edges should be lightly golden, and the center should be set but still slightly jiggly. A good test is to gently shake the pan; if the center wobbles slightly but the edges are firm, it’s ready. Remember, the cheesecake will continue to set as it cools, so avoid overbaking to prevent cracks!
Conclusion on Apple Crisp Cheesecake Recipe
Final Thoughts and Encouragement to Try the Recipe
In conclusion, the Apple Crisp Cheesecake is a delightful dessert that beautifully combines the creamy richness of cheesecake with the warm, comforting flavors of spiced apples and a crunchy topping. This recipe is not only easy to follow but also allows for plenty of customization, making it a perfect choice for any occasion. Whether you’re celebrating a special event or simply treating yourself, this cheesecake is sure to impress.
As you embark on your baking journey, remember that the joy of creating this dessert lies in the process. Take your time, enjoy the aromas of cinnamon and baked apples, and savor each step. Don’t hesitate to experiment with flavors and ingredients to make it your own. The possibilities are endless, and your creativity will shine through in every bite.
So, gather your ingredients, roll up your sleeves, and dive into making this delicious Apple Crisp Cheesecake. Your friends and family will be grateful, and you’ll find yourself wanting to make it again and again. Happy baking!
Apple Crisp Cheesecake
Ingredients
Equipment
Method
- Prepare the cheesecake base by mixing graham cracker crumbs, melted butter, and granulated sugar, then press into the bottom of a springform pan.
- Make the apple filling by tossing diced apples with cinnamon and nutmeg, then set aside.
- Create the crisp topping by mixing oats, flour, brown sugar, and cinnamon, then blend in softened butter until crumbly.
- Assemble the cheesecake by beating cream cheese, sugar, and vanilla, then adding eggs and folding in the apple mixture. Pour over the crust and top with crisp mixture.
- Bake at 325°F for 55-60 minutes until set, then cool in the oven with the door ajar for 60 minutes before refrigerating for at least 240 minutes.