
Introduction to Red Velvet Cake Recipe
The History of Red Velvet Cake
Red velvet cake has a rich and fascinating history that dates back to the 1800s. Originally, it was a simple chocolate cake with a hint of red color, which was achieved through the use of cocoa powder. The cake gained popularity during the Great Depression, when it was often served in upscale restaurants. The unique color and flavor made it a favorite for special occasions.
Interestingly, the red hue of the cake was once attributed to a chemical reaction between the cocoa powder and acidic ingredients like buttermilk and vinegar. However, today, most recipes use red food coloring to achieve that vibrant color. This cake became a staple in Southern cuisine and is now a beloved dessert across the United States.
Why You Should Try This Red Velvet Cake Recipe
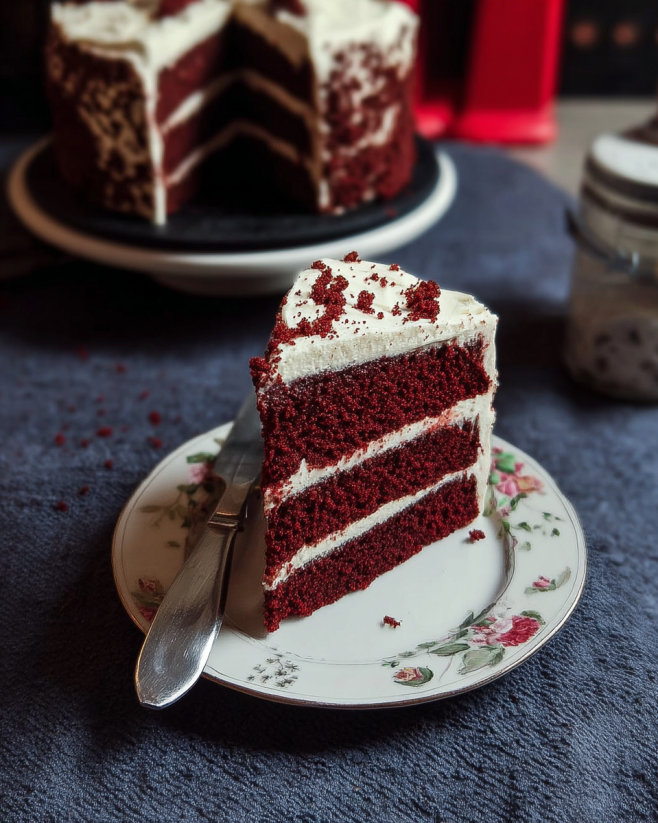
If you’re looking for a dessert that’s both visually stunning and delicious, this red velvet cake recipe is perfect for you. The cake is moist, tender, and has a subtle chocolate flavor that pairs beautifully with the creamy frosting. Not only is it a feast for the eyes, but it also offers a delightful taste experience.
This recipe is straightforward and easy to follow, making it suitable for bakers of all skill levels. Whether you’re celebrating a birthday, an anniversary, or just want to treat yourself, this red velvet cake will impress your family and friends. Plus, the cream cheese frosting adds a rich and tangy contrast that elevates the cake to a whole new level.
So, roll up your sleeves and get ready to bake a cake that’s sure to become a favorite in your household!
Ingredients for Red Velvet Cake Recipe
To create a delightful red velvet cake, you’ll need a few key ingredients. Each component plays a vital role in achieving that signature flavor and texture. Here’s what you’ll need:
- 2 ½ cups all-purpose flour
- 1 ½ cups granulated sugar
- 1 teaspoon baking soda
- 1 teaspoon salt
- 1 teaspoon cocoa powder
- 1 ½ cups vegetable oil
- 1 cup buttermilk, room temperature
- 2 large eggs, room temperature
- 2 tablespoons red food coloring
- 1 teaspoon vanilla extract
- 1 teaspoon white vinegar
For the cream cheese frosting, gather the following:
- 8 ounces cream cheese, softened
- ½ cup unsalted butter, softened
- 4 cups powdered sugar
- 1 teaspoon vanilla extract
- 2 tablespoons heavy cream (optional for consistency)
These ingredients will come together to create a moist and flavorful cake that’s perfect for any occasion. Make sure to use fresh ingredients for the best results. Now that you have everything ready, let’s move on to the preparation steps!
Step-by-Step Preparation of Red Velvet Cake Recipe
Step 1: Preheat the Oven
350°F (175°C). This ensures that your cake bakes evenly and rises perfectly. While the oven heats up, you can prepare your cake pans. Grease and flour two 9-inch round cake pans to prevent sticking. This step is crucial for a smooth cake release.
Step 2: Prepare the Cake Batter
flour, sugar, baking soda, salt, and cocoa powder. Sifting helps to aerate the dry ingredients, making your cake light and fluffy. In another bowl, whisk together the vegetable oil, buttermilk, eggs, red food coloring, vanilla extract, and vinegar. Mix until everything is well combined.
Next, gradually add the wet mixture to the dry ingredients. Stir gently until just combined. Be careful not to overmix, as this can lead to a dense cake. You want a smooth batter with a beautiful red hue!
Step 3: Bake the Cake Layers
25-30 minutes. To check if they’re done, insert a toothpick into the center of the cakes. If it comes out clean, they’re ready! If not, give them a few more minutes.
10 minutes. This makes it easier to transfer them to a wire rack. Once cooled, carefully remove the cakes from the pans and let them cool completely on the rack.
Step 4: Make the Cream Cheese Frosting
cream cheese and unsalted butter together until smooth and creamy. Gradually add the powdered sugar and vanilla extract, mixing until well combined. If your frosting is too thick, you can add heavy cream a little at a time until you reach your desired consistency.
Step 5: Assemble the Cake
Now comes the exciting part—assembling your cake! Place one layer of the cooled cake on a serving plate. Spread a generous amount of cream cheese frosting on top. Then, carefully place the second layer on top. Frost the top and sides of the cake with the remaining frosting. Make it as smooth or as textured as you like!
3 days. This cake is sure to impress anyone who sees (and tastes) it!
Variations of Red Velvet Cake Recipe
Gluten-Free Red Velvet Cake Recipe
If you or someone you know is gluten-sensitive, you can still enjoy a delicious red velvet cake! To make a gluten-free version, simply substitute the all-purpose flour with a gluten-free flour blend. Look for a blend that contains xanthan gum, as this helps mimic the texture of traditional flour.
Follow the same steps as the original recipe, ensuring that all other ingredients are gluten-free. You might also want to check the labels on your baking soda and cocoa powder to confirm they are gluten-free. This variation will yield a moist and flavorful cake that everyone can enjoy!
Vegan Red Velvet Cake Recipe
2 tablespoons of flaxseed meal with 6 tablespoons of water and let it sit for about 5 minutes until it thickens. This mixture acts as a great egg substitute.
1 tablespoon of lemon juice or vinegar to 1 cup of almond milk and letting it sit for a few minutes. Use vegetable oil as in the original recipe, and you’ll have a delightful vegan red velvet cake that’s just as tasty!
These variations ensure that everyone can enjoy the rich flavor and beautiful color of red velvet cake, regardless of dietary restrictions. So, whether you’re gluten-free or vegan, you can still indulge in this classic dessert!
Cooking Note for Red Velvet Cake Recipe
When baking a red velvet cake, there are a few important cooking notes to keep in mind. These tips will help you achieve the best results and ensure your cake turns out perfectly every time.
First, always use room temperature ingredients. This includes your eggs and buttermilk. Room temperature ingredients mix more easily, leading to a smoother batter and a more even bake. If you forget to take them out in advance, you can warm the eggs in a bowl of warm water for about 10 minutes.
Next, be mindful of your mixing technique. When combining the wet and dry ingredients, mix until just combined. Overmixing can lead to a dense cake, which is not what you want. A light and fluffy texture is key to a delicious red velvet cake.
Additionally, the quality of your ingredients matters. Use high-quality cocoa powder and food coloring for the best flavor and color. The vibrant red hue is a signature of this cake, so don’t skimp on the food coloring. If you prefer a more natural approach, consider using beet juice as a coloring alternative.
Lastly, keep an eye on your baking time. Ovens can vary, so start checking your cakes a few minutes before the recommended time. Insert a toothpick into the center; if it comes out clean or with a few moist crumbs, your cake is done. This will help prevent overbaking, which can dry out your cake.
By following these cooking notes, you’ll be well on your way to creating a stunning and delicious red velvet cake that will impress everyone at your gathering!
Serving Suggestions for Red Velvet Cake Recipe
When it comes to serving your delightful red velvet cake, there are plenty of creative and delicious options to consider. This cake is not only a treat for the taste buds but also a feast for the eyes. Here are some serving suggestions to elevate your red velvet cake experience:
- Classic Slice: Serve a generous slice of red velvet cake on a decorative plate. Pair it with a dollop of whipped cream or a scoop of vanilla ice cream for a classic dessert experience.
- Festive Garnish: Add a sprinkle of chocolate shavings or crushed nuts on top of the frosting for added texture and flavor. Fresh berries, like raspberries or strawberries, can also add a pop of color and a fruity contrast.
- Cupcake Version: Transform your red velvet cake into cupcakes! Bake the batter in cupcake liners and frost each one with cream cheese frosting. This makes for easy serving at parties or gatherings.
- Layered Parfait: Create a red velvet cake parfait by layering crumbled cake with cream cheese frosting and fresh fruit in a glass. This not only looks beautiful but also offers a fun way to enjoy the flavors.
- Chocolate Drizzle: For a richer taste, drizzle melted chocolate over the frosted cake. This adds an extra layer of indulgence that chocolate lovers will appreciate.
- Tea or Coffee Pairing: Serve slices of red velvet cake alongside a cup of tea or coffee. The rich flavors of the cake complement the warmth of your favorite beverage perfectly.
These serving suggestions can enhance the presentation and enjoyment of your red velvet cake. Whether you’re celebrating a special occasion or simply indulging in a sweet treat, these ideas will make your cake stand out. Enjoy every bite!
Tips for Perfecting Your Red Velvet Cake Recipe
Creating the perfect red velvet cake is an art that combines the right ingredients, techniques, and a little bit of love. Here are some essential tips to help you achieve a moist, flavorful, and visually stunning cake every time you bake:
- Measure Accurately: Baking is a science, so precise measurements are crucial. Use a kitchen scale for the best accuracy, especially for flour. Too much flour can lead to a dry cake.
- Use Fresh Ingredients: Always check the expiration dates on your baking powder, baking soda, and cocoa powder. Fresh ingredients ensure the best flavor and texture.
- Don’t Skip the Vinegar: The vinegar in the recipe not only adds a slight tang but also reacts with the baking soda to help the cake rise. This is key for achieving that light and fluffy texture.
- Cool Completely: Allow your cake layers to cool completely before frosting. If they are warm, the frosting can melt and slide off, ruining your beautiful creation.
- Chill the Frosting: If your cream cheese frosting is too soft, chill it in the refrigerator for about 15 minutes. This will make it easier to spread and help it hold its shape.
- Experiment with Flavors: Don’t hesitate to add your twist! A teaspoon of almond extract or a hint of espresso powder can enhance the flavor profile of your red velvet cake.
- Use Cake Strips: To prevent doming, consider using cake strips around your pans. These help the cakes bake evenly, resulting in flat tops that are easier to frost.
- Practice Patience: Baking is not a race. Take your time with each step, from mixing to frosting. Rushing can lead to mistakes that affect the final product.
By following these tips, you’ll be well on your way to mastering the art of red velvet cake baking. Each cake you create will be a delicious testament to your skills and dedication. Happy baking!
Breakdown of Time for Red Velvet Cake Recipe
Prep Time
20-30 minutes. During this time, you will gather your ingredients, preheat the oven, and mix the batter. Make sure to have everything ready before you start, as this will make the process smoother and more enjoyable.
Cooking Time
25-30 minutes. Keep an eye on the cakes as they bake, checking for doneness with a toothpick. Remember, every oven is different, so your cakes might need a few extra minutes or could be done a bit sooner. It’s always best to check a little early to avoid overbaking.
Total Time
1 hour to 1 hour and 15 minutes from start to finish. This includes both the prep and cooking times. Once the cakes are baked and cooled, you’ll spend a little extra time frosting and assembling your masterpiece. The effort is well worth it when you see the smiles on everyone’s faces as they enjoy your delicious red velvet cake!
Nutritional Information for Red Velvet Cake Recipe
Calories
450 calories. This number can vary slightly based on the specific ingredients used and portion sizes. While it’s a treat, enjoying it in moderation is key to maintaining a balanced diet.
Protein
4 grams. While this isn’t a high-protein dessert, it does contribute to your daily intake. Pairing your cake with a glass of milk or a scoop of ice cream can enhance the protein content while making your dessert even more enjoyable!
Sodium
300 milligrams of sodium. This amount is relatively moderate, but it’s always wise to consider your overall daily sodium consumption, especially if you have dietary restrictions. Balancing your meals throughout the day can help you enjoy this delicious cake without worry.
Understanding the nutritional information of your red velvet cake can help you make informed choices. Whether you’re celebrating a special occasion or simply treating yourself, knowing what’s in your dessert adds to the enjoyment. So, savor each bite and appreciate the delightful flavors of this classic cake!
FAQs about Red Velvet Cake Recipe
What makes red velvet cake red?
The vibrant red color of red velvet cake comes primarily from the addition of red food coloring. Originally, the cake’s reddish hue was achieved through a reaction between cocoa powder and acidic ingredients like buttermilk and vinegar. However, modern recipes typically use food coloring to ensure a bright and consistent color. This striking appearance is part of what makes red velvet cake so special and appealing!
Can I use cocoa powder in my red velvet cake recipe?
Yes, cocoa powder is an essential ingredient in red velvet cake! It adds a subtle chocolate flavor that complements the cake’s unique taste. In this recipe, you’ll find that just a small amount of cocoa powder is used, which helps to enhance the overall flavor without overpowering the cake. So, don’t skip this ingredient; it’s key to achieving that classic red velvet taste!
How do I store leftover red velvet cake?
3 days. If you want to store it for a longer period, consider freezing it. Wrap individual slices in plastic wrap and then place them in a freezer-safe bag. This way, you can enjoy a slice of red velvet cake whenever you crave it!
What is the best frosting for red velvet cake?
The classic choice for frosting red velvet cake is cream cheese frosting. Its rich and tangy flavor perfectly complements the sweetness of the cake. The creamy texture of the frosting also adds a delightful contrast to the moist cake layers. However, if you prefer something different, you can try buttercream frosting or even a whipped cream frosting for a lighter option. Ultimately, the best frosting is the one that you enjoy the most!
Conclusion on Red Velvet Cake Recipe
In conclusion, the red velvet cake recipe is a delightful treat that combines rich flavors with a stunning appearance. Its history adds a layer of charm, making it a favorite for celebrations and special occasions. Whether you’re baking for a birthday, an anniversary, or simply to satisfy your sweet tooth, this cake is sure to impress.
With its moist texture and creamy cream cheese frosting, each bite offers a perfect balance of sweetness and tang. Plus, the versatility of this recipe allows for various adaptations, including gluten-free and vegan options, ensuring that everyone can enjoy a slice.
As you embark on your baking journey, remember the tips and techniques shared throughout this article. From measuring ingredients accurately to allowing your cake to cool completely, these small details can make a big difference in the final result. So, gather your ingredients, preheat your oven, and get ready to create a masterpiece that will be the highlight of any gathering.
Don’t forget to share your delicious creation with family and friends. The joy of baking is not just in the process but also in the smiles and happiness it brings to those you love. Happy baking, and enjoy every moment of making and savoring your red velvet cake!