
Have you ever had one of those days where nothing feels quite right until you get a big, warm hug? Maybe it’s a hug from a parent, a friend, or even a furry pet. Food can be like that, too. Sometimes, you just need a meal that feels like a warm, comforting blanket, something that brings the whole family together at the table, smiling and asking for seconds. For me, that food is always Chicken Enchiladas are a must-try for dinner!
Think about it: soft flour tortillas wrapped around a savory, seasoned chicken filling, bathed in a rich, zesty red sauce, and topped with a blanket of bubbly, melted cheese. It’s more than just a dish; it’s an experience. It’s the smell of spices filling your kitchen, the satisfying sound of cheese bubbling in the oven, and the moment you take that first bite—it’s pure comfort. You might think making something so delicious is complicated, but I promise you, it’s totally achievable. You’re about to discover how simple it is to create this incredible Mexican classic right in your own kitchen. We’ll walk through every step, from prepping the chicken to that beautiful final garnish, so you can confidently add this amazing recipe to your family’s rotation. Let’s get cooking!
Why Chicken Enchiladas Make the Perfect Weeknight Meal
When you’re searching for a dinner idea, you need something that checks all the boxes: delicious, filling, and not too much fuss. That’s exactly why chicken enchiladas are such a superstar. They take basic, affordable ingredients and turn them into something spectacular. Unlike some fancy recipes that require all sorts of steps and specialized equipment, this dish relies on simple techniques and pantry staples that you probably already have on hand. It’s the ultimate comfort food because it’s so satisfying, blending different textures—the soft tortilla, the tender chicken, and the creamy cheese—into one perfect bite.
This recipe also offers fantastic value. You can easily feed a large family or prepare enough for a few days of leftovers with minimal effort. Plus, because you bake them all together in one dish, cleanup is easier than you might think. Imagine sitting down to a meal that looks and tastes like it came from your favorite restaurant, but you made it yourself! It’s empowering to create such a crowd-pleasing dish, and you’ll find that the process of layering and rolling the enchiladas is actually quite fun and relaxing. It becomes a small, mindful activity in your day.
The Magic of Rotisserie Chicken: Your Time-Saving Trick
One of the biggest secrets to making weeknight meals easy is knowing where to take shortcuts without sacrificing quality. And when it comes to chicken enchiladas, the rotisserie chicken is your best friend. Instead of spending time boiling or baking raw chicken and then waiting for it to cool down, you can grab a pre-cooked rotisserie chicken from your local grocery store. It’s a huge time-saver!
Think about the steps you get to skip: no measuring, no seasoning, no worrying about whether the chicken is cooked all the way through. The rotisserie chicken is already juicy and usually seasoned perfectly, which only adds more flavor to your enchilada filling. All you need to do is shredding chicken with two forks or your hands—a simple task that can even be a fun job for a younger helper in the kitchen! This convenience means you can go from thinking about dinner to having the enchiladas ready for the oven in half the time. You’re giving yourself a head start, and that’s a win on any busy evening.
A Burst of Authentic Flavors: The Spice Essentials
What truly makes this dish shine is the wonderful mix of spices that you add to the filling. Without these seasonings, the chicken would be bland, but with them, you create a rich, complex flavor profile that hints at authentic Mexican cuisine. You don’t need a spice rack full of exotic ingredients; just two key players do most of the heavy lifting: cumin and chili powder.
Cumin is the spice that gives Mexican dishes that distinctive, warm, and earthy aroma. It has a slightly smoky, nutty flavor that deepens the savory notes of the chicken. Chili powder, which is usually a blend of chili peppers, cumin, and oregano, adds a nice bit of kick and color. You can choose a mild chili powder if you prefer less heat, or a spicier one if you like that zesty kick. Along with a touch of salt and pepper, these spices balance everything out perfectly. Remember, a well-seasoned filling is the heart of a great enchilada, so don’t be shy when you’re mixing everything together in the skillet!
Essential Gear: Preparing Your Kitchen for Enchilada Success
Before you even start chopping an onion or unwrapping the tortillas, it’s smart to take a few minutes to gather all your tools. This way, you won’t be scrambling for a measuring spoon when your hands are covered in chicken filling. Getting organized beforehand is called mise en place in professional kitchens—it just means having everything in its place. For this recipe, you don’t need anything fancy, just a few everyday kitchen items that will make the process smooth and enjoyable.
This small step of preparation makes the entire cooking process feel less stressful and more like a fun project. You’ll know exactly where everything is, and you can focus entirely on mixing, rolling, and creating your delicious chicken enchiladas. Taking pride in your kitchen setup is part of the joy of cooking!
Your Must-Have Tools Checklist
Here are the specific tools you’ll need. It’s a short list, but each item plays an important role:
- Large Skillet: This is where you’ll sauté the onions and garlic and mix the seasoned chicken filling. A non-stick skillet works great for easy stirring and cleanup.
- Cutting Board and Knife: Needed for safely chopping your small onion and mincing the garlic.
- Measuring Spoons and Cups: Essential for accurately measuring the spices (cumin and chili powder), oil, and chicken. Accuracy helps ensure the flavor is just right!
- Mixing Bowl (Optional but Helpful): If you prefer to mix the chicken filling outside of the skillet after it cools slightly.
- Two Forks or Hand Mixer: For the process of shredding chicken. Two forks are the classic method, but a hand mixer can make quick work of a large amount of chicken.
- Large Spoon or Ladle: For scooping the filling into the tortillas and pouring the sauce over the top.
- Aluminum Foil: You’ll need this to cover the baking dish during the first part of the cooking process to trap moisture and ensure even heating.
Picking the Perfect Baking Dish
The baking dish is like the stage for your enchilada performance! Choosing the right size is important because you want your rolled enchiladas to fit snugly next to each other. When they are packed closely, they hold their shape better while they bake, and the sauce is less likely to seep underneath and make them soggy.
A standard 9×13-inch rectangular glass or ceramic baking dish is the ideal size for a batch made with 8 flour tortillas. If your dish is too large, the sauce will spread out thinly, and the enchiladas might dry out. If it’s too small, you might have to stack them, which doesn’t allow the cheese and sauce to distribute evenly. A deep dish is always better, as it gives the sauce plenty of room to bubble without overflowing. Make sure your dish is clean and ready before you start rolling, because once you start assembling, things move quickly!
Gathering Your Supplies: The Chicken Enchilada Ingredient List
One of the great things about this dish is that the ingredients are straightforward and easy to find. You don’t need a trip to a specialty store; everything is waiting for you at the regular grocery store. We’re combining hearty ingredients with powerful seasonings to create a dinner recipe that everyone will love. Let’s take a closer look at the key components, and you’ll see just how simple it is to build these amazing flavors.
It’s always a good idea to lay out all your ingredients on the counter before you start. This is often called prepping your ingredients. Check off the items, make sure you have the right amounts, and then you can jump straight into the cooking without any interruptions. This preparation is essential for a smooth and enjoyable cooking experience.
The Core Filling Components
The filling is where the magic starts. It needs to be flavorful and moist so that your enchiladas aren’t dry.
- Cooked and Shredded Chicken (2 cups): As discussed, rotisserie chicken is perfect for convenience. If you cook your own, aim for white or dark meat—or a mix—for the best texture.
- Small Onion (1 piece, chopped): Onions add a base layer of savory flavor and a touch of sweetness when sautéed.
- Garlic (2 cloves, minced): Garlic is non-negotiable! It gives a wonderful aroma and essential flavor.
- Vegetable Oil (1 tablespoon): Used for sautéing the onion and garlic until they are soft and fragrant.
- Cumin (1 teaspoon) & Chili Powder (1 teaspoon): These are the warming spices that give your enchilada filling its signature taste. You can adjust the amount of chili powder based on how much heat you want.
- Salt and Pepper (to taste): These simple seasonings are vital for balancing and enhancing all the other flavors.
The Saucy, Cheesy Finish
The outside of the enchilada is just as important as the filling. The sauce and cheese create that incredible blanket of flavor and texture that makes you want to dive right in.
- Red Enchilada Sauce (1 can, 10 oz): This is the enchilada sauce! You can easily find this in the Mexican food aisle. You get to choose your preference here—a mild sauce is perfect for everyone, while a “hot” or “spicy” version adds extra fire if you like heat. Remember, you’ll use some in the bottom of the dish and the rest on top.
- Flour Tortillas (8 pieces): We use flour tortillas because they are soft and pliable, which makes the rolling process much easier and prevents them from cracking. They also hold up well when soaking in the sauce.
- Shredded Monterey Jack Cheese (2 cups): Monterey Jack is an excellent choice because it’s a mild cheese that melts beautifully and becomes wonderfully creamy. You need enough to mix into the filling and a generous amount for the topping.
| Ingredient Category | Ingredient Name | Quantity | Purpose in the Recipe |
|---|---|---|---|
| Protein | Cooked and Shredded Chicken | 2 cups | Main filling ingredient; provides flavor and substance. |
| Aromatics | Onion, chopped | 1 small | Sautéed to create a sweet and savory flavor base. |
| Aromatics | Garlic, minced | 2 cloves | Adds essential aroma and depth of flavor. |
| Spices | Cumin | 1 teaspoon | Adds earthy, smoky warmth (LSI: Mexican food flavor). |
| Spices | Chili Powder | 1 teaspoon | Adds color and a mild-to-medium kick. |
| Base | Flour Tortillas | 8 pieces | The wrapper for the filling. |
| Sauce | Red Enchilada Sauce | 1 can (10 oz) | Provides the zesty kick and moistness. |
| Dairy | Shredded Monterey Jack Cheese | 2 cups | Creates a creamy texture in the filling and a bubbly crust on top. |
| Garnish/Serving | Chopped Cilantro | for garnish | Adds freshness and a pop of color. |
| Garnish/Serving | Sour Cream | for serving | Adds a cool, creamy contrast to the spice. |
Step-by-Step Guide to Crafting Amazing Chicken Enchiladas
Now that you have all your tools and ingredients ready, it’s time for the fun part: assembly! Making enchiladas is all about building layers of flavor and getting the technique right, especially when it comes to rolling. Don’t rush this section. Take your time, follow the phases in order, and you’ll end up with a comfort food masterpiece that is absolutely restaurant-worthy. It’s a series of easy steps that lead to a truly satisfying result.
The goal here is to create a filling that is evenly seasoned and moist, and rolls that are tight enough to hold together in the baking dish. Once you’ve done it once, you’ll realize how straightforward the process is, and you’ll want to make them again and again.
Phase 1: Building the Flavor Foundation
The first important step is to prepare your chicken filling base. This step focuses on waking up the flavors of the onion and garlic by sautéing them in oil.
Start by heating your large skillet over medium heat. Add your tablespoon of vegetable oil. Once the oil is shimmering slightly, add your chopped onion. Sauté the onions, stirring occasionally, until they become soft and translucent. This should take about 3-4 minutes. Once they are soft, add the minced garlic. You only want to cook the garlic for about one minute—just until you can smell its beautiful aroma. Be careful not to let the garlic burn, as burnt garlic tastes bitter and can ruin the flavor foundation you are trying to build!
The Secret to Sweet Onions: Proper Sautéing
Why do you sauté the onions first? It’s a trick chefs use! Raw onions have a sharp, sometimes overpowering flavor. By cooking them slowly in oil, you allow their natural sugars to caramelize slightly, making them sweeter and much more mellow. This sweetness balances the spicy and savory flavors of the chili powder and chicken. Cooking them until they are soft, not browned, is the secret to a smooth, delicious base for your enchilada filling. This attention to detail is what separates a good dish from a truly great one.
Phase 2: Mixing and Seasoning the Filling
Once your aromatics (onion and garlic) are ready, it’s time to bring in the star: the chicken.
Add the shredded chicken (2 cups) to the skillet with the sautéed onions and garlic. Now, it’s time to season! Sprinkle in the cumin (1 teaspoon), chili powder (1 teaspoon), and a pinch of salt and pepper. Stir everything together thoroughly. You want to make sure that every single piece of chicken is coated with the fragrant spices. Continue to stir and cook this mixture for another 3-5 minutes. This short cooking time allows the spices to “bloom” in the heat, which means their flavors and aromas become much stronger and more potent. The filling is now seasoned, fragrant, and ready to be loaded into the flour tortillas.
Phase 3: The Art of Rolling a Perfect Enchilada
This is the part that some people find tricky, but it’s actually quite easy once you get the hang of it. Remember to take a moment to prepare your baking dish first: pour a small amount of the red enchilada sauce into the bottom of the dish and spread it around. This layer of sauce is very important because it prevents your enchiladas from sticking to the bottom and helps keep them moist while they bake.
Now, grab one flour tortilla. Place a generous, but not overflowing, spoonful of the chicken mixture down the center. You want enough filling to make it satisfying, but not so much that you can’t roll it tightly. Sprinkle a small amount of shredded Monterey Jack cheese over the filling. To roll, fold one edge of the tortilla over the filling, tucking it in tight, and then roll it up securely, like rolling up a sleeping bag. Place the rolled enchilada into the prepared baking dish, with the seam (the edge where the tortilla finishes rolling) facing down. This seam-down position keeps the roll secure while baking. Repeat this process until all 8 tortillas are filled and lined up in the dish.
Phase 4: Drenching and Cheesy Topping
With your beautiful rows of rolled chicken enchiladas lined up in the dish, it’s time for the final touches before they hit the oven.
Take the remaining enchilada sauce and pour it slowly and evenly over the top of the rolled tortillas. You want every single enchilada to be fully coated and swimming a little bit in that flavorful sauce. The sauce will soak into the tortillas as they bake, making them super tender. Once the sauce is poured, take the rest of your shredded cheese and sprinkle it generously over the top. Don’t be shy here! The cheese topping is what gives you that glorious, golden, bubbly crust that everyone loves. This layer of cheese seals in the moisture and flavor below. You’re now ready for the oven!
Baking to Golden Perfection: Oven Time and Temperature
Baking is the final step where all the flavors melt and mingle together. The heat of the oven not only cooks the tortillas further but also ensures the filling is piping hot and the cheese is perfectly melted. You’ll want to preheat your oven to 375°F (190°C) before you even start the assembly process, so it’s hot and ready to go as soon as the dish is finished. Baking enchiladas requires a two-stage process: first covered, and then uncovered. This ensures the best texture.
Make sure you place your baking dish carefully into the preheated oven, ideally on the middle rack for the most even cooking. The total baking time is around 25 to 35 minutes, but keep an eye on them—the smell of baked enchiladas is one of the best kitchen aromas in the world!
Covered vs. Uncovered: Why Both Matter
The first stage of baking is done while the dish is covered with aluminum foil. This initial 20-25 minute period is crucial for several reasons. The foil traps the steam and moisture inside the dish, which allows the flour tortillas to soften further and soak up all that wonderful enchilada sauce without drying out. This ensures your enchiladas come out tender and not tough. The heat is focused on heating the filling all the way through and melting the cheese inside the rolls.
After the first 20-25 minutes, you’ll remove the foil. The remaining 5-10 minutes of baking are done uncovered. This is where the magic happens on top! Without the foil, the direct heat of the oven is focused on the top layer of Monterey Jack cheese. The cheese will bubble up, turn a beautiful golden color, and form a slightly crisp crust. This two-step method gives you the best of both worlds: a tender, soft interior and a bubbly, delicious exterior.
Knowing When They’re Done
How can you tell your enchiladas are perfectly cooked? You don’t need a thermometer, just your eyes and ears! Look for these signs:
- Bubbly Sauce: The sauce around the edges and even in the middle should be vigorously bubbling. This is a clear sign that the entire dish is heated through and piping hot.
- Golden Cheese: The cheese on top should be completely melted and have beautiful patches of golden-brown color. It should look crusty and inviting.
- Wonderful Aroma: Your kitchen will be filled with the rich, unmistakable scent of baked spices and melted cheese.
- The Rest Period: Once you take the dish out of the oven, do not serve immediately! Let the chicken enchiladas rest for about 5 minutes. This resting time allows the sauce to settle, the cheese to firm up slightly, and the enchiladas to hold their shape better when you serve them. It’s the hardest part—waiting—but it’s worth it!
Customizing Your Comfort Food: Fun Swaps and Additions
One of the best things about cooking is that you are the boss! While our recipe gives you a fantastic starting point for traditional red sauce enchiladas, you don’t have to stick to it forever. You can easily adjust this recipe to suit your family’s tastes, dietary needs, or just what you happen to have in your pantry. Making smart substitutions is part of mastering any dinner recipe. Let’s look at some ways you can put your own twist on this Mexican food classic. This is where you can truly make the recipe your own and customize it to be your favorite version of Chicken Enchiladas are a must-try for dinner!
Cheese Choices: Beyond Monterey Jack
We chose shredded Monterey Jack cheese because it melts so beautifully and has a mild flavor that doesn’t overpower the chicken and sauce. But if you want a change, you have lots of options!
- Cheddar: If you like a sharper, tangier flavor, use a mild or medium cheddar.
- Colby Jack: This is a mix of Monterey Jack and Colby cheese, offering a great balance of meltiness and flavor.
- Oaxaca or Asadero: These are traditional Mexican melting cheeses. They have a more authentic texture when melted and are fantastic for that creamy stretch.
- Cream Cheese: For an extra-creamy filling, you can mix 4 ounces of softened cream cheese right into the seasoned chicken mixture before rolling. It adds a richness that is hard to beat!
Exploring Different Sauces (Green vs. Red)
Our recipe uses red enchilada sauce, which is tomato-based and seasoned with dried chili peppers. It’s the most common and beloved sauce. But if you want to switch things up, try the green alternative:
- Green Enchilada Sauce (Salsa Verde): This sauce is made from tomatillos (which look like small green tomatoes but are tangier) and green chili peppers. It offers a brighter, tangier, and often slightly spicier flavor profile. It pairs wonderfully with chicken and provides a completely different experience. You can use it in the exact same way as the red sauce.
- Homemade Sauce: If you’re feeling ambitious, you can make your own sauce! [Search for simple red enchilada sauce recipes online] to learn how to make it from scratch. Homemade sauce always tastes fresh and delicious, and you can control the level of spice precisely.
Adding Veggies for Extra Nutrition
Enchiladas are already a hearty meal, but adding vegetables is a great way to boost the nutrition and add more texture and color. You want to make sure the vegetables are cooked before you add them to the filling so they don’t release too much water during the baking process.
Here are a few quick additions you can make:
- Black Beans: Rinse and drain half a can of black beans and mix them right into the chicken filling. They add protein and fiber.
- Corn: A half-cup of frozen or canned corn kernels adds a lovely burst of sweetness and color.
- Bell Peppers: Chop up half a bell pepper (red, green, or yellow) and sauté it along with the onions in Phase 1. They add a nice crunch and sweetness.
- Chopped Spinach: Stir in a handful of fresh or frozen (and thawed/drained) spinach into the filling. It melts right in and gives you an extra serving of greens!
Serving Like a Pro: Garnishes and Sides
The final step in any great meal is the presentation! When you pull your bubbly chicken enchiladas from the oven, they already look incredible. But adding a few simple garnishes and pairing them with the right side dishes can turn your weeknight dinner recipe into a full-blown Mexican feast. These little finishing touches are easy to do but make a huge difference in the way the dish looks and tastes.
Remember, the goal of garnishes is to add a fresh, bright contrast to the rich, warm, and savory flavors of the main dish. They also add color, making the plate look more inviting.
The Cool & Creamy Toppings
When you have a dish that is warm, savory, and spicy (like enchiladas), you need something cool and creamy to balance it out. This is where your garnishes come in!
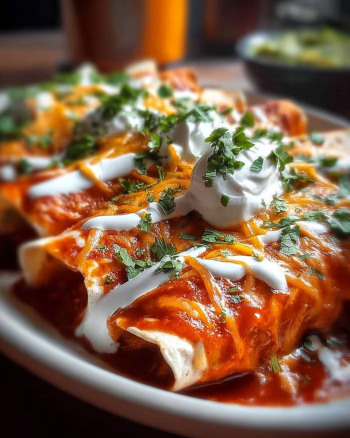
- Chopped Cilantro: This is the most classic garnish for Mexican food. Chopped cilantro adds a pop of bright green color and a fresh, citrusy, herby flavor. Sprinkle it liberally over the top just before serving.
- Sour Cream: A dollop or a drizzle of sour cream adds a cool, tangy creaminess that cuts through the richness of the cheese and the heat of the chili powder. You can serve it directly on top of the enchiladas or put it in a small bowl on the side for people to add their own.
- Avocado or Guacamole: Sliced avocado or a spoonful of fresh guacamole adds a healthy fat that helps calm the spice and provides a silky, smooth texture contrast.
- Pico de Gallo: A spoonful of fresh salsa (tomatoes, onions, cilantro, lime) on the side gives a little juicy freshness.
Best Sides to Complete Your Mexican Fiesta
You can serve enchiladas on their own, but pairing them with simple, classic side dishes makes the meal feel complete.
- Mexican Rice: A simple, fluffy rice that’s cooked with tomato sauce, garlic, and cumin is the perfect foundation. The rice soaks up any extra enchilada sauce wonderfully. [Find a quick Mexican rice recipe here].
- Simple Salad: A quick side salad with chopped lettuce, tomatoes, and a light vinaigrette dressing offers a crisp, palate-cleansing contrast to the heavy, rich main course.
- Refried Beans: A scoop of warm refried beans on the side is a classic comfort food pairing. You can buy them canned and just heat them up quickly on the stovetop for ultimate convenience.
- Tortilla Chips and Salsa: Before the main course, you can put out a bowl of crunchy tortilla chips and your favorite salsa to keep everyone happy while they wait for the enchiladas to come out of the oven.
Mastering the Leftovers and Meal Prep
One of the great bonuses of making a casserole-style dish like enchiladas is that they are fantastic for leftovers. In fact, many people think they taste even better the next day once the flour tortillas have fully absorbed the enchilada sauce and the flavors have deepened. This recipe is also perfect for meal prep, allowing you to cook once and eat several times, saving you time and money throughout the week. Knowing how to store and reheat them properly is key to enjoying them long after that initial dinner.
You can easily double the recipe and make two large baking dishes. Serve one for dinner tonight, and then store the other one for a quick meal later in the week or even next month!
Storing for Tomorrow’s Lunch
If you have leftovers from your delicious dinner, here’s the best way to keep them fresh for tomorrow:
- Cool Completely: Allow the dish to cool down to room temperature before covering it. Covering a hot dish will trap steam and make the leftovers soggy.
- Cover Tightly: Once cool, cover the entire baking dish tightly with plastic wrap or aluminum foil, making sure it’s sealed all around.
- Refrigerate: Place the covered dish in the refrigerator. The enchiladas will stay fresh and delicious for 3 to 4 days.
- Reheating: To reheat, simply scoop out the portion you want and place it on a microwave-safe plate. Heat it gently in the microwave until it is steaming hot throughout. If you are reheating the whole pan, cover it with foil and bake it in the oven at 350°F (175°C) for about 15-20 minutes, or until hot.
Freezing Enchiladas for Future Cravings
Enchiladas freeze remarkably well, making this a perfect freezer meal prep option. You have two ways to freeze them: baked or unbaked.
Freezing Unbaked (Recommended):
- Assemble the enchiladas completely in a disposable aluminum baking dish (this is easier for freezing).
- Cover the dish tightly with a layer of plastic wrap and then a layer of aluminum foil.
- Label it with the date and the baking instructions (375°F for 20-25 minutes covered, then 5-10 minutes uncovered).
- To bake, remove the plastic wrap, replace the foil, and bake directly from frozen, adding about 20-30 minutes to the total baking time.
Freezing Baked:
- Bake the enchiladas completely.
- Let them cool completely.
- Cut individual portions and wrap each one tightly in plastic wrap, then foil.
- Store these individual portions in a large freezer bag.
- To reheat, unwrap an individual portion and bake at 350°F (175°C) until hot, or microwave for a few minutes.
| Component | Approximate Serving Size | Calories (Estimate) | Protein (g) | Fat (g) | Key Nutrient Focus |
|---|---|---|---|---|---|
| Chicken | 1 enchilada | 400-500 | 25-35 | 18-25 | High in Lean Protein (Energy) |
| Monterey Jack | (Topping) | Included above | High in Calcium (Bones) | ||
| Flour Tortilla | 1 piece | Included above | Complex Carbohydrates (Endurance) | ||
| Red Sauce | (Included) | Low | Antioxidants (Health) | ||
| Overall Meal | 2 enchiladas (Standard serving) | 800-1000 | 50-70 | 36-50 | Balanced, Hearty, & High in Protein/Calcium |
Note: These are estimates for a standard serving. Actual nutritional information depends on the exact brand of sauce, type of chicken, and amount of cheese you use.
Frequently Asked Questions (FAQ) About Enchiladas
It’s completely normal to have questions when you’re trying a new dinner recipe! Enchiladas are simple, but there are always little tricks that can make them even better. Here are answers to some of the most common questions people ask when they’re making their first (or fiftieth!) batch of these incredible chicken enchiladas.
Q1: Can I use corn tortillas instead of flour tortillas?
A: Yes, you definitely can! Using corn tortillas is actually more traditional for Mexican enchiladas. The biggest difference is that corn tortillas tear easily. To prevent this, you should briefly flash-fry them in hot oil or quickly dip them in the warm enchilada sauce before rolling. This softens them up just enough so they won’t crack when you roll them.
Q2: My enchiladas came out dry. What did I do wrong?
A: There are a few possible reasons! First, make sure you used enough sauce. You need to use a small amount in the bottom of the baking dish and drench the top generously. Second, your filling might have been too dry; ensure your chicken is moist and that you didn’t overcook the filling in the skillet. Finally, check your baking time—if you bake them for too long uncovered, the edges of the flour tortillas can dry out. Using the foil for the first 20 minutes helps prevent this.
Q3: Can I make the filling ahead of time?
A: Absolutely! The chicken filling can be made up to three days in advance. In fact, making the filling ahead of time is a fantastic meal prep strategy. Just store the cooled filling in an airtight container in the refrigerator. When you’re ready to make dinner, all you have to do is roll the tortillas, pour the sauce, and bake! This seriously cuts down on the day-of cooking time.
Q4: How can I make these spicier?
A: If you like a big zesty kick, there are several ways to turn up the heat! You can choose a “hot” red enchilada sauce instead of mild. You can also add a pinch of cayenne pepper or a teaspoon of finely chopped jalapeño to the chicken filling when you add the chili powder and cumin. For an easy topping, serve them with a drizzle of your favorite hot sauce.
Q5: Do I have to use Monterey Jack cheese?
A: No, you don’t! While Monterey Jack is our favorite for its creamy melt, you can use any cheese that melts well. Good options include Colby Jack, Mozzarella, or a Mexican blend. You could also mix some sharp cheddar in with the Monterey Jack for a stronger flavor. The important thing is that you use a full 2 cups for maximum cheesiness!
Q6: Why did the recipe tell me to use aluminum foil first?
A: The aluminum foil is used to trap steam and moisture inside the baking dish during the first part of the baking process. This steam keeps the flour tortillas and the edges of the enchiladas soft and tender. Without the foil, the top layer of cheese would brown too quickly, and the tortillas would get tough and chewy instead of soft and delicious. Removing the foil at the end allows the cheese to get that beautiful, bubbly, golden crust.
Final Thoughts: Your New Go-To Dinner Adventure
You’ve now mastered the art of making an incredible batch of chicken enchiladas! You know the simple tricks, like using convenient rotisserie chicken and the importance of those warm spices—the cumin and chili powder. You’ve learned how to choose the right baking dish, how to successfully roll a flour tortilla, and how to achieve that perfect bubbly crust. These skills go beyond just making enchiladas; they boost your confidence to try other Mexican food recipes and comfort food classics.
Making a home-cooked meal like this is truly a labor of love, and the pride you feel when you pull that golden, cheesy dish out of the oven is unmatched. Remember that cooking is an adventure, and every time you step into the kitchen, you’re learning, creating, and most importantly, making memories. This recipe is now yours to own, to change, and to share. It’s truly a must-try for dinner, and you’re going to love the results!
Ready to get started? Go gather those ingredients, put on your favorite music, and start that amazing meal prep for the week. Let’s make some Chicken Enchiladas are a must-try for dinner! tonight and make your kitchen the heart of your home!
Cheesy Chicken Enchiladas
Ingredients
Equipment
Method
- Prepare the chicken by cooking and shredding it.
- Preheat oven to 375°F (190°C).
- Heat oil in a skillet. Sauté onion and garlic until soft (3-4 min).
- Add chicken, cumin, chili powder, salt, and pepper. Stir and cook (3-5 min).
- Pour a small amount of sauce into the bottom of the baking dish.
- Fill each tortilla with the chicken mixture and a sprinkle of cheese, then roll tightly. Place seam-side down in the dish.
- Pour the remaining enchilada sauce over the top and sprinkle with the rest of the cheese.
- Cover with foil and bake for 20-25 minutes.
- Remove foil and bake for an additional 5-10 minutes until the cheese is bubbly.
- Rest for a few minutes before serving. Garnish with cilantro and sour cream.